
大数据平台使用搭建脚本一键安装OS
本文给大家分享的是如何在大数据平台使用脚本来实现一键安装定制OS,并给大家附上了脚本源码,有需要的小伙伴可以参考下
搭建脚本篇
脚本命名随便,只要能看懂就行
镜像包说明
os1.1.iso 用于安装服务端和客户端操作系统
hdp.iso 用于安装hdp服务
1.架构图:
服务端

客户端
2.原理分析
安装系统-安装本地yum源-安装http源-安装并配置ntp服务-配置秘钥-安装jdk-安装mysql-编译安装ambari平台
3.服务端脚本分析
(1)create_local_yum.sh #安装本地yum 源
1 2 3 4 5 6 7 8 9 10 11 12 13 14 15 16 17 18 19 20 21 | #!/bin/bashiso_path=/dev/sr0echo "Iso file path is :" /dev/sr0yum_path=/mnt/vrv/echo 'Creating mount directory :' /mnt/vrv/mkdir -p /mnt/vrv/mount /dev/sr0 /mnt/vrvecho 'Updating /etc/yum.repos.d/ files...'rm -rf /etc/yum.repos.d/*touch /etc/yum.repos.d/vrv.repoecho "[vrv-local]name=vrv-localbaseurl=file:///mnt/vrv/gpgcheck=0enabled=1" >> /etc/yum.repos.d/vrv.repoyum clean all && echo 'yum repository has been updated!'host_ip=`/sbin/ifconfig -a|grep inet|grep -v 127.0.0.1|grep -v inet6|awk '{print $2}'|tr -d "addr:"`echo "$host_ip os-manager" >>/usr/bin/os/hosts#echo "$host_ip os-manager" >>/etc/hosts |
(2)update_master.sh #安装http源,配置主节点,配置ntp
1 2 3 4 5 6 7 8 9 10 11 12 13 14 15 16 17 18 19 20 21 22 23 24 25 26 27 28 29 30 31 32 33 34 35 36 37 38 39 40 41 42 43 44 45 46 47 48 49 50 51 52 53 54 55 56 57 58 59 60 61 62 63 64 65 66 67 68 69 70 71 72 73 74 75 76 77 78 79 80 81 82 83 84 85 86 87 88 89 90 91 92 93 94 95 96 97 98 99 100 | #!/bin/bash#往本机/etc/hosts添加hosts文件内容##############cat hosts >> /etc/hosts;#echo "添加hosts到/etc/hosts文件完成";host_ip=`/sbin/ifconfig -a|grep inet|grep -v 127.0.0.1|grep -v inet6|awk '{print $2}'|tr -d "addr:"`suffix_ip=${host_ip%.*}suffix_ip=${suffix_ip%.*}cd /mnt/vrv/Packages/#rpm -ivh python-deltarpm-3.5-0.5.20090913git.el6.x86_64.rpmyum -y install mkisofs vim httpd createrepo perl python bind-utils openssh-clients ntp vim wget unzip bind && chkconfig httpd on && mkdir -p /var/www/html/centos && mkdir -p /var/www/html/centos/Packages/Packages && mkdir -p /var/www/html/ambari/ && mkdir -p /var/www/html/vmp-extend/ && echo "拷贝文件中..." && cp -rf /mnt/vrv/Packages/* /var/www/html/centos/Packages/Packages/ && echo "拷贝文件完成,生成源中..." && createrepo /var/www/html/centos/Packages/Packages/ && rm -rf /etc/yum.repos.d/* && echo "http源拷贝完成,更新yum..."cp -rf /mnt/vrv/system/* /var/www/html/touch /etc/yum.repos.d/vrv-http.repoecho "[vrv-http]name=vrv-httpbaseurl=http://$host_ip/centos/Packages/Packagesgpgcheck=0enabled=1" >> /etc/yum.repos.d/vrv-http.reposervice httpd restart && chkconfig httpd on && yum clean allecho "http 源已经配置完成"echo "开始配置dns..."echo "开始配置ntp..."chkconfig ntpd on #cp ntp.conf /etc/ntp.conf # 写入ntp.conf文件echo "driftfile /var/lib/ntp/driftrestrict default kod nomodify notrap nopeer noqueryrestrict -6 default kod nomodify notrap nopeer noqueryrestrict 127.0.0.1 restrict -6 ::1restrict $suffix_ip.0.0 mask 255.255.0.0 nomodify notraprestrict 0.vrv.pool.ntp.org mask 255.255.255.255 nomodify notrap noqueryrestrict 1.vrv.pool.ntp.org mask 255.255.255.255 nomodify notrap noqueryrestrict 2.vrv.pool.ntp.org mask 255.255.255.255 nomodify notrap noquery#server 210.72.145.44server 127.127.1.0 # local clockfudge 127.127.1.0 stratum 10 includefile /etc/ntp/crypto/pwkeys /etc/ntp/keys" > /etc/ntp.confservice ntpd restart && echo "ntp 配置完成!"ln -s /usr/share/zoneinfo/Asia/Shanghai /etc/localtimehwclock --systohc --localtime## 配置 hdp yum####################echo "开始配置ambari..."mkdir -p /var/www/html/ambari/mkdir -p /var/www/html/vmp-extend/cp -rf /mnt/vrv/vrv/AMBARI-2.2.1.0/centos6/2.2.1.0-161/* /var/www/html/ambari/cp -rf /mnt/vrv/vrv/vmp-extend-1.0/* /var/www/html/vmp-extend/createrepo /var/www/html/vmp-extend/createrepo /var/www/html/ambari/# 写入文件touch /etc/yum.repos.d/ambari.repotouch /etc/yum.repos.d/vmp-extend.repoecho "[ambari-2.x]name=Ambari 2.xbaseurl=http://$host_ip/ambari/gpgcheck=0enabled=1priority=1" >> /etc/yum.repos.d/ambari.repoecho "#cd /mnt/vrv/vrv/vmp-extend-1.0#chmod 777 vmp-extend-1.0.sh#sh vmp-extend-1.0.sh[vmp-extend-1.0]name=vmp-extend-1.0baseurl=http://$host_ip/vmp-extend/gpgcheck=0enabled=1priority=1" >> /etc/yum.repos.d/vmp-extend.repoyum clean all && echo "ambari 配置完成"# 配置selinux#############echo "开始配置selinux..."sed -i 's/enforcing/disabled/' /etc/selinux/config && echo "selinux 配置完成"# 配置 iptalbes###########echo "开始配置iptables..."service iptables stop && chkconfig iptables off && service ip6tables stop && chkconfig ip6tables off && echo "iptables配置完成"# 关闭 THP################echo "关闭THP..."echo "if test -f /sys/kernel/mm/redhat_transparent_hugepage/defrag;then echo never > /sys/kernel/mm/redhat_transparent_hugepage/defrag fi" >> /etc/rc.local && echo "闭THP完成"echo "更新主节点完成" |
(3)generate_ssh.sh #配置ssh秘钥,安装jdk和mysql
1 2 3 4 5 6 7 8 9 10 11 12 13 14 15 16 17 18 19 20 21 22 23 24 25 26 27 28 29 30 31 32 33 34 35 36 37 38 39 40 41 42 43 44 45 46 47 48 49 50 51 52 53 54 55 56 57 58 59 60 61 62 63 64 65 66 67 68 69 70 71 72 73 74 75 76 77 78 79 80 81 82 83 84 85 86 87 88 89 90 91 92 93 94 95 96 | #!/bin/bashif [ $# -lt 2 ]; then echo " HELP generate_ssh.sh --generate ssh key for login without typing password; this script should run on the namenode machine and user should edit the ip-list file USAGE: ./generate_ssh.sh user pasaword EXAMPLE: ./generate_ssh root adminHELP " exit 0 fi yum -y install expect && echo "expect 安装完成"user=$1ip=$HOSTNAMEpass=$2rm -rf /root/.ssh/*echo "##################################"echo " generate the rsa public key on $HOSTNAME ..."echo "##################################"expect -c " set timeout -1 spawn ssh-keygen -t rsa expect \"*id_rsa*\" send \"\r\" expect \"*passphrase*\" send \"\r\" expect \"*again*\" send \"\r\" expect eof " cat /usr/bin/os/hosts | while read linedo#提取ip ip_i=${line% *} full_hostname_i=${ip_i##* } ip_i=${ip_i% *} hostname_i=${line##* } expect -c " set timeout -1 spawn ssh-copy-id -i /root/.ssh/id_rsa.pub $hostname_i expect \"yes/no\" send \"yes\r\" expect \"password:\" send \"$pass\r\" expect \"#\"expect eof"doneecho "ssh配置完成"#安装jdkecho " jdk 安装中"rpm -e java-1.6.0-openjdk-1.6.0.38-1.13.10.4.el6.x86_64rpm -e jdk-1.7.0_80-fcs.x86_64rpm -e java-1.7.0-openjdk-1.7.0.99-2.6.5.1.el6.x86_64cd /mnt/vrv/Packages/rpm -ivh jdk-7u80-linux-x64.rpmecho " jdk 安装完成"#安装mysqlecho "安装mysql中"cd /mnt/vrv/Packages/rpm -e mysql-5.1.73-7.el6.x86_64.rpm --nodepsrpm -e --nodeps mysql-libs-5.1.73-7.el6.x86_64.rpmyum remove -y mysql-libsrm -fr /usr/lib/mysqlrm -fr /usr/include/mysqlrm -f /etc/my.cnfrm -fr /var/lib/mysqlrpm -ivh MySQL-server-5.5.50-1.linux2.6.x86_64.rpmrpm -ivh MySQL-client-5.5.50-1.linux2.6.x86_64.rpmecho never > /sys/kernel/mm/redhat_transparent_hugepage/enabledservice mysql restartservice httpd restartecho "安装mysql完成"echo "初始化mysql"mysqladmin -uroot password 123456.echo "初始化mysql完成"touch /etc/my.cnfecho "[client]default-character-set=utf8[mysqld]character_set_server=utf8lower_case_table_names=1" >> /etc/my.cnfservice mysql restart |
(4)mysql_start.sh #主要用来配置mysql配置
1 2 3 4 5 6 7 8 9 10 11 12 13 14 15 16 17 18 19 20 21 22 23 24 25 26 27 28 29 30 31 32 | echo "安装ambari中"rpm -e vmp-i18n-2.1.1.0yum -y install ambari-serverecho "安装ambari完成"mysql -uroot -pvrv123456. -e "grant all on *.* to root@'%' identified by 'vrv123456.';flush privileges; CREATE USER 'ambari'@'%' IDENTIFIED BY 'ambari';grant all privileges on *.* to 'ambari'@'%' identified by 'ambari' with grant option; CREATE USER 'ambari'@'localhost' IDENTIFIED BY 'ambari';grant all privileges on *.* to 'ambari'@'localhost' identified by 'ambari' with grant option;CREATE USER 'ambari'@'os-manager' IDENTIFIED BY 'ambari'; grant all privileges on *.* to 'ambari'@'os-manager' identified by 'ambari' with grant option; flush privileges; CREATE USER 'hive'@'%' IDENTIFIED BY 'hive';grant all privileges on *.* to 'hive'@'%' identified by 'hive' with grant option; CREATE USER 'hive'@'localhost' IDENTIFIED BY 'hive';grant all privileges on *.* to 'hive'@'localhost' identified by 'hive' with grant option;CREATE USER 'hive'@'os-manager' IDENTIFIED BY 'hive';grant all privileges on *.* to 'hive'@'os-manager' identified by 'hive' with grant option; flush privileges;CREATE USER 'oozie'@'%' IDENTIFIED BY 'oozie';GRANT ALL PRIVILEGES ON *.* TO 'oozie'@'%';FLUSH PRIVILEGES;create database ambari default charset='UTF8';create database hive default charset='UTF8';create database oozie default charset='UTF8';quit" mysql -uroot -p123456. -e "use ambari;SOURCE /var/lib/ambari-server/resources/Ambari-DDL-MySQL-CREATE.sql;quit" |
(5)jiaohu.sh #自动配置ambari(需要提前设置好)
1 2 3 4 5 6 7 8 9 10 11 12 13 14 15 16 17 18 19 20 21 22 23 24 25 26 27 28 29 30 31 32 33 34 35 36 37 38 39 40 41 42 43 44 45 46 47 48 49 50 51 52 53 54 55 | #!/bin/bash#修改参数echo never > /sys/kernel/mm/redhat_transparent_hugepage/enabledsysctl vm.swappiness=10#安装mysql驱动echo "安装mysql驱动中"#yum install mysql-connector-java -ymkdir -p /usr/share/java/cp -rf /mnt/vrv/vrv/vmp-extend-1.0/misc/mysql-connector-java-5.1.36.jar /usr/share/java/mv /usr/share/java/mysql-connector-java-5.1.36.jar /usr/share/java/mysql-connector-java.jar#cp -rf /mnt/vrv/vmp-extend-1.0/misc/mysql-connector-java-5.1.36.jar /usr/share/java/cp -rf /usr/share/java/mysql-connector-java.jar /usr/lib/ambari-server/echo "安装mysql驱动完成"ambari-server setup --jdbc-db=mysql --jdbc-driver=/usr/share/java/mysql-connector-java.jarexpect -c " spawn ambari-server setupexpect \"*continue*\" send \"y\r\"expect \"*Customize*\" send \"y\r\"expect \"*Enter*\"send \"root\r\" expect \"*JDK*\"send \"y\r\" expect \"*choice*\"send \"3\r\" expect \"*JAVA*\"send \"\/usr\/java\/default\r\" expect \"*configuration*\"send \"y\r\" expect \"*choice*\"send \"3\r\" expect \"*Hostname*\"send \"os-manager\r\" expect \"*Port*\"send \"3306\r\" expect \"*Database*\"send \"ambari\r\" expect \"*Username*\"send \"ambari\r\" expect \"*Database*\"send \"ambari\r\" expect \"*Re-enter*\"send \"ambari\r\" expect \"*properties*\"send \"y\r\" expect eof " cd /mnt/vrv/vrv/vmp-extend-1.0/sh vmp-extend-1.0.shecho "api.csrfPrevention.enabled=false" >>/etc/ambari-server/conf/ambari.propertiesambari-server startyum install dos2* -ydos2unix /usr/bin/os/*.shecho "安装server端完成" |
到这一步服务端已经安装完成。
4.客户端脚本分析
(1)create_local_yum.sh #安装本地yum 源
1 2 3 4 5 6 7 8 9 10 11 12 13 14 15 16 17 18 19 20 21 | #!/bin/bashiso_path=/dev/sr0echo "Iso file path is :" /dev/sr0yum_path=/mnt/vrv/echo 'Creating mount directory :' /mnt/vrv/mkdir -p /mnt/vrv/mount /dev/sr0 /mnt/vrvecho 'Updating /etc/yum.repos.d/ files...'rm -rf /etc/yum.repos.d/*touch /etc/yum.repos.d/vrv.repoecho "[vrv-local]name=vrv-localbaseurl=file:///mnt/vrv/gpgcheck=0enabled=1" >> /etc/yum.repos.d/vrv.repoyum clean all && echo 'yum repository has been updated!'host_ip=`/sbin/ifconfig -a|grep inet|grep -v 127.0.0.1|grep -v inet6|awk '{print $2}'|tr -d "addr:"`echo "$host_ip os-manager" >>/usr/bin/os/hosts#echo "$host_ip os-manager" >>/etc/hosts |
(2)ntp.sh #安装ntp服务,选择安装mysql
1 2 3 4 5 6 7 8 9 10 11 12 13 14 15 16 17 18 19 20 21 22 23 24 25 26 27 28 29 30 31 32 33 34 35 36 37 38 39 40 41 42 43 44 45 46 47 48 49 50 51 52 53 54 55 56 57 58 59 60 61 62 63 64 65 66 67 68 69 70 71 72 73 74 75 76 77 78 79 80 81 82 83 84 85 86 87 88 89 90 91 | #!/bin/bash#往本机/etc/hosts添加hosts文件内容#############echo "添加hosts到/etc/hosts文件完成";host_ip=`/sbin/ifconfig -a|grep inet|grep -v 127.0.0.1|grep -v inet6|awk '{print $2}'|tr -d "addr:"`suffix_ip=${host_ip%.*}suffix_ip=${suffix_ip%.*}yum -y install mkisofs vim httpd python createrepo perl bind-utils openssh-clients ntp vim wget unzip bindyum clean allecho "开始配置ntp..."chkconfig ntpd on echo "driftfile /var/lib/ntp/driftrestrict default kod nomodify notrap nopeer noqueryrestrict -6 default kod nomodify notrap nopeer noqueryrestrict 127.0.0.1 restrict -6 ::1restrict $suffix_ip.0.0 mask 255.255.0.0 nomodify notraprestrict 0.vrv.pool.ntp.org mask 255.255.255.255 nomodify notrap noqueryrestrict 1.vrv.pool.ntp.org mask 255.255.255.255 nomodify notrap noqueryrestrict 2.vrv.pool.ntp.org mask 255.255.255.255 nomodify notrap noquery#server 210.72.145.44#server 192.168.2.11 # local clockfudge 127.127.1.0 stratum 10 includefile /etc/ntp/crypto/pwkeys /etc/ntp/keys" > /etc/ntp.confservice ntpd restart && echo "ntp 配置完成!"ln -s /usr/share/zoneinfo/Asia/Shanghai /etc/localtimehwclock --systohc --localtime# 配置selinux#############echo "开始配置selinux..."sed -i 's/enforcing/disabled/' /etc/selinux/config && echo "selinux 配置完成"# 配置 iptalbes###########echo "开始配置iptables..."service iptables stop && chkconfig iptables off && service ip6tables stop && chkconfig ip6tables off && echo "iptables配置完成"# 关闭 THP################echo "关闭THP..."echo "if test -f /sys/kernel/mm/redhat_transparent_hugepage/defrag;then echo never > /sys/kernel/mm/redhat_transparent_hugepage/defrag fi" >> /etc/rc.local && echo "闭THP完成"echo "更新节点完成"#安装jdkecho " jdk 安装中"rpm -e java-1.6.0-openjdk-1.6.0.38-1.13.10.4.el6.x86_64rpm -e jdk-1.7.0_80-fcs.x86_64rpm -e java-1.7.0-openjdk-1.7.0.99-2.6.5.1.el6.x86_64cd /mnt/vrv/Packages/rpm -ivh jdk-7u80-linux-x64.rpmecho " jdk 安装完成"read -p "install mysql,Please insert y or n ": nameif [ $name = "n" ]then echo "不需要安装mysql"elif [ $name = "y" ]then#安装mysqlecho "安装mysql中"cd /mnt/vrv/Packages/rpm -e mysql-5.1.73-7.el6.x86_64.rpm --nodepsrpm -e --nodeps mysql-libs-5.1.73-7.el6.x86_64.rpmyum remove -y mysql-libsrm -fr /usr/lib/mysqlrm -fr /usr/include/mysqlrm -f /etc/my.cnfrm -fr /var/lib/mysqlrpm -ivh MySQL-server-5.5.50-1.linux2.6.x86_64.rpmrpm -ivh MySQL-client-5.5.50-1.linux2.6.x86_64.rpmecho never > /sys/kernel/mm/redhat_transparent_hugepage/enabledservice mysql startecho "安装mysql完成"echo "初始化mysql"mysqladmin -uroot password vrv123456.echo "初始化mysql完成"echo "增加客户端完成"touch /etc/my.cnfecho "[client]default-character-set=utf8[mysqld]character_set_server=utf8lower_case_table_names=1" >> /etc/my.cnfservice mysql restartfi |
5.一键命令脚本分析:
1 2 3 4 5 6 7 8 9 10 11 12 13 14 15 16 17 18 19 20 21 22 23 24 25 26 27 28 29 30 31 32 33 34 35 36 37 38 39 40 41 42 43 44 45 46 47 48 49 50 51 52 53 54 55 56 57 58 59 60 61 62 63 64 65 66 67 68 69 70 71 72 73 74 75 76 77 78 79 80 81 82 83 84 85 86 87 88 89 90 91 92 93 94 95 96 97 98 99 100 101 102 103 104 105 106 107 108 109 110 111 112 113 114 115 116 117 118 119 120 121 122 123 124 125 126 127 128 129 130 131 132 133 134 135 136 137 138 139 140 141 142 143 144 145 146 147 148 149 150 151 152 153 154 155 156 157 158 159 160 161 162 163 164 165 166 167 168 169 170 171 172 173 174 175 176 177 178 179 180 181 182 183 184 185 186 187 188 189 190 191 192 193 194 195 196 197 198 199 200 201 202 203 204 205 206 207 208 209 210 211 212 213 214 215 216 217 218 219 220 221 222 223 224 225 226 227 228 229 230 231 232 233 234 235 236 | #!/bin/shecho "os 1.1 install script"echo "1.安装os server 2.加固系统 3.修改主机ip地址 4.修改主机名 5.修改网络 6.修改ambari主机地址 7.修改root密码 8.重启网络服务 9.退出"echo "++++++++自动修改ip和主机名等相关信息+++++++++"echo "ETHCONF=/etc/sysconfig/network-scripts/ifcfg-eth0"echo "HOSTS=/etc/hosts"echo "NETWORK=/etc/sysconfig/network"echo "DIR=/data/backup/`date +%Y%m%d`" echo "NETMASK=255.255.255.0"echo "安装好mysql默认密码为vrv123456."echo "+++++++++-------------------------+++++++++++"#Define Path 定义变量,可以根据实际情况修改 ETHCONF=/etc/sysconfig/network-scripts/ifcfg-eth0 HOSTS=/etc/hosts NETWORK=/etc/sysconfig/network DIR=/data/backup/`date +%Y%m%d` NETMASK=255.255.255.0 echo "================================================"echo#定义change_ip函数 function Change_ip () { #判断备份目录是否存在,中括号前后都有空格,!叹号在shell表示相反的意思# if [ ! -d $DIR ];then mkdir -p $DIR fi echo "Now Change ip address ,Doing Backup Interface eth0" cp $ETHCONF $DIR grep "dhcp" $ETHCONF #如下0用来判断上一次操作的状态,为0,表示上一次操作状态正确或者成功# if [ $? -eq 0 ];then#read -p 交互输入变量IPADDR,注冒号后有空格,sed -i 修改配置文件# read -p "Please insert ip Address:" IPADDR read -p "Please insert gatway Address:" gateway sed -i 's/dhcp/static/g' $ETHCONF #awk -F. 意思是以.号为分隔域,打印前三列# echo -e "IPADDR=$IPADDR\nNETMASK=$NETMASK\nGATEWAY=`echo $gateway|awk -F. '{print $1"."$2"."$3"."$4}'`" >>$ETHCONF echo "This IP address Change success !" else echo -n "This $ETHCONF is static exist ,please ensure Change Yes or NO": read i fi if [ "$i" == "y" -o "$i" == "yes" ];then read -p "Please insert ip Address:" IPADDR read -p "Please insert gateway Address:" gateway count=(`echo |awk -F. '{print $1,$2,$3,$4}'`) #定义数组, 0代表获取变量值总个数# A=${#count[@]} #while条件语句判断,个数是否正确,不正确循环提示输入,也可以用[0-9]来判断ip# while [ "$A" -ne "4" ] do read -p "Please re Inster ip Address,example 192.168.0.11 ip": IPADDR count=(`echo $IPADDR|awk -F. '{print $1,$2,$3,$4}'`) A=${#count[@]} done #sed -e 可以连续修改多个参数# sed -i -e 's/^IPADDR/#IPADDR/g' -e 's/^NETMASK/#NETMASK/g' -e 's/^GATEWAY/#GATEWAY/g' $ETHCONF #echo -e \n为连续追加内容,并自动换行# echo -e "IPADDR=$IPADDR\nNETMASK=$NETMASK\nGATEWAY=`echo $gateway|awk -F. '{print $1"."$2"."$3"."$4}'`" >>$ETHCONF echo "This IP address Change success !"else echo "This $ETHCONF static exist,please exit" exit $? fi } #定义hosts函数 ############function hosts############## function Change_hosts () { if [ ! -d $DIR ];then mkdir -p $DIR fi cp $HOSTS $DIR read -p "Please insert ip address": IPADDR read -p "Please insert ip hostname": hostname host=`echo $IPADDR|sed 's/\././g'` cat $HOSTS |grep 127.0.0.1 |grep "$host" if [ $? -ne 0 ];then# sed -i "s/127.0.0.1/127.0.0.1 $host/g" $HOSTS echo "$host $hostname" >> /etc/hosts echo "This hosts change success " else echo "This $host IS Exist .........." fi } ###########fuction network############### #定义network函数 function Change_network () { if [ ! -d $DIR ];then mkdir -p $DIR fi cp $NETWORK $DIR read -p "Please insert host name": IPADDR host=`echo $IPADDR|sed 's/\././g'` grep "$host" $NETWORK if [ $? -ne 0 ];then sed -i "s/^HOSTNAME/#HOSTNAME/g" $NETWORK echo "HOSTNAME=$IPADDR" >>$NETWORK else echo "This $host IS Exist .........." fi } function Change_rootpassword () {read -p "Please insert you root password": passwordecho $password | passwd --stdin root}function restart_server () {echo "restart network server ...."service network restartifup eth0}function exit_quit () {echo "quit......"break}function install_os_server () {cd /usr/bin/os/sh create_local_yum.sh && sh update_master.sh && ./generate_ssh.sh root root && sh mysql_start.sh && sh jiaohu.sh >> /usr/bin/os/install.os_server.log}function jiagu () {cd /usr/bin/os/sh jiagu.sh >>/usr/bin/os/install.jiagu.log}function Change_ambari_host () {echo "正在备份ambari.properties"cp -rf /etc/ambari-server/conf/ambari.properties /etc/ambari-server/conf/ambari.properties.bak read -p "Please insert ip oldhostname(默认为os-manager)": oldhostnameread -p "Please insert ip newhostname": newhostnamesed -i 's/'$oldhostname'/'$newhostname'/' /etc/ambari-server/conf/ambari.properties echo "已修改主机名,正在重启服务"service ambari-server restartecho "重启ambari完成,访问:http://$newhostname:8080"}function add_key () {cd /usr/bin/os/sh miyao.sh}#PS3一般为菜单提示信息# PS3="Please Select Menu": #select为菜单选择命令,格式为select $var in ..command.. do .... done select i in "install_os_server" "jiagu" "Change_ip" "Change_hosts" "Change_network" "Change_ambari_host" "Change_rootpassword" "restart_server" "add_key" "exit_quit" do#case 方式,一般用于多种条件下的判断 case $i in install_os_server ) install_os_server ;; jiagu ) jiagu ;; Change_ip ) Change_ip ;; Change_hosts ) Change_hosts ;; Change_network ) Change_network ;; Change_ambari_host ) Change_ambari_host;; Change_rootpassword ) Change_rootpassword;; restart_server ) restart_server;; add_key ) add_key;; exit_quit ) exit_quit;; *) echo echo "Please Insert $0: install_os_server(1)|jiagu(2)|Change_ip(3)|Change_hosts(4)|Change_network(5)|Change_ambari_host(6)|Change_rootpassword(7)|restart_network_server(8)|add_key(9)|quit(10)|" echo "温馨提示:请按8重启网络服务" break;; esac done |
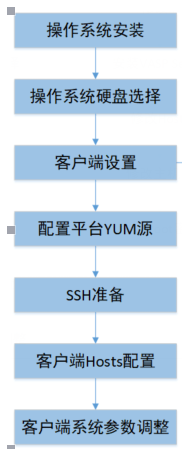
6.安装操作系统:
首先在服务器启动时,按DEL进入boot选项选光驱启动。
挂载镜像os1.1.iso开始进行安装

选择menu vasp server install new system,进行服务端安装。
7.操作系统硬盘选择
选择一块硬盘进行系统安装


安装完成

默认用户:root 密码:root
8.服务端设置
进入/usr/bin/os/目录
cd /usr/bin/os/
脚本说明:
1.create_local_yum.sh #作用用来更新本地yum源装一些系统工具
2.update_master.sh #更新ambari要用的yum源并且安装http服务和主服务节点
3.generate_ssh.sh #个性化安装ssh服务 示例:./generate_ssh.sh root root 第一个root是账号,第二个root是密码。
4.mysql_start.sh #mysql服务安装和非交互式安装数据库,用户名和密码
默认密码为123456.
5.jiaohu.sh #运行此脚本可以实现非交互式安装ambari
6.change.sh #运行此脚本出9个选项可以一键安装ambari服务端和客户端手动设定ip地址,主机名和root密码,修改ambari主机名。
7.yum-hdp.sh #运行此脚本执行hdp源操作。
8.jiagu.sh #运行此脚本进行安全加固。
9.miyao.sh #添加服务端公钥到客户
执行sh change.sh
进入菜单选项

8.1 修改ip地址
运行change.sh 执行3进行ip地址修改
(需要重启网卡服务)
输入yes,然后输入ip地址和网关地址,最后再确认一遍ip地址。

运行8重启服务

8.2 安装vasp server
运行change.sh 执行1进行server安装
安装完成如图:

8.3 修改hosts
运行change.sh 执行4进行hosts修改

8.4 修改hostnames
运行change.sh 执行5进行hostname修改
(需要重启服务器)
#reboot
8.5 修改ambari hostname
运行change.sh 执行6进行ambari hostname修改
首先要输入默认的vasp-manager然后再输入hostname
(需要跟hostname名字一致)

8.6 修改root密码
运行change.sh 执行7进行root密码修改
8.7 服务端更新时间
9.配置平台yum源
挂载hdp.iso
cd /usr/bin/vasp/
执行sh yum-hdp.sh
# sh yum-hdp.sh
Please insert source path:/dev/sr0
Please insert target path:/mnt
输入源路径,目标路径

输入本机ip地址:192.168.2.11
自动执行#yum clean all && yum list
访问http:192.168.2.11/centos 获取centos的yum源地址
访问http:192.168.2.11/ambari 获取ambari的yum源地址
访问http:192.168.2.11/HDP 获取HDP的yum源地址
访问http:192.168.2.11/HDP-UTILS 获取HDP-UTILS的yum源地址
访问http:192.168.2.11/vmp-extend 获取vmp-extend的yum源地址
10.vmp管理平台
在网页输入:http://192.168.2.11:8080/
//mysql初始库密码 用户:root 密码:123456.
//vmp管理平台密码 用户:admin 密码:admin

后续更新。。。