
Unity实现切割图集工具
Unity实现切割图集工具
这篇文章主要为大家详细介绍了Unity实现切割图集工具,文中示例代码介绍的非常详细,具有一定的参考价值,感兴趣的小伙伴们可以参考一下
本文实例为大家分享了Unity实现切割图集工具的具体代码,供大家参考,具体内容如下
操作步骤
先将脚本拖入Editor
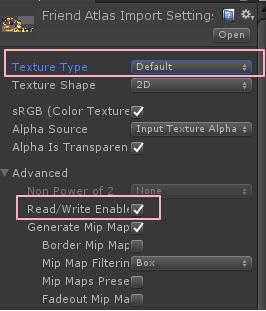
1.选中要切割的图片,texture type 选为default,并勾选Advanced下的read/Write Enabled
2.texture type改为sprite(2D and UI),Sprite mode 选为Multiple,apply一下
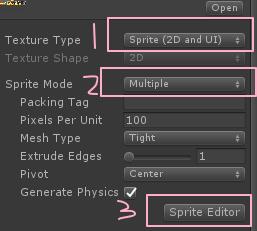
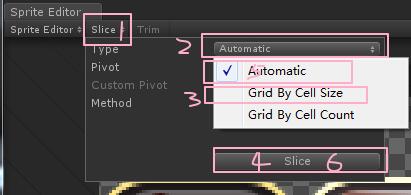
3.Sprite Editor 先选其他的切一下,在选第一个切一下,切割成小图,apply
4.选中图集右键,imageslicer,process to Sprites

5.等待切割完成后就可以在同级目录的同名文件夹下使用了
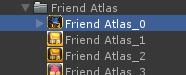
使用时要把小图Type改为sprite(2D and UI),也可以更改名字
脚本如下
1 2 3 4 5 6 7 8 9 10 11 12 13 14 15 16 17 18 19 20 21 22 23 24 25 26 27 28 29 30 31 32 33 34 35 36 37 38 39 40 41 42 43 44 45 46 47 48 49 50 51 52 53 | using UnityEngine;using System.Collections;using UnityEditor;using System.IO;using System.Collections.Generic;/// <summary>/// 切割/// </summary>public static class ImageSlicer{ [MenuItem("Assets/ImageSlicer/Process to Sprites")] static void ProcessToSprite() { Texture2D image = Selection.activeObject as Texture2D;//获取旋转的对象 string rootPath = Path.GetDirectoryName(AssetDatabase.GetAssetPath(image));//获取路径名称 string path = rootPath + "/" + image.name + ".PNG";//图片路径名称 TextureImporter texImp = AssetImporter.GetAtPath(path) as TextureImporter;//获取图片入口 AssetDatabase.CreateFolder(rootPath, image.name);//创建文件夹 foreach (SpriteMetaData metaData in texImp.spritesheet)//遍历小图集 { Texture2D myimage = new Texture2D((int)metaData.rect.width, (int)metaData.rect.height); //abc_0:(x:2.00, y:400.00, width:103.00, height:112.00) for (int y = (int)metaData.rect.y; y < metaData.rect.y + metaData.rect.height; y++)//Y轴像素 { for (int x = (int)metaData.rect.x; x < metaData.rect.x + metaData.rect.width; x++) myimage.SetPixel(x - (int)metaData.rect.x, y - (int)metaData.rect.y, image.GetPixel(x, y)); } //转换纹理到EncodeToPNG兼容格式 if (myimage.format != TextureFormat.ARGB32 && myimage.format != TextureFormat.RGB24) { Texture2D newTexture = new Texture2D(myimage.width, myimage.height); newTexture.SetPixels(myimage.GetPixels(0), 0); myimage = newTexture; } var pngData = myimage.EncodeToPNG(); //AssetDatabase.CreateAsset(myimage, rootPath + "/" + image.name + "/" + metaData.name + ".PNG"); File.WriteAllBytes(rootPath + "/" + image.name + "/" + metaData.name + ".PNG", pngData); // 刷新资源窗口界面 AssetDatabase.Refresh(); } }} |
以上就是本文的全部内容,希望对大家的学习有所帮助,也希望大家多多支持脚本之家。
您可能感兴趣的文章:
Unity3D实现模型随机切割
Unity切割图集转换为多张图片
Unity使用EzySlice实现模型多边形顺序切割
原文链接:https://blog.csdn.net/qq_43140883/article/details/85250212