
ASP.NET实现图书管理系统的步骤详解
这篇文章主要介绍了ASP.NET图书管理系统简单实现步骤,本文通过实例截图展示的形式给大家介绍的非常详细,具有一定的参考借鉴价值,需要的朋友可以参考下
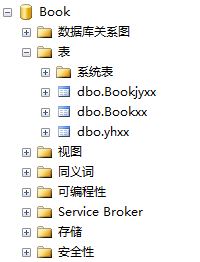
一、数据库添加
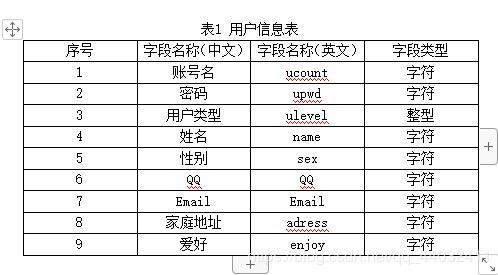
1.用户信息
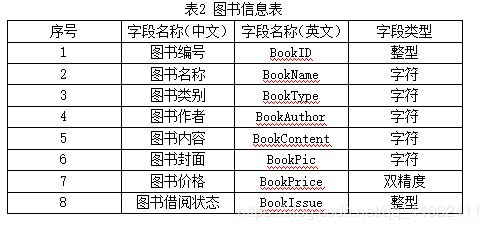
2.图书信息表
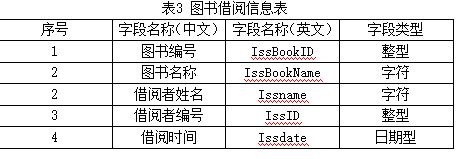
3.图书借阅信息表
二、版本页面
vs2010+sqlserver2008
三、实现功能
1. 用户注册登录
2. 两种身份:管理员和读者
3. 读者能够注册自己的账号和密码还有填写自己的个人信息
4. 读者根据自己需求的借阅和归还图书5. 管理员可以增、减、查、改等图书信息,修改用户信息待完善
四、主要页面展示
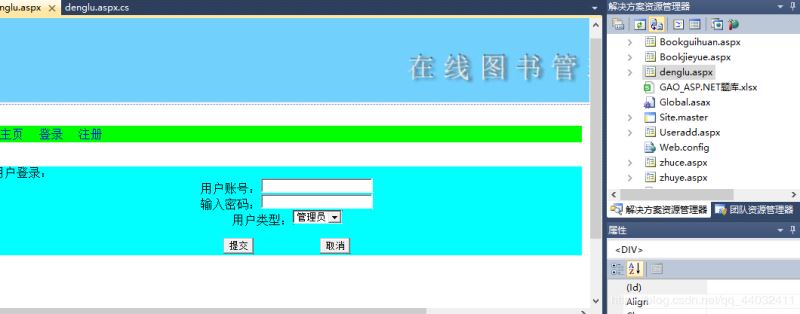
1.登录页面 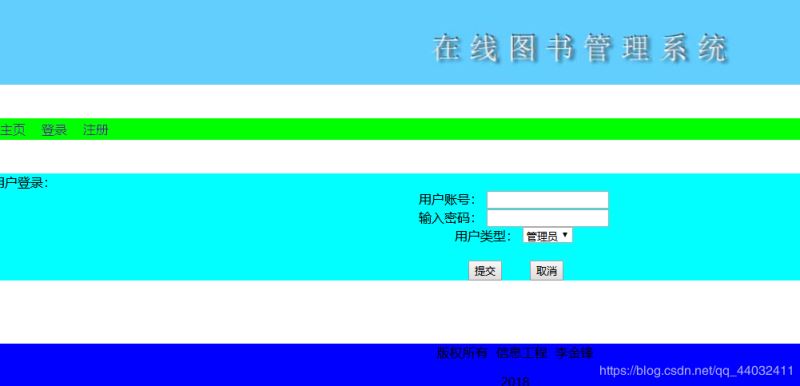 2.用户注册
 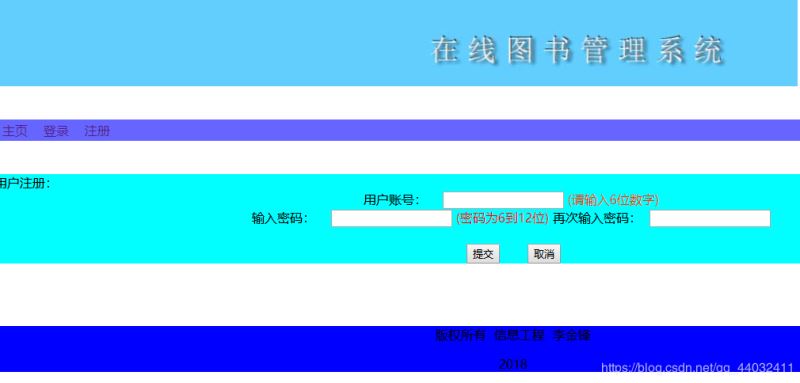 3.个人信息表
 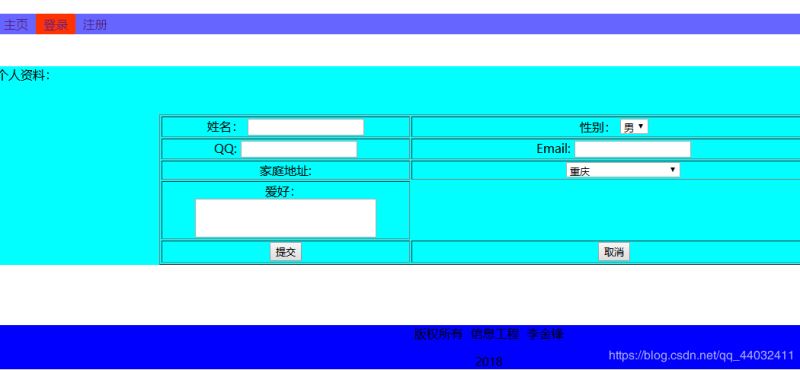 4.用户归还图书
 5.用户借阅书籍
 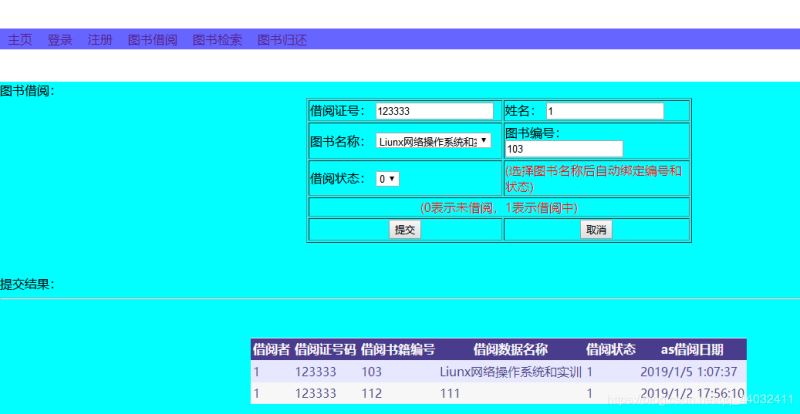 6.用户检索书籍
 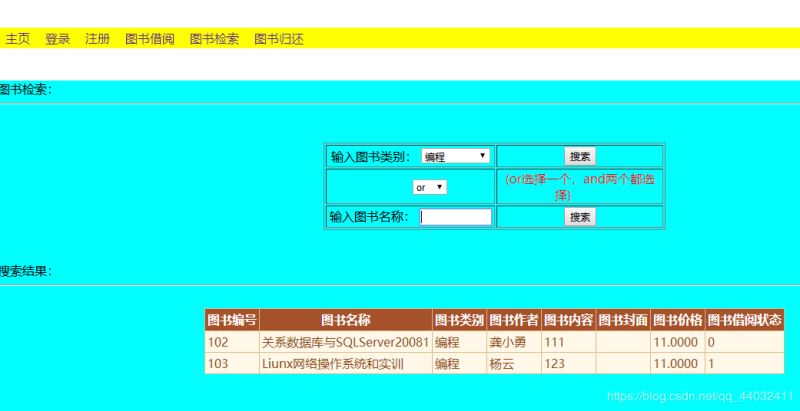 7.管理员页面
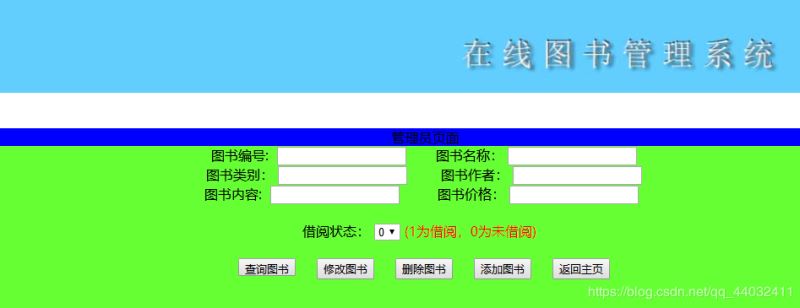
五、简单代码
1.注册页面(内容判断不在内)
1 2 3 4 5 6 7 8 9 10 11 12 13 14 15 16 17 18 19 20 21 | try { //赋予sql字符串数据 string strsql1 = "insert into yhxx (zh,mima) values ('" + Tet_zh.Text + "','" + Tet_mima.Text + "')"; //创建字符串对象 mycom = new SqlCommand(strsql1, myconn); mycom.ExecuteNonQuery(); //关闭数据库 myconn.Close(); Response.Write("<script>alert('添加成功!!')</script>"); //保存账号 //str = Tet_zh.Text; //保存用户名 Application["name"] = Tet_zh.Text; //如果成功了成功转入 Response.Redirect("Useradd.aspx"); } catch (Exception ex) { Response.Write("<script>alert('用户已存在!!')</script>"); } |
2.个人信息页面(内容判断不在内)
1 2 3 4 5 6 7 8 9 10 11 12 13 14 15 16 17 18 19 20 21 | protected void tianjia() { //添加用户信息 try { //赋予sql字符串数据 string strsql1 = "update yhxx set xm='"+Tet_xm.Text+"',xb='"+tet_xb.Text+"',qq='"+Tet_qq.Text+"',Email='"+Tet_email.Text+"',dizhi='"+tet_home.Text+"',enjioy='"+Tet_enjoy.Text+"' where zh='"+Application["name"]+"'"; // 创建字符串对象 mycom = new SqlCommand(strsql1, myconn); mycom.ExecuteNonQuery(); //关闭数据库 myconn.Close(); Response.Write("<script>alert('添加成功!!')</script>"); Response.Redirect("denglu.aspx"); } catch (Exception ex) { Response.Write("<script>alert('添加失败!!')</script>"+ex.Message.ToString()); } } |
3.登录页面(内容判断不在内)
1 2 3 4 5 6 7 8 9 10 11 12 13 14 15 16 17 18 19 20 21 22 23 24 25 26 27 | //普通用户登录,管理员登录雷同try{ string sql = "select * from yhxx where zh='"+Tet_zh.Text+"' and mima='"+Tet_mm.Text+"' and yhlb='"+tet_dz.Text+"'"; //创建命令对象 SqlCommand com = new SqlCommand(sql,myconn); //创建读取对象 SqlDataReader dr = com.ExecuteReader(); //成功弹出提示框 //MessageBox.Show("读取成功!!"); if (dr.Read()) { dr.Close(); myconn.Close(); Application["name1"] = Tet_zh.Text; Response.Redirect("index.aspx"); } else { Response.Write("<script>alert('用户名或密码有误!!')</script>"); }}catch (Exception ex){ Response.Write("<script>alert('登录失败!!')</script>");} |
4.图书检索
1 2 3 4 5 6 7 8 9 10 11 12 13 14 15 16 17 18 19 20 21 22 23 24 25 26 27 28 29 30 31 32 33 34 35 36 37 38 39 | try { //打开数据库 myconn.Open(); } catch (Exception ex) { Response.Write("<script>alert('数据库打开失败')</script>"); } try { //创建数据字符串 if (tet_name.Text == "") { Response.Write("<script>alert('名称不能为空!')</script>"); } else { string strsql3 = "select BookID as 图书编号,BookName as 图书名称," + "Booklb as 图书类别,Bookzz as 图书作者,Booklr as 图书内容," + "Bookfm as 图书封面,Bookjg as 图书价格,Bookzt as 图书借阅状态 " + " from Bookxx where BookName='" + tet_name.Text + "'"; mycom = new SqlCommand(strsql3, myconn); //打开数据库 //myconn.Open(); // myread = mycom.ExecuteReader(); GridView1.DataSource = myread; GridView1.DataBind(); GridView1.Visible = true; //关闭数据 myread.Close(); myconn.Close(); } } catch (Exception ex) { Response.Write("<script>alert('查询失败!')</script>" + ex.Message.ToString()); } |
5.图书借阅
1 2 3 4 5 6 7 8 9 10 11 12 13 14 15 16 17 18 19 20 21 22 23 24 25 26 27 28 29 30 31 32 33 34 35 36 37 38 | 1.先添加图书 if (myread.Read()) { if (tet_zt.Text == "0") { //添加借阅信息表 myread.Close(); string strsql5 = "insert into Bookjyxx (ISBookID,ISBookname,ISBookzt,ISname,ISid) " + " values (" + Tet_Bookid.Text + ",'" + tet_Name.Text + "'," + tet_zt.Text + ",'" + Tet_xm.Text + "'," + Tet_ID.Text + ")"; mycom = new SqlCommand(strsql5, myconn); mycom.ExecuteNonQuery(); //关闭 myconn.Close(); myread.Close(); ////////////////////////////////////// xiugai(); chaxun(); } if (tet_zt.Text == "1") { Response.Write("<script>alert('该书正在借阅中')</script>"); chaxun(); } 2.再分别修改借阅状态 //创建 //先修改图书表状态信息 string strsql7 = "update Bookxx set Bookzt='1' where BookID='" + Tet_Bookid.Text + "'"; mycom = new SqlCommand(strsql7, myconn); myconn.Close(); myconn.Open(); mycom.ExecuteNonQuery(); //再修改借阅状态表信息 string strsql8 = "update Bookjyxx set ISBookzt='1' where ISBookID='" + Tet_Bookid.Text + "'"; mycom = new SqlCommand(strsql8, myconn); mycom.ExecuteNonQuery(); Response.Write("<script>alert('借阅成功!')</script>"); //关闭 myconn.Close(); |
6.图书归还
1 2 3 4 5 6 7 8 9 10 11 12 13 14 15 16 17 18 19 20 21 22 23 24 25 | //删除他的借阅图书信息 string strsql3="delete from bookjyxx where ISid='"+Tet_id.Text+"'"; mycom = new SqlCommand(strsql3, myconn); myconn.Open(); mycom.ExecuteNonQuery(); ////////////////////////////// //刷新信息 //查询信息 string strsql4= "select ISname as 借阅者,ISid as 借阅证号码,ISBookID as 借阅书籍编号," + "ISBookname as 借阅数据名称,ISBookzt as 借阅状态,ISdate as借阅日期 from Bookjyxx where ISid='" + Tet_id.Text + "'"; mydata = new SqlDataAdapter(strsql4, myconn); DataSet set = new DataSet(); mydata.Fill(set); GridView1.DataSource = set.Tables[0]; GridView1.DataBind(); GridView1.Visible = true; //修改状态 //先修改图书表状态信息 string strsql7 = "update Bookxx set Bookzt='0' where BookID='" +tet_Bookid.Text+ "'"; mycom = new SqlCommand(strsql7, myconn); mycom.ExecuteNonQuery(); Response.Write("<script>alert('归还成功!')</script>"); //关闭 myconn.Close(); set.Clear(); |
总结
以上所述是小编给大家介绍的ASP.NET实现图书管理系统的步骤,希望对大家有所帮助