
pyqt5教程QGraphicsScene及QGraphicsView使用基础
这篇文章主要为大家介绍了pyqt5教程中QGraphicsScene及QGraphicsView使用基础,有序要的朋友可以借鉴参考下,希望能够有所帮助
效果图:
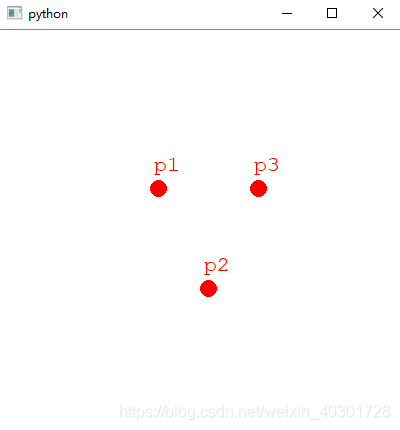
1 2 3 4 5 6 7 8 9 10 11 12 13 14 15 16 17 18 19 20 21 22 23 24 25 26 27 28 29 30 31 32 33 34 35 36 37 38 39 | from PyQt5.QtCore import Qt, QRectFfrom PyQt5.QtGui import QColor, QPen, QBrush, QFontfrom PyQt5.QtWidgets import (QGraphicsView, QGraphicsScene, QApplication)class MainWindow(QGraphicsView): def __init__(self, parent=None): super(MainWindow, self).__init__(parent) # 创建场景 self.scene = MyGraphScene(self) # 在场景中添加文字 self.addPoint(0, 0, "p1") self.addPoint(50, 100, "p2") self.addPoint(100, 0, "p3") self.setSceneRect(QRectF(-150, -150, 400, 400)) self.scale(2, 2) # 将场景加载到窗口 self.setScene(self.scene) def addPoint(self, x, y, name): self.scene.addEllipse(x, y, 16, 16, QPen(QColor(Qt.red)), QBrush(QColor(Qt.red))) text = self.scene.addText(name) text.setDefaultTextColor(QColor(Qt.red)) text.setFont(QFont("Courier New", 16)) text.setPos(x, y - 30)class MyGraphScene(QGraphicsScene): def __init__(self, parent=None): super(MyGraphScene, self).__init__(parent) def drawBackground(self, painter, rect): # 在这里可以绘制底板,比如网格 passif __name__ == '__main__': import sys # 每个PyQt程序必须创建一个application对象,sys.argv 参数是命令行中的一组参数 # 注意:application在 PyQt5.QtWidgets 模块中 # 注意:application在 PyQt4.QtGui 模块中 app = QApplication(sys.argv) # 创建桌面窗口 mainWindow = MainWindow() # 显示桌面窗口 mainWindow.show() sys.exit(app.exec_()) |
使用概要:
1、创建继承自QGraphicsView的窗口
2、创建继承自QGraphicsScene的画布
3、将画布设置给View窗口QGraphicsView::setScene(self.scene)
4、自由的在画布上添加元素:
①通过已经封装好的方法,如前面代码使用的
②自定义item,继承自QGraphicsItem该类,并通过QGraphicsScene::addItem(item)的方法将item添加到画布
QGraphicsView的API
QGraphicsScene的API
PS.这一篇是为下一篇做一个铺垫,下一篇将做一个预览窗口,是以QGraphicsScene、QGraphicsView 这两个类为基础实现的
传送链接:
以上就是pyqt5教程QGraphicsScene及QGraphicsView使用基础的详细内容,