
Dialog/PopupWindow/Toast 到底该怎么选
前言
显示页面除了Activity,使用最多的可能就是Dialog、PopupWindow、Toast了。这三者有相似之处也有不一样的地方,本篇文章旨在厘清三者关系,阐明各自的优缺点,并探讨哪种场合使用它们。
本篇文章涉及到WindowManager相关知识,如有需要请移步:Window/WindowManager 不可不知之事
通过本篇文章,你将了解到:
1、Dialog/PopupWindow/Toast 生命周期
2、Dialog/PopupWindow/Toast 异同之处
3、Dialog/PopupWindow/Toast 使用场合
Dialog/PopupWindow/Toast 生命周期
在之前的文章有提过:任何View都需要添加到Window上才能展示,这个过程大致分为四个步骤:
1、构造显示的目标View
2、获取WindowManager 实例
3、构造约束Window的WindowManager.LayoutParams
4、WindowManager.addView(View, LayoutParams)
Dialog/PopupWindow/Toast 实际上就是封装了上述四个步骤,并提供更进一步的功能及其更丰富的接口使用,接下来我们逐步分析。
Dialog 生命周期
先来看看简单demo
        //自定义View
        MyGroup myGroup = new MyGroup(v.getContext());
        //Dialog 实例
        Dialog dialog = new Dialog(v.getContext());
        //添加View
        dialog.setContentView(myGroup);
        //最终展示
        dialog.show();复制代码
先看看Dialog构造函数:
    Dialog(@NonNull Context context, @StyleRes int themeResId, boolean createContextThemeWrapper) {
        //themeResId 指定Dialog样式
        if (createContextThemeWrapper) {
            if (themeResId == Resources.ID_NULL) {
                //若不指定,则使用默认的样式
                final TypedValue outValue = new TypedValue();
                context.getTheme().resolveAttribute(R.attr.dialogTheme, outValue, true);
                themeResId = outValue.resourceId;
            }
            mContext = new ContextThemeWrapper(context, themeResId);
        } else {
            mContext = context;
        }

        //获取WindowManager,context是Activity类型,因此此时获取的WindowManager
        //即是Activity的WindowManager
        mWindowManager = (WindowManager) context.getSystemService(Context.WINDOW_SERVICE);
        //构造Window对象
        final Window w = new PhoneWindow(mContext);
        mWindow = w;
        //监听touch/key event等事件
        w.setCallback(this);
        //省略
        w.setWindowManager(mWindowManager, null, null);
        //Window默认居中
        w.setGravity(Gravity.CENTER);
    }复制代码
构造Window对象时:
#Window.java
//构造LayoutParams
    private final WindowManager.LayoutParams mWindowAttributes =
            new WindowManager.LayoutParams();

//WindowManager.java
    public static final int TYPE_APPLICATION        = 2;
    public LayoutParams() {
        super(LayoutParams.MATCH_PARENT, LayoutParams.MATCH_PARENT);
        type = TYPE_APPLICATION;
        format = PixelFormat.OPAQUE;
    }复制代码
可以看出,Dialog构造方法主要做了两件事:
1、构造WindowManager
2、构造Window对象,同时在Window里会初始化WindowManager.LayoutParams 变量
完成了四个步骤的第二、三步:构造WindowManager/LayoutParams对象。
再看看setContentView(XX)
#Dialog.java
    public void setContentView(@android.annotation.NonNull View view) {
        //Window 方法,实例是PhoneWindow
        mWindow.setContentView(view);
    }

#PhoneWindow.java
    public void setContentView(View view) {
        setContentView(view, new ViewGroup.LayoutParams(MATCH_PARENT, MATCH_PARENT));
    }

    @Override
    public void setContentView(View view, ViewGroup.LayoutParams params) {
        if (mContentParent == null) {
            //构造DecorView
            installDecor();
        } else if (!hasFeature(FEATURE_CONTENT_TRANSITIONS)) {
            mContentParent.removeAllViews();
        }
        if (hasFeature(FEATURE_CONTENT_TRANSITIONS)) {
            //省略
        } else {
            //mContentParent 为 DecorView 子View
            //将自定义View添加到mContentParent里,最终也是挂到了DecorView Tree里
            mContentParent.addView(view, params);
        }
        //省略
    }复制代码
其中有关DecorView的创建过程请移步:Android DecorView 一窥全貌(上)
setContentView(XX)构造了DecorView,并将自定义View添加到DecorView里
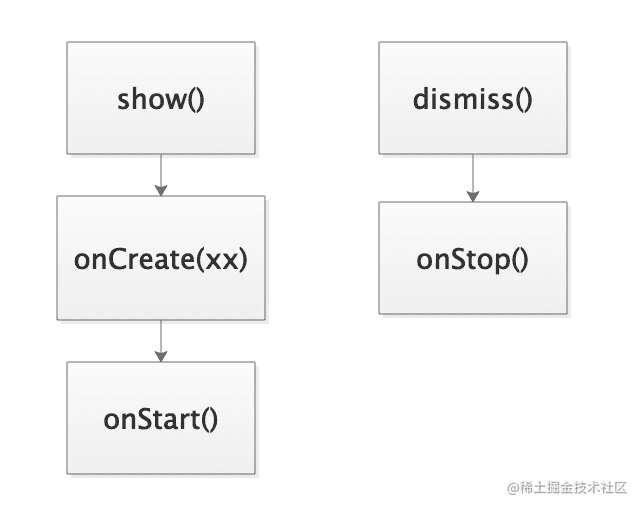
最后看看dialog.show()
    public void show() {
        if (mShowing) {
            //Dialog 正在展示,则退出
            return;
        }
        if (!mCreated) {
            //最终调用onCreate(xx)
            dispatchOnCreate(null);
        } else {
            //省略
        }
        onStart();
        //获取DecorView,在setContentView(XX)时已经构造好DecorView
        mDecor = mWindow.getDecorView();
        //在创建Window时已经构造好
        WindowManager.LayoutParams l = mWindow.getAttributes();

        //添加DecorView
        mWindowManager.addView(mDecor, l);
        mShowing = true;
    }复制代码
dialog.show() 完成了四个步骤中的最后一步:addView(xx)
至此,Dialog创建完毕并显示,通过上述分析可知,Dialog将四个步骤封装了。
如何关闭Dialog
既然是通过WindowManager.addView(xx)添加的View,那么Dialog关闭相应的也需要调用WindowManager.removeView(xx),此处调用的是WindowManager.removeViewImmediate(xx),表示立即执行销毁动作。
#Dialog.java
    @Override
    public void dismiss() {
        if (Looper.myLooper() == mHandler.getLooper()) {
            //主线程直接执行
            dismissDialog();
        } else {
            //子线程切换到主线程执行
            mHandler.post(mDismissAction);
        }
    }

    @UnsupportedAppUsage
    void dismissDialog() {
        if (mDecor == null || !mShowing) {
            return;
        }
        try {
            //移除DecorView
            mWindowManager.removeViewImmediate(mDecor);
        } finally {
            //调用onStop
            onStop();
            mShowing = false;
            sendDismissMessage();
        }
    }复制代码
Dialog 生命周期如下:
PopupWindow 生命周期
同样的简单demo
        //PopupWindow 宽、高
        popupWindow = new PopupWindow(400, 400);
        MyGroup myGroup = new MyGroup(v.getContext());
        popupWindow.setContentView(myGroup);
        //展示popupWindow
        popupWindow.showAsDropDown(button);复制代码
看得出来PopupWindow创建与Dialog类似。
先看看构造函数:
    public PopupWindow(View contentView, int width, int height, boolean focusable) {
        //contentView 为自定义View
        if (contentView != null) {
            mContext = contentView.getContext();
            //获取WindowManager mContext 属于Activity类型
            //与Dialog 一样,WindowManager 就是Activity WindowManager
            mWindowManager = (WindowManager) mContext.getSystemService(Context.WINDOW_SERVICE);
        }
        //设置 mContentView = contentView;
        setContentView(contentView);
        //设置Window宽、高
        setWidth(width);
        setHeight(height);
        //设置获取焦点与否
        setFocusable(focusable);
    }复制代码
注意,PopupWindow 默认宽高为0,因此需要外部设置宽高值
setContentView(XX)
    public void setContentView(View contentView) {
        if (isShowing()) {
            return;
        }
        //赋值
        mContentView = contentView;
        if (mContext == null && mContentView != null) {
            //获取Context
            mContext = mContentView.getContext();
        }
        if (mWindowManager == null && mContentView != null) {
            //根据Context获取WindowManager
            mWindowManager = (WindowManager) mContext.getSystemService(Context.WINDOW_SERVICE);
        }
    }复制代码
popupWindow.showAsDropDown(View anchor)
View anchor 指的是先锚定一个View,PopupWindow根据这个View的位置来确定自己的位置。
public void showAsDropDown(View anchor, int xoff, int yoff, int gravity) {
if (isShowing() || !hasContentView()) {
//正在展示,则不处理后续
return;
}
//一系列监听锚定的View
attachToAnchor(anchor, xoff, yoff, gravity);
//构造 LayoutParams,并设置其一些参数
final WindowManager.LayoutParams p =
createPopupLayoutParams(anchor.getApplicationWindowToken());
//构造"DecorView",该DecorView不是我们常见的DecorView,而是PopupWindow里的内部类
//该View作为Window的根View
preparePopup(p);
//根据anchor确认Window的起始位置
final boolean aboveAnchor = findDropDownPosition(anchor, p, xoff, yoff,
p.width, p.height, gravity, mAllowScrollingAnchorParent);
updateAboveAnchor(aboveAnchor);
//添加到Window里。WindowManager.addView(xx)
invokePopup(p);
}复制代码至此,PopupWindow创建完毕,可以看出以上步骤包括了Window显示的四个步骤。
如何关闭PopupWindow
与Dialog 类似,PopupWindow 有个方法:
public void dismiss();复制代码
该方法最后调用了WindowManager.removeViewImmediate(xx)方法移除Window。
Toast 生命周期
还是一个小demo:
Toast.makeText(App.getApplication(), "hello toast", Toast.LENGTH_LONG).show();复制代码
makeText(XX)是个静态方法:
    public static Toast makeText(@android.annotation.NonNull Context context, @android.annotation.Nullable Looper looper,
                                 @android.annotation.NonNull CharSequence text, @Duration int duration) {
        //构造 Toast对象
        Toast result = new Toast(context, looper);
        //加载View
        LayoutInflater inflate = (LayoutInflater)
                context.getSystemService(Context.LAYOUT_INFLATER_SERVICE);
        View v = inflate.inflate(com.android.internal.R.layout.transient_notification, null);
        TextView tv = (TextView)v.findViewById(com.android.internal.R.id.message);
        //tv是v的子View 设置显示的内容
        tv.setText(text);
        //记录到Toast里
        result.mNextView = v;
        result.mDuration = duration;
        return result;
    }复制代码
Toast.show()方法
    public void show() {
        INotificationManager service = getService();
        String pkg = mContext.getOpPackageName();
        //构造TN对象
        TN tn = mTN;
        tn.mNextView = mNextView;
        final int displayId = mContext.getDisplayId();

        try {
            //加入到队列里
            service.enqueueToast(pkg, tn, mDuration, displayId);
        } catch (RemoteException e) {
            // Empty
        }
    }复制代码
到此Toast创建并显示出来,但是我们并没有看到熟悉的WindowManager.addView(xx),继续来看看。
show()方法里构造了TN对象,最后该对象被加入到了INotificationManager里。该类是底层服务类,其实现类是:NotificationManagerService.java。既然传给了底层,那么势必要有传回来的动作,查看TN类发现:
    public void show(IBinder windowToken) {
        if (localLOGV) Log.v(TAG, "SHOW: " + this);
        //发送到handler执行
        mHandler.obtainMessage(SHOW, windowToken).sendToTarget();
    }

    public void handleShow(IBinder windowToken) {
        if (mView != mNextView) {
            // remove the old view if necessary
            handleHide();
            mView = mNextView;
            Context context = mView.getContext().getApplicationContext();
            String packageName = mView.getContext().getOpPackageName();
            if (context == null) {
                context = mView.getContext();
            }

            //获取 WindowManager 对象
            mWM = (WindowManager)context.getSystemService(Context.WINDOW_SERVICE);
            final Configuration config = mView.getContext().getResources().getConfiguration();
            final int gravity = Gravity.getAbsoluteGravity(mGravity, config.getLayoutDirection());

            //WindowManager.LayoutParams mParams = new WindowManager.LayoutParams();
            mParams.gravity = gravity;
            if ((gravity & Gravity.HORIZONTAL_GRAVITY_MASK) == Gravity.FILL_HORIZONTAL) {
                mParams.horizontalWeight = 1.0f;
            }
            if ((gravity & Gravity.VERTICAL_GRAVITY_MASK) == Gravity.FILL_VERTICAL) {
                mParams.verticalWeight = 1.0f;
            }
            //设置Toast 坐标等属性
            mParams.x = mX;
            mParams.y = mY;
            mParams.verticalMargin = mVerticalMargin;
            mParams.horizontalMargin = mHorizontalMargin;
            mParams.packageName = packageName;
            mParams.hideTimeoutMilliseconds = mDuration ==
                    Toast.LENGTH_LONG ? LONG_DURATION_TIMEOUT : SHORT_DURATION_TIMEOUT;
            mParams.token = windowToken;
            if (mView.getParent() != null) {
                if (localLOGV) Log.v(TAG, "REMOVE! " + mView + " in " + this);
                mWM.removeView(mView);
            }
            try {
                //添加到Window
                mWM.addView(mView, mParams);
                trySendAccessibilityEvent();
            } catch (WindowManager.BadTokenException e) {
                /* ignore */
            }
        }
    }复制代码
又看到了熟悉的addView(xx)流程。总结来说:
make() 方法构造Toast
show() 方法 将要显示的内容加入到service
service根据时间长短通过handler通知UI进行展示
如何关闭Toast
既然Toast显示策略都在service里完成,那么当时间到了之后让Toast消失也是service通知上层销毁Window
    public void cancel() {
        if (localLOGV) Log.v(TAG, "CANCEL: " + this);
        mHandler.obtainMessage(CANCEL).sendToTarget();
    }

    public void handleHide() {
        if (mView != null) {
            if (mView.getParent() != null) {
                //销毁Window
                mWM.removeViewImmediate(mView);
            }
            try {
                getService().finishToken(mPackageName, this);
            } catch (RemoteException e) {
            }
            mView = null;
        }
    }复制代码
Dialog/PopupWindow/Toast 异同之处
上边分析了三者的生命周期,了解到他们都是通过addView(xx)添加View到Window进行展示的,那么他们各自的特点以及侧重点是体现在哪些方面呢?接下来分析。
当我们分别运行上边的三个demo,发现:
Dialog 表现:
居中展示、外部有蒙层、点击屏幕外Dialog消失、点击返回键Dialog消失、Dialog 拦截了屏幕上所有的touch/key 事件。
Dialog需要Activity类型的Context启动。
有动画。
PopupWindow 表现
基于某个锚点显示,可以偏移任何距离。点击屏幕外PopupWindow不消失,PopupWindow 仅仅拦截自身区域内的touch/key 事件。
PopupWindow需要Activity类型的Context启动。 有动画。
Toast 表现
Toast 在屏幕底部弹出一段文本,该文本在展示指定的时间后消失。
Toast 不强制需要Activity类型的Context启动。
有动画。
接下来看看造成以上差异之处的原因:
Window 位置确定
WindowManager.LayoutParams.gravity
指定Window方位,如居中、居左、居右、居底、居顶。
WindowManager.LayoutParams.x
WindowManager.LayoutParams.y
这俩参数确定Window 距离"gravity"指定方位的偏移。
如当gravity=Gravity.LEFT 那么layoutParams.x = 200(正数),表示X轴向右偏移的距离,负数反之。
当gravity=Gravity.RIGHT 那么layoutParams.x = 200,表示X轴向左偏移的距离,负数反之。
同理垂直方向也是一样道理。
因此Window 位置确定是通过gravity 和x/y属性结合判断的。
Dialog 位置确定
    Dialog(@android.annotation.NonNull Context context, @StyleRes int themeResId, boolean createContextThemeWrapper) {
        //省略
        final Window w = new PhoneWindow(mContext);
        //设置gravity
        w.setGravity(Gravity.CENTER);
    }复制代码
Dialog 构造函数里设置Window居中,因此demo里表现出来的Dialog居中展示。
因此改变"gravity"默认值:
dialog.getWindow().getAttributes().gravity = Gravity.XX
PopupWindow 位置确定
    public void showAsDropDown(View anchor, int xoff, int yoff, int gravity) {
        //省略...
        //确定layoutParams.x/layoutParams.y 的值
        //xoff/yoff 表示的是window 距离锚点anchor的偏移,默认是anchor的左下角
        //gravity指的是window与anchor的对齐方式,比如Gravity.RIGHT,表示Window与anchor右对齐
        //当xoff/yoff、gravity同时设置时,先按照anchor的左下角偏移xoff/yoff,得出当前的layoutParams.x/layoutParams.y值
        //再根据gravity调整layoutParams.x/layoutParams.y值
        final boolean aboveAnchor = findDropDownPosition(anchor, p, xoff, yoff,
                p.width, p.height, gravity, mAllowScrollingAnchorParent);
        //省略...
    }复制代码
findDropDownPosition(xx) 该方法确定了PopupWindow 的WindowManager.LayoutParams.x/WindowManager.LayoutParams.y值。
再来看看WindowManager.LayoutParams.gravity如何确定的:
    protected final WindowManager.LayoutParams createPopupLayoutParams(IBinder token) {
        final WindowManager.LayoutParams p = new WindowManager.LayoutParams();
        //计算出LayoutParams.gravity
        p.gravity = computeGravity();
        //省略
        return p;
    }

    private int computeGravity() {
        //根据mGravity来确定gravity
        int gravity = mGravity == Gravity.NO_GRAVITY ?  Gravity.START | Gravity.TOP : mGravity;
        if (mIsDropdown && (mClipToScreen || mClippingEnabled)) {
            gravity |= Gravity.DISPLAY_CLIP_VERTICAL;
        }
        return gravity;
    }复制代码
而mGravity是可以在外部设置的:
    public void showAtLocation(View parent, int gravity, int x, int y) {d
        mParentRootView = new WeakReference<>(parent.getRootView());
        showAtLocation(parent.getWindowToken(), gravity, x, y);
    }

    public void showAtLocation(IBinder token, int gravity, int x, int y) {
        //省略...
        mGravity = gravity;
        //省略
    }复制代码
因此,可以通过showAtLocation(xx)设置PopupWindow的Gravity。
此处需要注意的是:
showAsDropDown(xx)参数里的gravity指的是PopupWindow与锚点View的对齐方式。 而showAtLocation(xx)参数里的gravity才是PopupWindow的Gravity。
Toast 位置确定Toast 默认底部水平居中。在Toast.TN 类里,当展示Toast时调用handleShow(xx)方法:
    public void handleShow(IBinder windowToken) {
        //省略
        if (mView != mNextView) {
            // 省略
            //通过mGravity计算
            final int gravity = Gravity.getAbsoluteGravity(mGravity, config.getLayoutDirection());
            mParams.gravity = gravity;
            //x、y的值
            mParams.x = mX;
            mParams.y = mY;
        }
    }复制代码
而mGravity、mX、mY可以在外部设置:
    public void setGravity(int gravity, int xOffset, int yOffset) {
        mTN.mGravity = gravity;
        mTN.mX = xOffset;
        mTN.mY = yOffset;
    }复制代码
因此调用setGravity(xx)可以改变Toast展示的位置
Window外部区域变暗
Dialog弹出时外部区域会变暗,该效果由以下字段控制
WindowManager.LayoutParams.dimAmount
取值float类型
范围[0-1]
值越大表示不透明度越高
0表示不变暗,1表示完全变暗
该值需要生效,需要配合另外字段使用:
layoutParams.flags |= WindowManager.LayoutParams.FLAG_DIM_BEHIND;
Dialog 外部变暗
    protected ViewGroup generateLayout(DecorView decor) {
        if (a.getBoolean(R.styleable.Window_backgroundDimEnabled,
                mIsFloating)) {
            if ((getForcedWindowFlags()&WindowManager.LayoutParams.FLAG_DIM_BEHIND) == 0) {
                //设置标记,表示支持变暗
                params.flags |= WindowManager.LayoutParams.FLAG_DIM_BEHIND;
            }
            if (!haveDimAmount()) {
                //设置变暗的具体值
                params.dimAmount = a.getFloat(
                        android.R.styleable.Window_backgroundDimAmount, 0.5f);
            }
        }
    }复制代码
可以看出Dialog dimAmount值从style里获取,该style里的默认值是0.6。当然我们可以在外部修改dimAmount值。
                dialog.setContentView(myGroup);
                dialog.getWindow().getAttributes().dimAmount = 0.3f;
                dialog.show();复制代码
需要注意的是,dimAmount赋值操作需要在setContentView(xx)之后进行,否则设置的值会被setContentView(xx)重置。
PopupWindow和Toast 没有对此设置相应的值,因此就没有外部区域变暗的说法。
Window touch/key 事件
Dialog 事件接收
点击Dialog 外部时(touch),Dialog消失;点击物理返回键时(key),Dialog消失。因此我们可以猜测出Dialog是接收到了touch/key事件,并判断如果touch事件在Window外部,那么关闭Dialog。
涉及到两个步骤:
1、能接收到外部touch/key 事件
2、对事件进行相应的处理(是否关闭Dialog)
1、设置Dialog能否接收touch/key 事件
Window 默认接收外部点击事件和key事件,Dialog没有更改此默认值,因此能接收到touch/key 事件。
2、对接收的事件做处理
Dialog 实现了Window.Callback 接口,重写方法里对touch事件做处理
#Dialog.java
    public boolean dispatchTouchEvent(@android.annotation.NonNull MotionEvent ev) {
        //先交给Dialog可见区域处理
        if (mWindow.superDispatchTouchEvent(ev)) {
            return true;
        }
        //事件没消费,继续处理
        return onTouchEvent(ev);
    }

    public boolean onTouchEvent(@android.annotation.NonNull MotionEvent event) {
        //shouldCloseOnTouch(xx)
        //该方法判断是否是up事件且是否点击在Dialog外部区域且是否设置了可以关闭Dialog的标记
        //都满足,则返回true
        if (mCancelable && mShowing && mWindow.shouldCloseOnTouch(mContext, event)) {
            //符合条件,则关闭Dialog
            cancel();
            return true;
        }

        return false;
    }复制代码
同样的,Dialog 实现了KeyEvent.Callback,重写方法里对key事件做处理
#Dialog.java
    public boolean dispatchKeyEvent(@android.annotation.NonNull KeyEvent event) {
        if ((mOnKeyListener != null) && (mOnKeyListener.onKey(this, event.getKeyCode(), event))) {
            return true;
        }
        //可见区域做处理
        if (mWindow.superDispatchKeyEvent(event)) {
            return true;
        }
        //继续分发
        return event.dispatch(this, mDecor != null
                ? mDecor.getKeyDispatcherState() : null, this);
    }

    public boolean onKeyUp(int keyCode, @android.annotation.NonNull KeyEvent event) {
        if ((keyCode == KeyEvent.KEYCODE_BACK || keyCode == KeyEvent.KEYCODE_ESCAPE)
                && event.isTracking()
                && !event.isCanceled()) {
            onBackPressed();
            return true;
        }
        return false;
    }

    public void onBackPressed() {
        //标记生效,则移除Dialog
        if (mCancelable) {
            cancel();
        }
    }复制代码
从上面可以看出,Dialog点击外部和点击物理返回键消失需要同时满足两个条件,那么想要Dialog不消失,只要不满足其中某个条件即可。实际上Dialog是根据第二个条件设置标记位,已经为我们封装好了方法:
点击外部不消失:
dialog.setCanceledOnTouchOutside(false);
点击物理返回键不消失:
dialog.setCancelable(false);
值得注意的是:调用了上述方法,Dialog还是接收了事件,只是不关闭Dialog而已。事件并没有分发到其底下的Window。
PopupWindow 事件接收
与Dialog类似,看其是否满足两个条件。
先来看看PopupWindow 调用栈:
showAsDropDown(xx)->createPopupLayoutParams(xx)->computeFlags(xx)
#PopupWindow.java
    private int computeFlags(int curFlags) {
        //省略
        if (!mFocusable) {
            //焦点功能没开启,则标记FLAG_NOT_FOCUSABLE
            //该标记下,Window不接收其外部区域的touch事件
            //也不接收key事件
            curFlags |= WindowManager.LayoutParams.FLAG_NOT_FOCUSABLE;
            if (mInputMethodMode == INPUT_METHOD_NEEDED) {
                //键盘相关
                curFlags |= WindowManager.LayoutParams.FLAG_ALT_FOCUSABLE_IM;
            }
        } else if (mInputMethodMode == INPUT_METHOD_NOT_NEEDED) {
            curFlags |= WindowManager.LayoutParams.FLAG_ALT_FOCUSABLE_IM;
        }
        //省略
    }复制代码
computeFlags(xx)计算WindowManager.LayoutParams.flags的值。PopupWindow是否接收事件取决于"mFocusable",在我们的demo里并没有对该值进行设置,默认为false,因此PopupWindow不能接收外部点击事件与key事件,当然也就不能处理是否关闭PopupWindow的逻辑了。
而"mFocusable"字段的赋值可以在PopupWindow构造函数里指定或者调用
public void setFocusable(boolean focusable)
当指定focusable=true时,PopupWindow就能接收touch/key事件了,PopupDecorView 负责接收事件处理:
    @Override
    public boolean dispatchTouchEvent(MotionEvent ev) {
        //onTouch 优先执行
        if (mTouchInterceptor != null && mTouchInterceptor.onTouch(this, ev)) {
            return true;
        }
        return super.dispatchTouchEvent(ev);
    }

    @Override
    public boolean onTouchEvent(MotionEvent event) {
        final int x = (int) event.getX();
        final int y = (int) event.getY();

        //接收Down事件关闭
        if ((event.getAction() == MotionEvent.ACTION_DOWN)
                && ((x < 0) || (x >= getWidth()) || (y < 0) || (y >= getHeight()))) {
            dismiss();
            return true;
        } else if (event.getAction() == MotionEvent.ACTION_OUTSIDE) {
            //另一类事件
            dismiss();
            return true;
        } else {
            return super.onTouchEvent(event);
        }
    }复制代码
key事件差不多,此处略过。
总结来说:
设置focusable为true即可点击外部消失PopupWindow,反之则不消失
网上一些文章说的是PopupWindow 会阻塞程序,这种观点是错误的。实际上是下一层的Window(Activity)没有接收到事件,当然不会做任何处理了
Toast 事件接收
Toast 一般用来定时展示一个文本,因此一般无需接收事件。
在Toast 构造函数里,会构造TN对象,该对象里初始化WindowManager.LayoutParams.flags参数:
    TN(String packageName, @android.annotation.Nullable Looper looper) {
        final WindowManager.LayoutParams params = mParams;
        //省略
        params.setTitle("Toast");
        //设置不接收外部的touch事件和key事件
        params.flags = WindowManager.LayoutParams.FLAG_KEEP_SCREEN_ON
                | WindowManager.LayoutParams.FLAG_NOT_FOCUSABLE
                | WindowManager.LayoutParams.FLAG_NOT_TOUCHABLE;
        //省略
    }复制代码
关于Window touch/key 事件详细字段内容请移步:Window/WindowManager 不可不知之事本篇只说明设置了哪些参数。
启动Dialog/PopupWindow/Toast 所需的Context限制
请移步:[Android各种Context的前世今生] (juejin.cn/post/701596…)
Window 动画
控制Window 动画的字段是:
WindowManager.LayoutParams.windowAnimations
Dialog 动画
Dialog 默认动画:
    <style name="Animation.Dialog">
        <item name="windowEnterAnimation">@anim/dialog_enter</item>
        <item name="windowExitAnimation">@anim/dialog_exit</item>
    </style>复制代码
替换Dialog默认动画,定义Style
    <style name="myAnim">
        <item name="android:windowEnterAnimation">@anim/myanim</item>
    </style>

    <style name="myDialog" parent="myTheme">
        <item name="android:windowAnimationStyle">@style/myAnim</item>
    </style>复制代码
Dialog 构造函数引用该Style。
当然也可以单独设置
dialog.getWindow().getAttributes().windowAnimations = R.style.myAnim;
PopupWindow 动画
PopupWindow 默认没有动画,其加载动画时机:
createPopupLayoutParams(xx)->computeAnimationResource(xx)
在外部指定其动画:
    public void setAnimationStyle(int animationStyle) {
        mAnimationStyle = animationStyle;
    }复制代码
popupWindow.setAnimationStyle(R.style.myAnim);
Toast 动画
在Toast.TN的构造函数里,有默认动画:
params.windowAnimations = com.android.internal.R.style.Animation_Toast;复制代码
    <style name="Animation.Toast">
        <item name="windowEnterAnimation">@anim/toast_enter</item>
        <item name="windowExitAnimation">@anim/toast_exit</item>
    </style>复制代码
Toast 没有提供对外接口设置Window动画。
Dialog/PopupWindow/Toast 使用场合
从上边分析可以看出,造成Window表现差异的实际上就是WindowManager.LayoutParams 参数的差异。因此重点是我们能否拿到WindowManager.LayoutParams对象。
对于Dialog:
可以通过dialog.getWindow().getAttributes() 获取WindowManager.LayoutParams对象,对象获取到了那么里边的各种参数就可以设置了。
需要注意的是:setContentView(xx)可能会重置LayoutParams里的一些参数,因此一般我们更改LayoutParams参数最好在setContentView(xx)之后。
对于PopupWindow/Toast这两者并没有提供方法获取WindowManager.LayoutParams对象,仅仅提供一些方法单独设置WindowManager.LayoutParams对象里的一些变量。比如设置Window的位置、设置touch/key 事件接收、动画等。
使用建议
1、对于想要设置背景蒙层的,建议使用Dialog。PopupWindow/Toast并没有提供方法设置该参数
2、对于想要基于某个锚点(View)位置展示Window的,建议使用PopupWindow。当然Dialog/Toast也是可以指定位置,只是PopupWindow已经将这套封装了,不用重复造轮子
3、对于想要监听外部touch/key 事件的,建议使用Dialog;Dialog重写touch/key比较方便。
4、对于想要简单弹出提示,并且有时长限制的,建议使用Toast。
如若对Dialog/PopupWindow/Toast 都不能解决你的需求,那就更容易了。这三者都是封装了WindowManager的操作,我们直接使用原生的WindowManager,能拿到所有参数,想要啥效果都可以设置。
Dialog/PopupWindow/Toast 默认动画都是用了系统的属性,对styleable/style/attr 有疑问的,请移步:
作者:小鱼人爱编程
链接:https://juejin.cn/post/7015986077932486686