
HTML用户注册页面设置源码
HTML用户注册页面设置源码
这篇文章主要介绍了HTML用户注册页面设置源码,代码简单易懂,对大家的学习或工作具有一定的参考借鉴价值,需要的朋友可以参考下
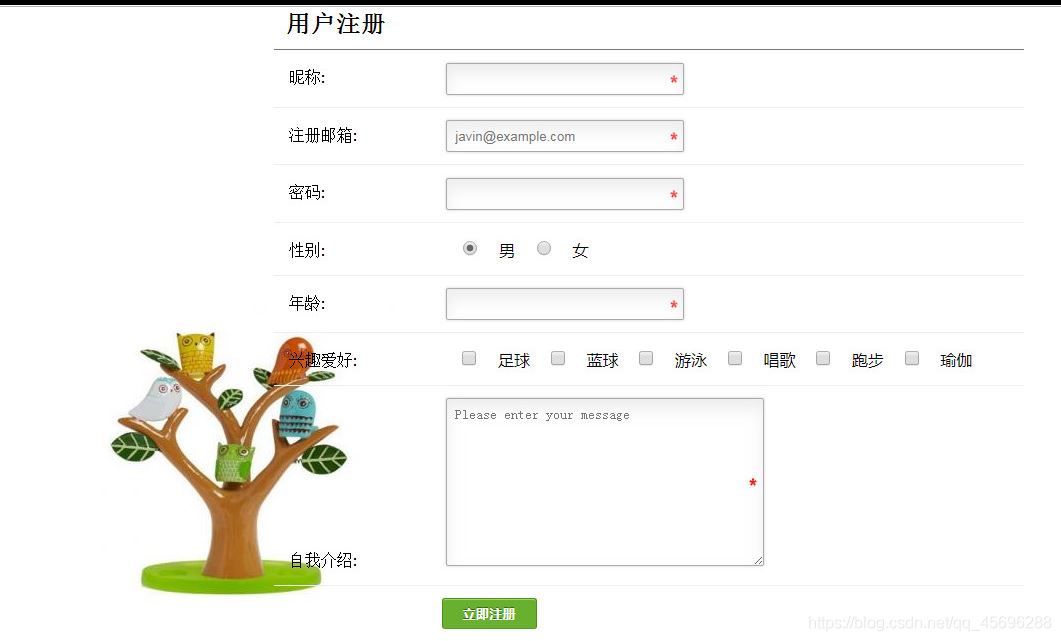
设计上图中的网页:
1 2 3 4 5 6 7 8 9 10 11 12 13 14 15 16 17 18 19 20 21 22 23 24 25 26 27 28 29 30 31 32 33 34 35 36 37 38 39 40 41 42 43 44 45 46 47 48 49 50 51 52 53 54 55 56 57 58 59 60 61 62 63 64 65 66 67 68 69 70 71 72 73 74 75 76 77 78 79 80 81 82 83 84 85 86 87 88 89 90 91 92 93 94 95 96 97 98 99 100 101 102 103 104 | <!DOCTYPE html><html lang="en"><head> <meta charset="UTF-8"> <meta name="viewport" content="width=device-width, initial-scale=1.0"> <title>Document</title> <style> form{ width: 800px; height: 700px; border: 1px solid red; margin: auto; background: url(images/tree.jpg) no-repeat -40px 300px; } form h3{ margin-left: 200px; } p{ margin-left: 200px; } hr{ margin-left: 200px; } .a1{ margin-left: 85px; } .a2{ margin-left: 110px; } input, textarea { background: url(images/attention.png) no-repeat right; } button{ margin-left: 200px; background: rgb(81, 187, 125); color: white; } span#as:hover input{ width: 300px; height: 40px; } </style></head><body> <form action=""> <h3>用户注册:</h3> <hr> <p>用户昵称:<span class="a1" id="as"><input type="text" required placeholder autofocus></span> <hr></p> <p>注册邮箱:<span class="a1" id="as"><input type="email" required placeholder="javin@example.com"></span><hr></p> <p>密码: <span class="a2" id="as"><input type="password" required placeholder></span><hr></p> <p>性别:<span class="a2">男<input type="radio" name="1" checked> 女 <input type="radio" name="1"> </span><hr> </p> <p>年龄:<span class="a2" id="as"><input type="number" name="number1" required placeholder></span><hr></p> <p>兴趣爱好:<span class="a1"> 足球<input type="checkbox" name="1"> 篮球<input type="checkbox" name="1"> 游泳<input type="checkbox" name="1"> 唱歌<input type="checkbox" name="1"> 跑步<input type="checkbox" name="1"> 瑜伽<input type="checkbox" name="1"> </span><hr></p> <p>自我介绍: <span class="a1"><textarea name="abcde" cols="30" rows="10" required placeholder>Please enter your message</textarea></span><hr> </p> <button type=submit>立即注册</button> <div></div> </form></body></html> |
到此这篇关于HTML用户注册页面设置源码的文章就介绍到这了