
Service Mesh - Istio实战篇(上)
Service Mesh - Istio实战篇(上)
项目准备和构建过程
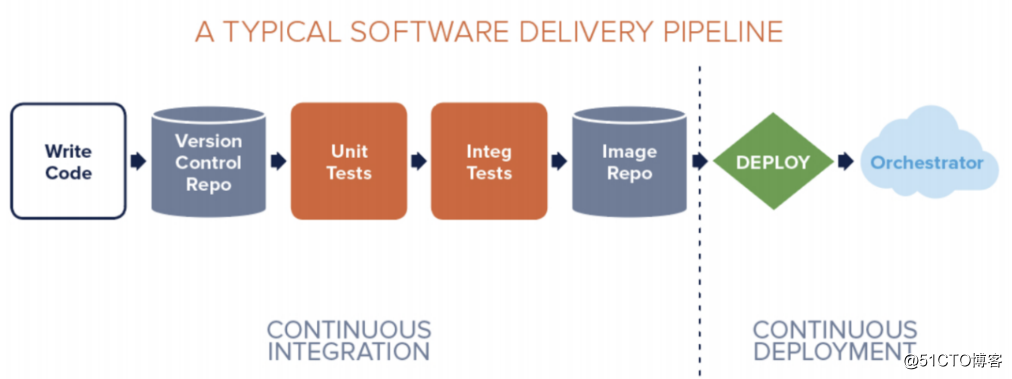
典型的 CI/CD 过程 - DevOps
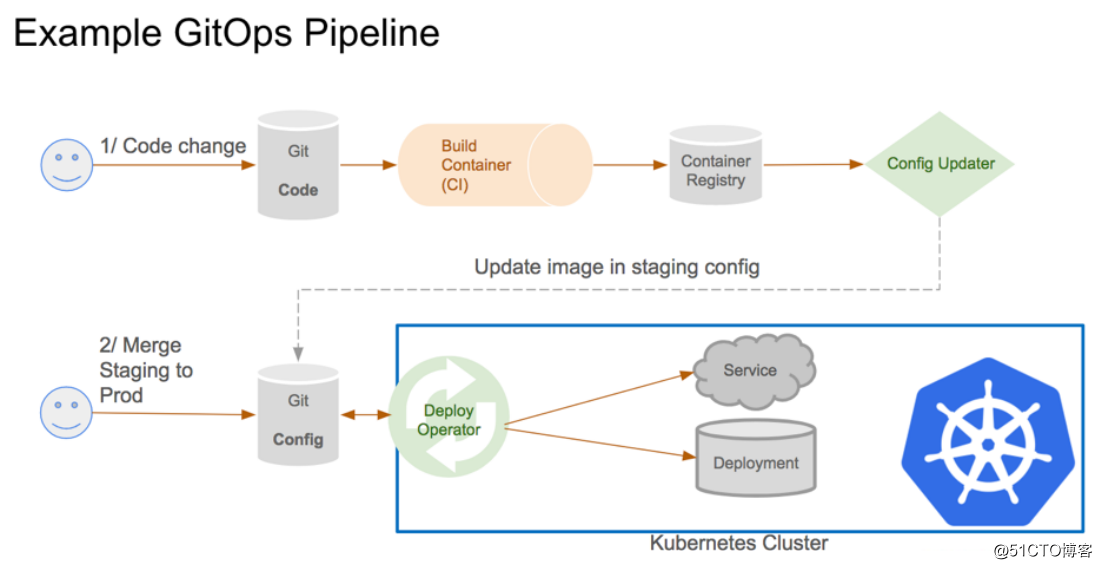
GitOps 持续交付过程
GitOps:一种集群管理和应用分发的持续交付方式
GitOps与典型的CI/CD不同,其中最大的不同点在于使用 Git 作为信任源,保存声明式基础架构(declarative infrastructure)和应用程序
以 Git 作为交付过程(pipeline)的中心,配置文件如k8s的yaml文件都保存在git进行管理
开发者只需要通过 pull request 完成应用的部署和运维任务,不需要去使用别的一些CI/CD工具
优势:提高生产率、改进开发体验、一致性和标准化、安全
push vs pull 流程(pipeline):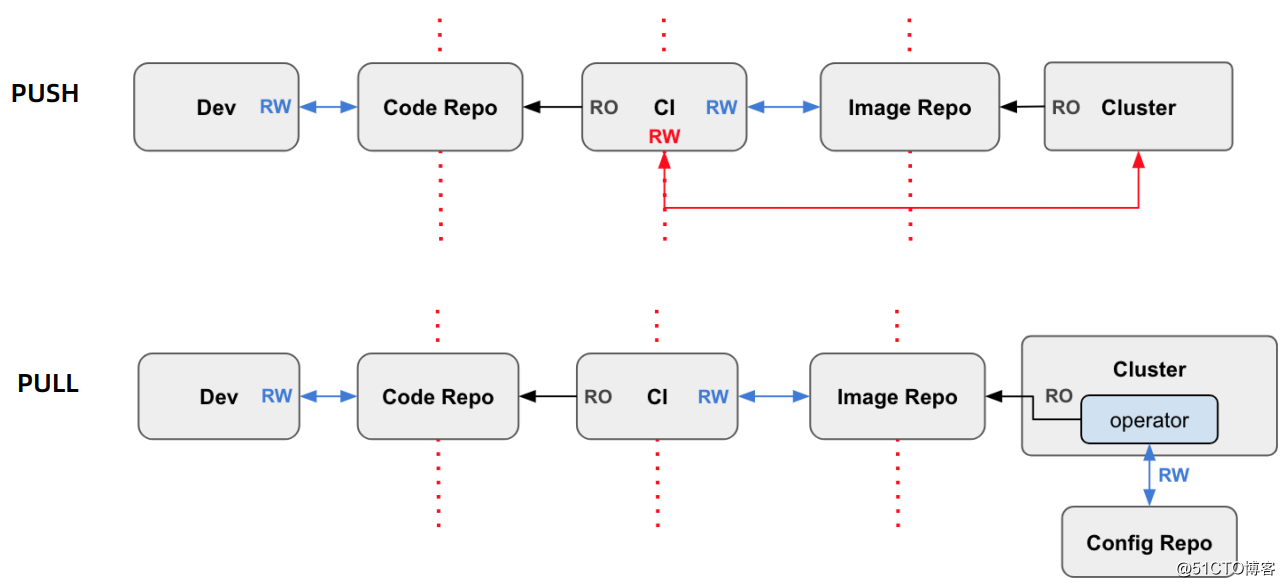
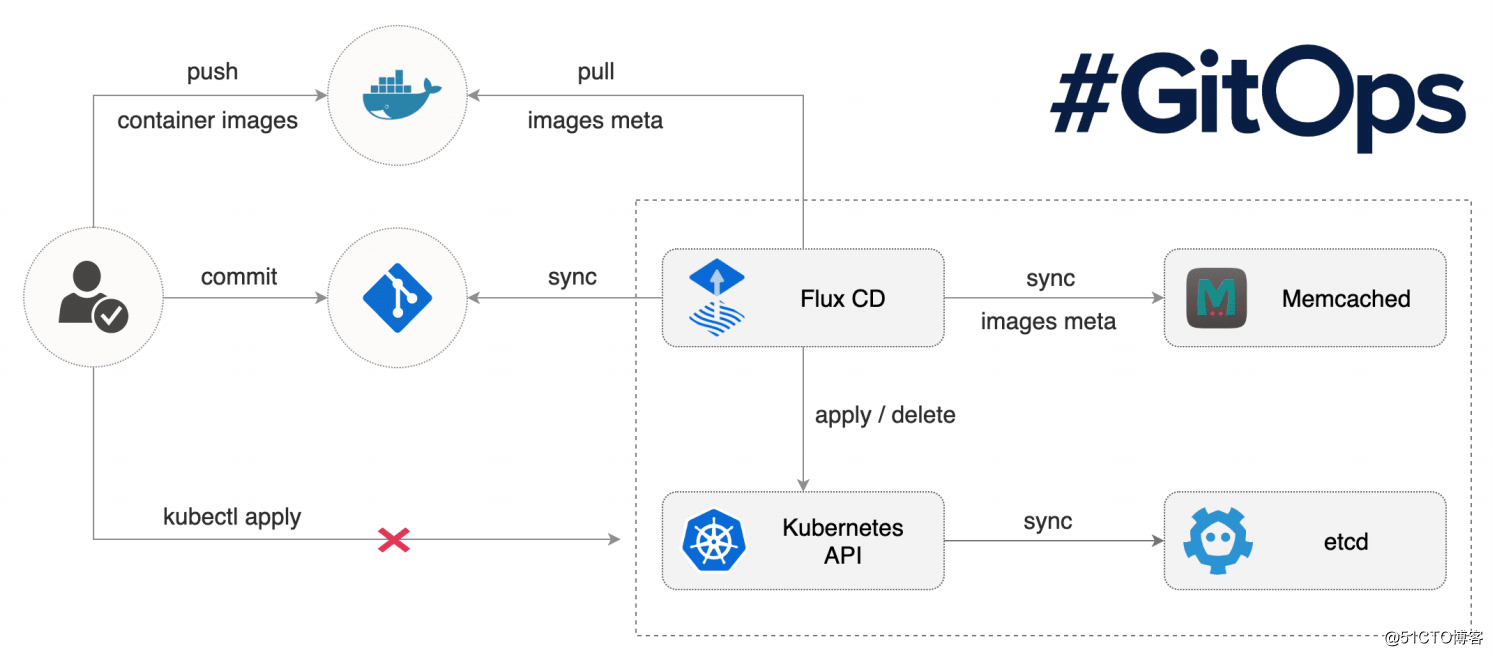
使用 Flux 构建和发布应用
Flux 官方定义:
The GitOps operator for Kubernetes
自动化部署工具(基于 GitOps)
特性:
自动同步、自动部署
声明式
基于代码(Pull request),而不是容器
准备工作
首先,我们需要准备一个Kubernetes集群:
以及在k8s中安装好 Istio 环境:
如下图所示,我们要部署一个由两个服务组成的Mesh,除此之外还会有一个网关和一个外部服务,可以说是精简且完整了: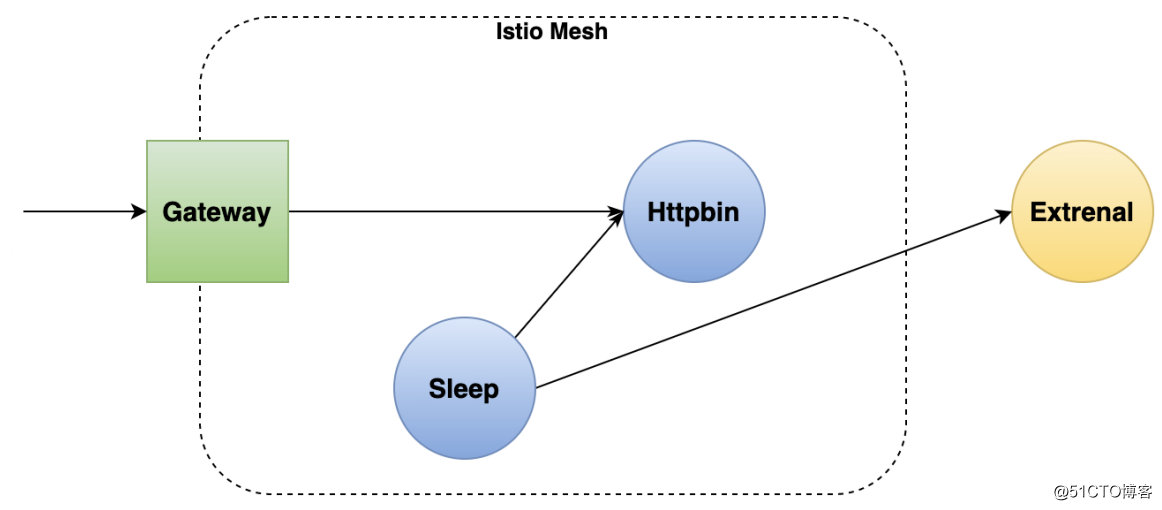
在调用链路上可以看出 sleep 是作为客户端的角色,httpbin 作为服务端的角色
准备一个 Git 仓库:
安装 Flux
官方文档:
首先,安装 fluxctl 命令工具,到Github仓库上下载可执行文件即可。然后将其放到 /usr/bin 目录下,并赋予可执行权限:
[root@m1 /usr/local/src]# mv fluxctl_linux_amd64 /usr/bin/fluxctl[root@m1 ~]# chmod a+x /usr/bin/fluxctl [root@m1 ~]# fluxctl version1.21.0
[root@m1 ~]#
给 Flux 创建一个命名空间,然后将 Flux Operator 部署到k8s集群:
[root@m1 ~]# kubectl create ns fluxnamespace/flux created
[root@m1 ~]# git clone https://github.com/fluxcd/flux.git[root@m1 ~]# cd flux/
在部署 Flux 之前,需要先修改几个Git相关的配置,修改为你Git仓库的用户名、邮箱、url等:
[root@m1 ~/flux]# vim deploy/flux-deployment.yaml  # 修改如下几个配置项...        # Replace the following URL to change the Git repository used by Flux.
        # HTTP basic auth credentials can be supplied using environment variables:
        # https://$(GIT_AUTHUSER):$(GIT_AUTHKEY)@github.com/user/repository.git
        - --git-url=git@github.com:fluxcd/flux-get-started
        - --git-branch=master        # Include this if you want to restrict the manifests considered by flux
        # to those under the following relative paths in the git repository
        # - --git-path=subdir1,subdir2
        - --git-label=flux-sync
        - --git-user=Flux automation
        - --git-email=flux@example.com
修改完成后,进行部署:
[root@m1 ~/flux]# kubectl apply -f deploy[root@m1 ~/flux]# kubectl get all -n fluxNAME                            READY   STATUS    RESTARTS   AGE
pod/flux-65479fb87-k5zxb        1/1     Running   0          7m20s
pod/memcached-c86cd995d-5gl5p   1/1     Running   0          44m

NAME                TYPE        CLUSTER-IP      EXTERNAL-IP   PORT(S)     AGE
service/memcached   ClusterIP   10.106.229.44   <none>        11211/TCP   44m

NAME                        READY   UP-TO-DATE   AVAILABLE   AGE
deployment.apps/flux        1/1     1            1           44m
deployment.apps/memcached   1/1     1            1           44m

NAME                                  DESIRED   CURRENT   READY   AGE
replicaset.apps/flux-65479fb87        1         1         1       7m20s
replicaset.apps/memcached-c86cd995d   1         1         1       44m
[root@m1 ~]#
除了以上方式,也可以使用命令行部署 Flux:
fluxctl install \
--git-user=xxx \
--git-email=xxx@xxx \
--git-url=git@github.com:xxx/smdemo \
--namespace=flux | kubectl apply -f -
由于使用的是私有仓库,我们还需要一些额外的操作,需要将其主机密钥添加到Flux daemon容器中的 ~/.ssh/known_hosts 文件中。具体步骤如下:
[root@m1 ~]# kubectl exec -n flux flux-65479fb87-k5zxb -ti -- \
    env GITHOST="gitee.com" GITREPO="git@gitee.com:demo_focus/service-mesh-demo.git" PS1="container$ " /bin/sh
container$ ssh-keyscan $GITHOST >> ~/.ssh/known_hosts   # 添加host keycontainer$ git clone $GITREPO   # 测试确保能正常对仓库进行克隆Cloning into 'service-mesh-demo'...
remote: Enumerating objects: 10, done.
remote: Counting objects: 100% (10/10), done.
remote: Compressing objects: 100% (10/10), done.
remote: Total 10 (delta 2), reused 0 (delta 0), pack-reused 0
Receiving objects: 100% (10/10), done.
Resolving deltas: 100% (2/2), done.
container$
完成 Flux 的部署后,我们需要将 Flux 生成的 deploy key 添加到 git 仓库中(read/write 权限),获取 deploy key 的命令如下:
[root@m1 ~]# fluxctl identity --k8s-fwd-ns fluxssh-rsa AAAAB3NzaC1yc2EAAAADAQABAAABgQDsyfN+x4jen+Ikpff8LszXLFTwXSQviFxCrIx7uMy7LJM5uUEsDdFs/DZL1g9h/YnkfLJlFrxOCJ+tuqPrXuj3ceEFfal4T3YWiDwf1RsGJvJd6ED5APjsxyu5gkj9LvkOB8OlYwPlS8Pygv997n93gtH7rFbocK5EQpbhhBlue3Or2ufI/KBxDCx6xLaH9U/16EEi+BDVSsCetGIQI+TSRqqpN30+Y8paS6iCYajKTubKv7x44WaVFgSDT9Y/OycUq1LupJoVoD8/5Y2leUMaF9dhMbQgoc8zjh8q2HF2n97mAvgYWJosjeIcAKS82C0zPlPupPevNedAhhEb82svPWh7BI4N4XziA06ypAEmfEz3JuUTTeABpF2hEoV4UEagkSyS8T3xhfdjigVcKiBW5AqRsRyx+ffW4WREHjARSC8CKl0Oj00a9FOGoNsDKkFuTbJePMcGdgvjs61UlgUUjdQFfHoZz2UVo2OEynnCpY7hj5SrEudkujRon4HEhJE= root@flux-7f5f7776df-l65lx
[root@m1 ~]#
复制密钥内容,到Git仓库上进行添加:
部署应用
为应用创建一个单独的命名空间,并且为其添加 istio-injection=enabled 标签,让 Istio 可以注入代理:
[root@m1 ~]# kubectl create ns demonamespace/demo created
[root@m1 ~]# kubectl label namespace demo istio-injection=enablednamespace/demo labeled
[root@m1 ~]#
将Git仓库克隆到本地,在仓库下创建 config 目录:
[root@m1 ~]# git clone git@gitee.com:demo_focus/service-mesh-demo.git[root@m1 ~]# cd service-mesh-demo/[root@m1 ~/service-mesh-demo]# mkdir config
在该目录下创建服务的配置文件:
[root@m1 ~/service-mesh-demo]# vim config/httpbin.yamlapiVersion: v1
kind: ServiceAccount
metadata:
  name: httpbin
  namespace: demo
---
apiVersion: v1
kind: Service
metadata:
  name: httpbin
  namespace: demo
  labels:
    app: httpbin
spec:
  ports:
  - name: http
    port: 8000
    targetPort: 80
  selector:
    app: httpbin
---
apiVersion: apps/v1
kind: Deployment
metadata:
  name: httpbin
  namespace: demo
spec:
  replicas: 1
  selector:
    matchLabels:
      app: httpbin
      version: v1
  template:
    metadata:
      labels:
        app: httpbin
        version: v1
    spec:
      serviceAccountName: httpbin
      containers:
      - image: docker.io/kennethreitz/httpbin
        imagePullPolicy: IfNotPresent
        name: httpbin
        ports:
        - containerPort: 80

[root@m1 ~/service-mesh-demo]# vim config/sleep.yamlapiVersion: v1
kind: ServiceAccount
metadata:
  name: sleep
  namespace: demo
---
apiVersion: v1
kind: Service
metadata:
  name: sleep
  namespace: demo
  labels:
    app: sleep
spec:
  ports:
  - port: 80
    name: http
  selector:
    app: sleep
---
apiVersion: apps/v1
kind: Deployment
metadata:
  name: sleep
  namespace: demo
spec:
  replicas: 1
  selector:
    matchLabels:
      app: sleep
  template:
    metadata:
      labels:
        app: sleep
    spec:
      serviceAccountName: sleep
      containers:
      - name: sleep
        image: governmentpaas/curl-ssl        command: ["/bin/sleep", "3650d"]
        imagePullPolicy: IfNotPresent
        volumeMounts:
        - mountPath: /etc/sleep/tls
          name: secret-volume
      volumes:
      - name: secret-volume
        secret:
          secretName: sleep-secret
          optional: true
将配置文件提交到远程仓库,更新 git repo:
[root@m1 ~/service-mesh-demo]# git add .[root@m1 ~/service-mesh-demo]# git commit -m "commit yaml"[root@m1 ~/service-mesh-demo]# git push origin master
执行如下命令,让 Flux 去同步仓库的变更,并进行自动部署:
[root@m1 ~]# fluxctl sync --k8s-fwd-ns fluxSynchronizing with ssh://git@gitee.com/demo_focus/service-mesh-demo
Revision of master to apply is 49bc37e
Waiting for 49bc37e to be applied ...
Done.
[root@m1 ~]#
默认情况下,Flux 会每隔5分钟自动进行 sync,并不需要我们手动去操作
此时查看 demo 命名空间下的资源,可以看到 Flux 自动帮我们部署了所有服务:
[root@m1 ~]# kubectl get all -n demoNAME                           READY   STATUS    RESTARTS   AGE
pod/httpbin-74fb669cc6-v9lc5   2/2     Running   0          36s
pod/sleep-854565cb79-mcmnb     2/2     Running   0          40s

NAME              TYPE        CLUSTER-IP      EXTERNAL-IP   PORT(S)    AGE
service/httpbin   ClusterIP   10.105.17.57    <none>        8000/TCP   36s
service/sleep     ClusterIP   10.103.14.114   <none>        80/TCP     40s

NAME                      READY   UP-TO-DATE   AVAILABLE   AGE
deployment.apps/httpbin   1/1     1            1           36s
deployment.apps/sleep     1/1     1            1           40s

NAME                                 DESIRED   CURRENT   READY   AGE
replicaset.apps/httpbin-74fb669cc6   1         1         1       36s
replicaset.apps/sleep-854565cb79     1         1         1       40s
[root@m1 ~]#
测试服务之间的连通性是否正常:
[root@m1 ~]# kubectl exec -it -n demo sleep-854565cb79-mcmnb -c sleep -- curl http://httpbin.demo:8000/ip{  "origin": "127.0.0.1"}
[root@m1 ~]#
实现自动化灰度发布
灰度发布过程
自动化灰度发布 - Flagger
灰度发布是个一点点迁移流量进行滚动升级的过程,因此如果通过人工手动来操作这个过程显然效率低下、容易出错,所以我们就需要使用自动灰度发布工具,例如 Flagger:
Flagger:Weaveworks开源的自动灰度发布工具
支持多种 Service Mesh 产品:Istio、Linkerd、App AWS Mesh
指标监控灰度发布状态
通知(slack、Microsoft team)
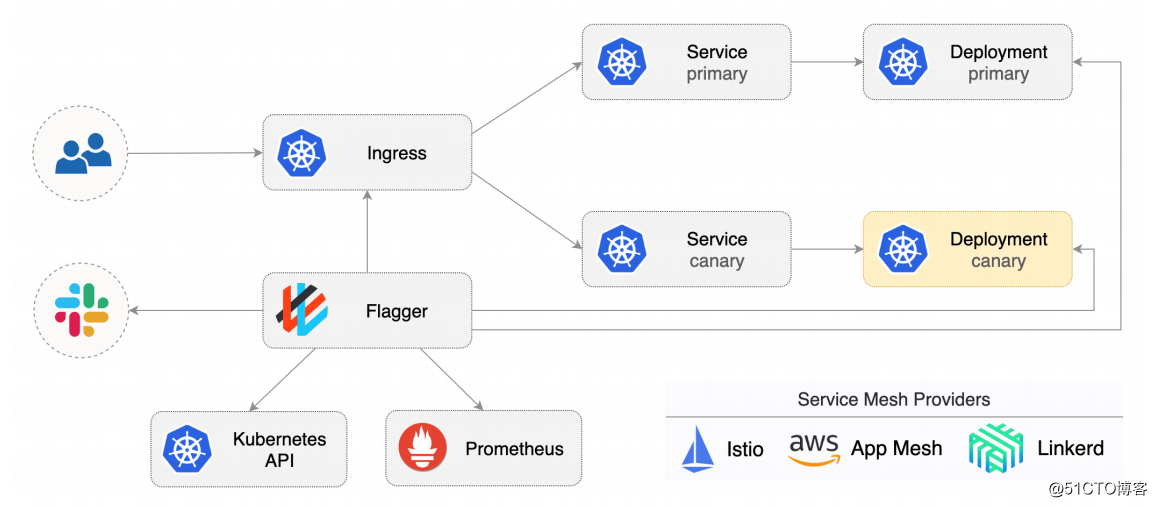
Flagger 工作流程: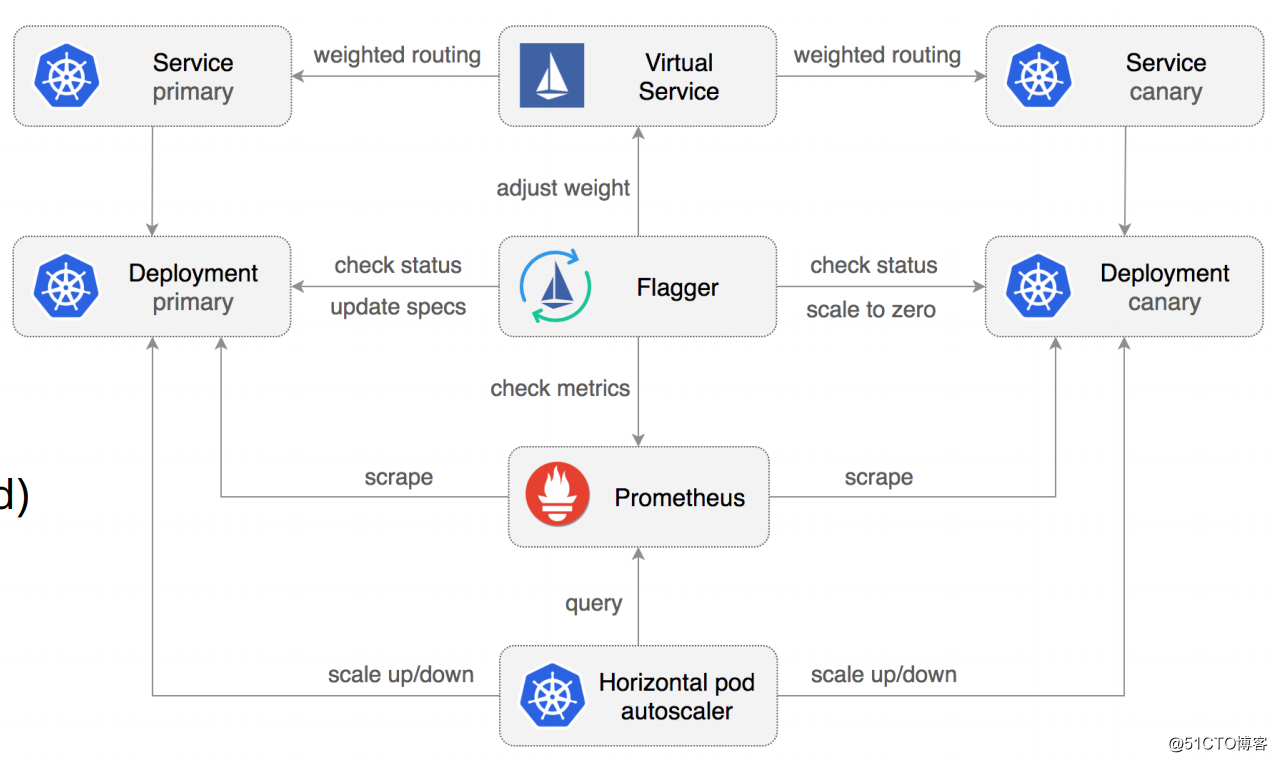
Flagger 安装
官方文档:
添加 Flagger 的 Helm 仓库:
[root@m1 ~]# helm repo add flagger https://flagger.app"flagger" has been added to your repositories
[root@m1 ~]#
创建 Flagger 的 crd:
[root@m1 ~]# kubectl apply -f https://raw.githubusercontent.com/fluxcd/flagger/main/artifacts/flagger/crd.yaml[root@m1 ~]# kubectl get crd |grep flaggeralertproviders.flagger.app                            2020-12-23T14:40:00Z
canaries.flagger.app                                  2020-12-23T14:40:00Z
metrictemplates.flagger.app                           2020-12-23T14:40:00Z
[root@m1 ~]#
通过 Helm 把 Flagger 部署到 istio-system 命名空间下:
[root@m1 ~]# helm upgrade -i flagger flagger/flagger \--namespace=istio-system \
--set crd.create=false \
--set meshProvider=istio \
--set metricsServer=http://prometheus.istio-system:9090
添加一个slack的hooks到flagger里,可以让flagger发送通知到slack频道里,这一步是可选的:
[root@m1 ~]# helm upgrade -i flagger flagger/flagger \--namespace=istio-system \
--set crd.create=false \
--set slack.url=https://hooks.slack.com/services/xxxxxx \
--set slack.channel=general \
--set slack.user=flagger
slack webhooks的使用文档:https://api.slack.com/messaging/webhooks
除了slack外,我们还可以为flagger配置一个grafana,该grafana集成了一个canary dashboard,可以方便我们去查看灰度发布的进度:
[root@m1 ~]# helm upgrade -i flagger-grafana flagger/grafana \--namespace=istio-system \
--set url=http://prometheus.istio-system:9090 \
--set user=admin \
--set password=admin
以上操作完成后,确认下flagger的部署情况:
[root@m1 ~]# kubectl get pods -n istio-system NAME                                    READY   STATUS    RESTARTS   AGE
flagger-b68b578b-5f8bh                  1/1     Running   0          7m50s
flagger-grafana-77b8c8df65-7vv89        1/1     Running   0          71s
...
为网格创建一个ingress网关:
[root@m1 ~]# kubectl apply -f - <<EOFapiVersion: networking.istio.io/v1alpha3kind: Gatewaymetadata:
  name: public-gateway
  namespace: istio-systemspec:
  selector:
    istio: ingressgateway
  servers:
    - port:
        number: 80
        name: http
        protocol: HTTP
      hosts:
        - "*"EOF
另外,我们还可以部署一个负载测试工具,当然这也是可选的:
[root@m1 ~]# kubectl create ns testnamespace/test created
[root@m1 ~]# kubectl apply -k https://github.com/fluxcd/flagger/tree/main/kustomize/tester[root@m1 ~]# kubectl get pods -n testNAME                                  READY   STATUS    RESTARTS   AGE
flagger-loadtester-64695f854f-5hsmg   1/1     Running   0          114s
[root@m1 ~]#
如果上面这种方式比较慢的话也可以将仓库克隆下来,然后对 tester 进行部署:
[root@m1 ~]# cd /usr/local/src[root@m1 /usr/local/src]# git clone https://github.com/fluxcd/flagger.git[root@m1 /usr/local/src]# kubectl apply -k flagger/kustomize/tester/
灰度发布配置
为 httpbin 服务配置HAP,让它可以支持动态伸缩,这也是可选的,但通常建议将HAP配置上:
[root@m1 ~]# kubectl apply -n demo -f - <<EOFapiVersion: autoscaling/v2beta1kind: HorizontalPodAutoscalermetadata:
  name: httpbinspec:
  scaleTargetRef:
    apiVersion: apps/v1
    kind: Deployment
    name: httpbin
  minReplicas: 2
  maxReplicas: 4
  metrics:
  - type: Resource
    resource:
      name: cpu      # scale up if usage is above
      # 99% of the requested CPU (100m)
      targetAverageUtilization: 99
EOF
创建用于验证灰度发布的 metric ,falgger会根据该指标逐渐迁移流量:
[root@m1 ~]# kubectl apply -f - <<EOFapiVersion: flagger.app/v1beta1kind: MetricTemplatemetadata:
  name: latency
  namespace: istio-systemspec:
  provider:
    type: prometheus
    address: http://prometheus.istio-system:9090
  query: |
    histogram_quantile(
        0.99,
        sum(
            rate(
                istio_request_duration_milliseconds_bucket{
                    reporter="destination",
                    destination_workload_namespace="{{ namespace }}",
                    destination_workload=~"{{ target }}"
                }[{{ interval }}]
            )
        ) by (le)
    )
EOF
创建 flagger 的 canary,具体的配置内容如下,灰度发布的相关配置信息都定义在这里:
apiVersion: flagger.app/v1beta1
kind: Canary
metadata:
  name: httpbin
  namespace: demo
spec:
  # deployment reference
  targetRef:
    apiVersion: apps/v1
    kind: Deployment
    name: httpbin
  # the maximum time in seconds for the canary deployment
  # to make progress before it is rollback (default 600s)
  progressDeadlineSeconds: 60
  # HPA reference (optional)
  autoscalerRef:
    apiVersion: autoscaling/v2beta1
    kind: HorizontalPodAutoscaler
    name: httpbin
  service:
    # service port number
    port: 8000
    # container port number or name (optional)
    targetPort: 80
    # Istio gateways (optional)
    gateways:
    - public-gateway.istio-system.svc.cluster.local
  analysis:
    # schedule interval (default 60s)
    interval: 30s
    # max number of failed metric checks before rollback
    threshold: 5
    # max traffic percentage routed to canary
    # percentage (0-100)
    maxWeight: 100
    # canary increment step
    # percentage (0-100)
    stepWeight: 20
    metrics:
    - name: request-success-rate
      # minimum req success rate (non 5xx responses)
      # percentage (0-100)
      thresholdRange:
        min: 99
      interval: 1m
    - name: latency
      templateRef:
        name: latency
        namespace: istio-system
      # maximum req duration P99
      # milliseconds
      thresholdRange:
        max: 500
      interval: 30s
    # testing (optional)
    webhooks:
      - name: load-test
        url: http://flagger-loadtester.test/
        timeout: 5s
        metadata:
          cmd: "hey -z 1m -q 10 -c 2 http://httpbin-canary.demo:8000/headers"
创建了 Canary 后,会发现它在集群中自动为 httpbin 创建了一些带 primary 命名的资源,还会创建一个Virtual Service,其路由规则指向 httpbin-primary 和 httpbin-canary 服务:
[root@m1 ~]# kubectl get pods -n demoNAME                             READY   STATUS    RESTARTS   AGE
httpbin-74fb669cc6-6ztkg         2/2     Running   0          50s
httpbin-74fb669cc6-vfs4h         2/2     Running   0          38s
httpbin-primary-9cb49747-94s4z   2/2     Running   0          3m3s
httpbin-primary-9cb49747-xhpcg   2/2     Running   0          3m3s
sleep-854565cb79-mcmnb           2/2     Running   0          94m
[root@m1 ~]# kubectl get svc -n demoNAME              TYPE        CLUSTER-IP      EXTERNAL-IP   PORT(S)    AGE
httpbin           ClusterIP   10.105.17.57    <none>        8000/TCP   86m
httpbin-canary    ClusterIP   10.99.206.196   <none>        8000/TCP   3m14s
httpbin-primary   ClusterIP   10.98.196.235   <none>        8000/TCP   3m14s
sleep             ClusterIP   10.103.14.114   <none>        80/TCP     95m
[root@m1 ~]# kubectl get vs -n demoNAME      GATEWAYS                                            HOSTS         AGE
httpbin   ["public-gateway.istio-system.svc.cluster.local"]   ["httpbin"]   3m29s
[root@m1 ~]#
然后我们使用如下命令触发灰度:
[root@m1 ~]# kubectl -n demo set image deployment/httpbin httpbin=httpbin-v2deployment.apps/httpbin image updated
[root@m1 ~]#
Tips:dep、configmap、secret 都会触发
查看 canary 的事件,可以看到已经检测到新版本了:
[root@m1 ~]# kubectl describe canary httpbin -n demo...
Events:
  Type     Reason  Age                  From     Message
  ----     ------  ----                 ----     -------
  ...
  Normal   Synced  2m57s                flagger  New revision detected! Scaling up httpbin.demo
  Warning  Synced  27s (x5 over 2m27s)  flagger  canary deployment httpbin.demo not ready: waiting for rollout to finish: 1 out of 2 new replicas have been updated
此时查看 httpbin 的Virtual Service,会发现已经将20%的流量切换到灰度发布版本了:
[root@m1 ~]# kubectl describe vs httpbin -n demo...
Spec:
  Gateways:
    public-gateway.istio-system.svc.cluster.local
  Hosts:
    httpbin
  Http:
    Route:
      Destination:
        Host:  httpbin-primary
      Weight:  80
      Destination:
        Host:  httpbin-canary
      Weight:  20
Events:        <none>
然后进入 sleep 服务中,使用脚本循环访问 httpbin 服务:
[root@m1 ~]# kubectl exec -it -n demo sleep-854565cb79-mcmnb -c sleep -- sh/ # while [ 1 ]; do curl http://httpbin.demo:8000/headers;sleep 2s; done
再次查看 httpbin 的Virtual Service,会发现已经将60%的流量切换到灰度发布版本了:
[root@m1 ~]# kubectl describe vs httpbin -n demo...
Spec:
  Gateways:
    public-gateway.istio-system.svc.cluster.local
  Hosts:
    httpbin
  Http:
    Route:
      Destination:
        Host:  httpbin-primary
      Weight:  40
      Destination:
        Host:  httpbin-canary
      Weight:  60
Events:        <none>
我们可以打开flagger的Grafana:
[root@m1 ~]# kubectl -n istio-system port-forward svc/flagger-grafana 3000:80 --address 192.168.243.138Forwarding from 192.168.243.138:3000 -> 3000
内置了如下dashboard:
在 Istio Canary Dashboard 可以查看发布过程: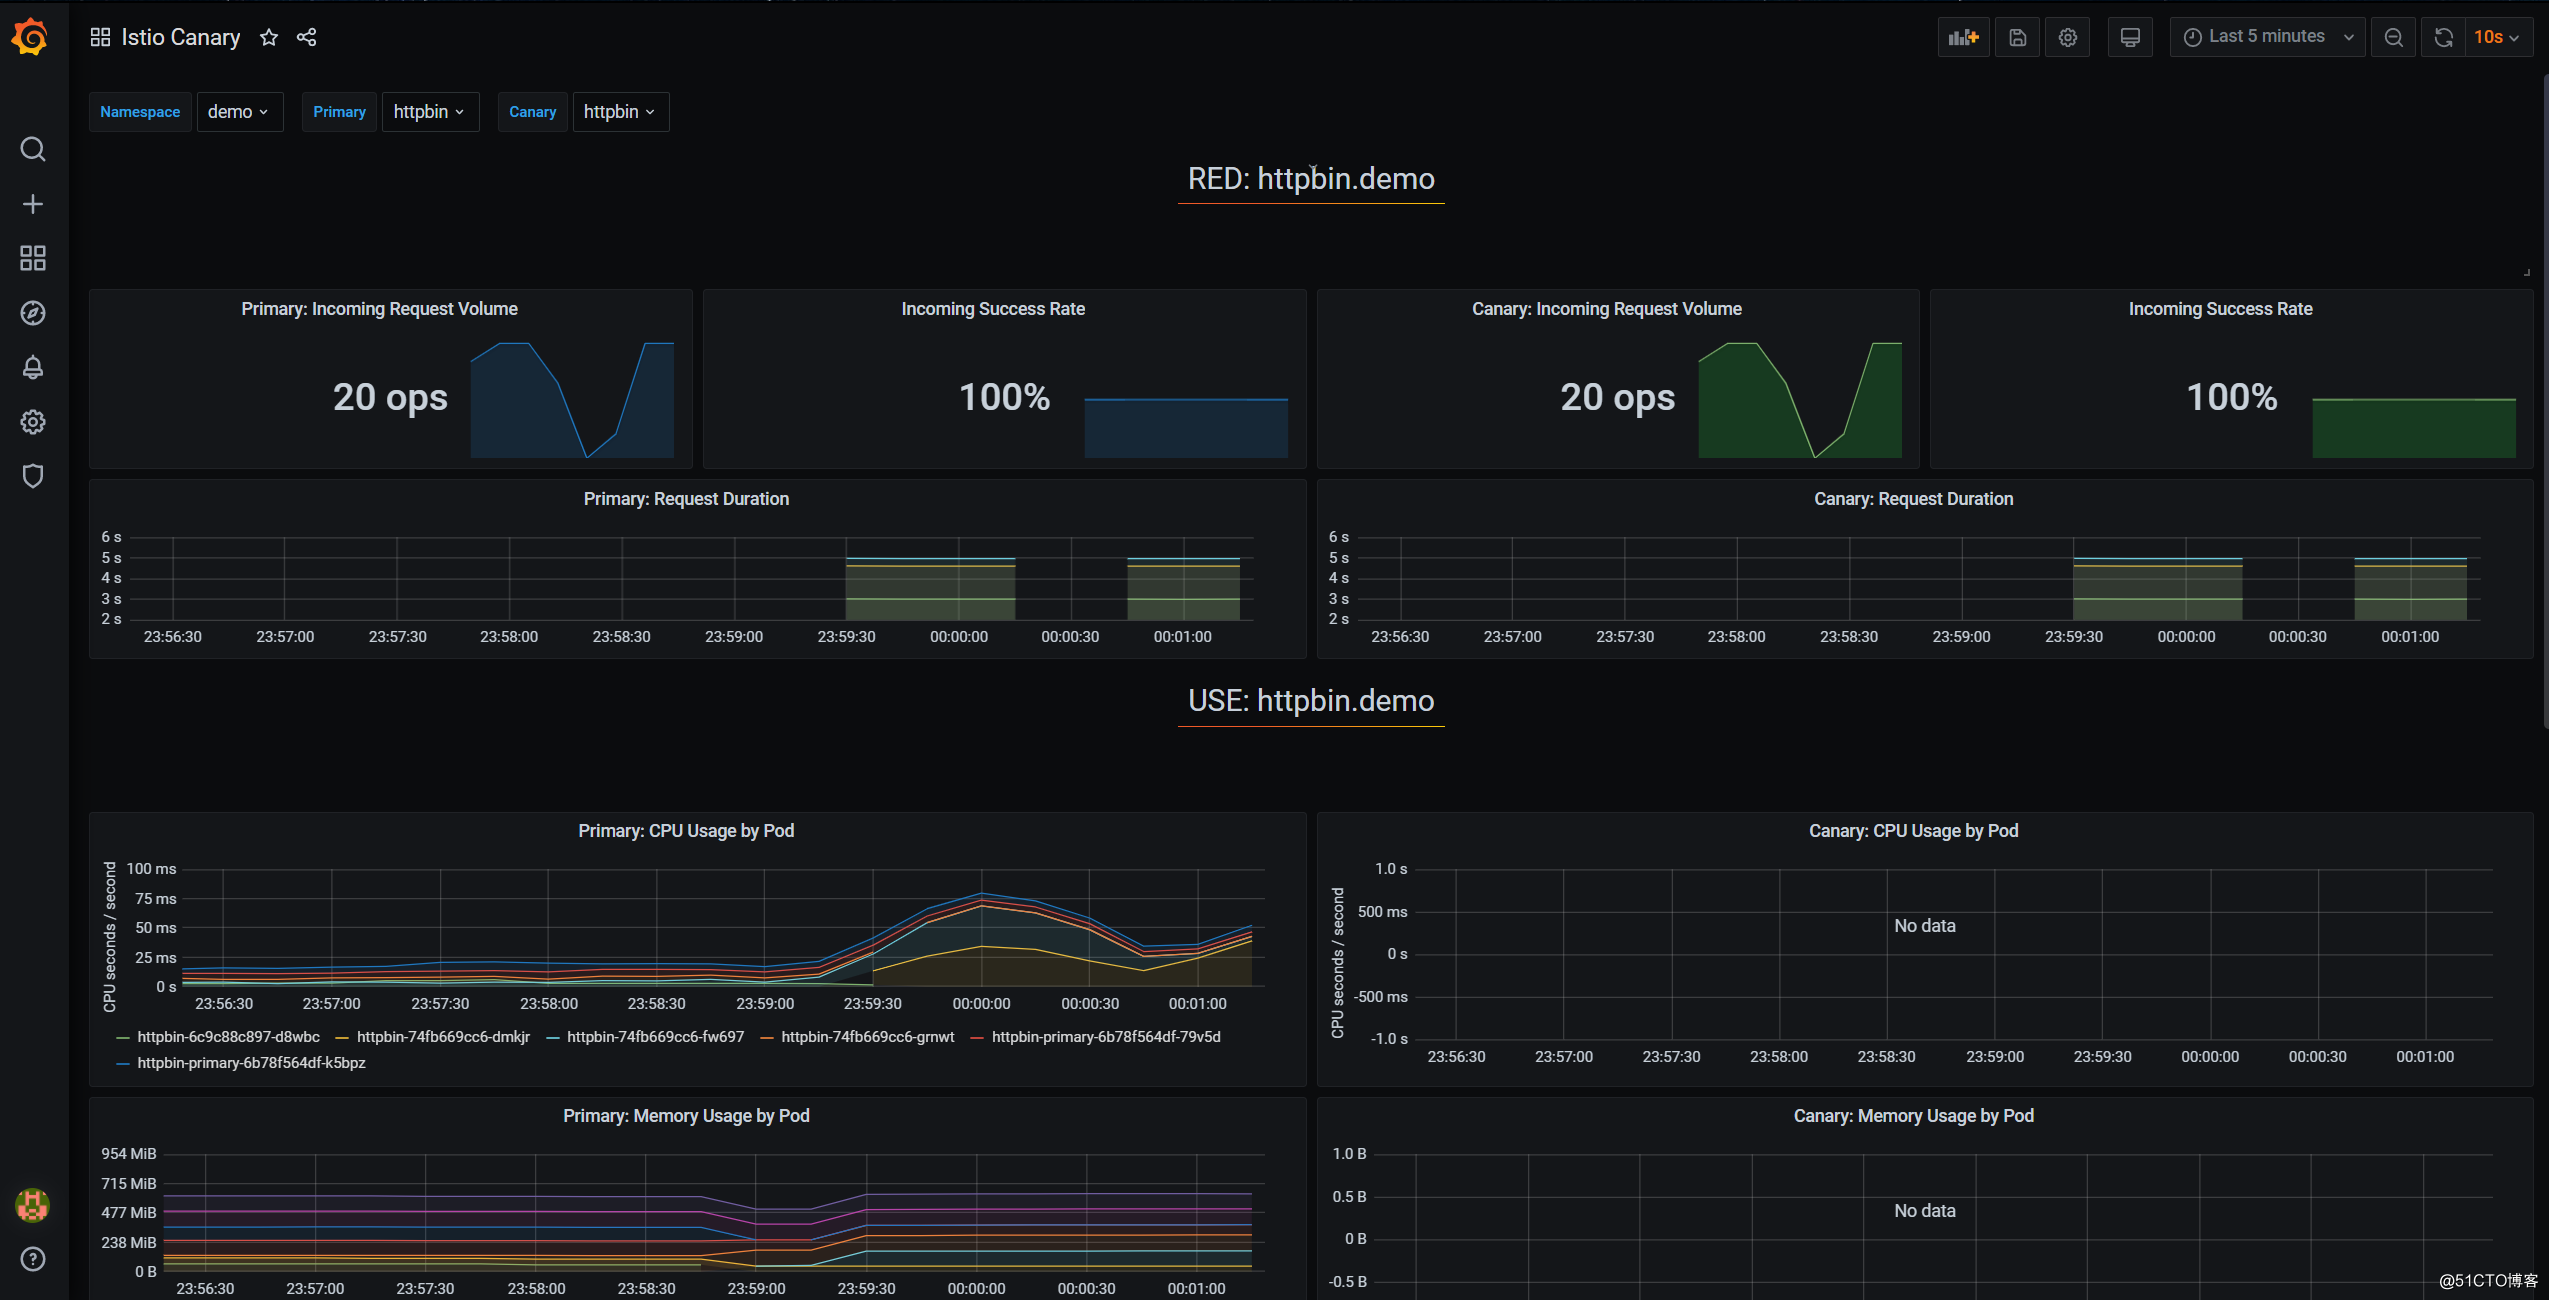
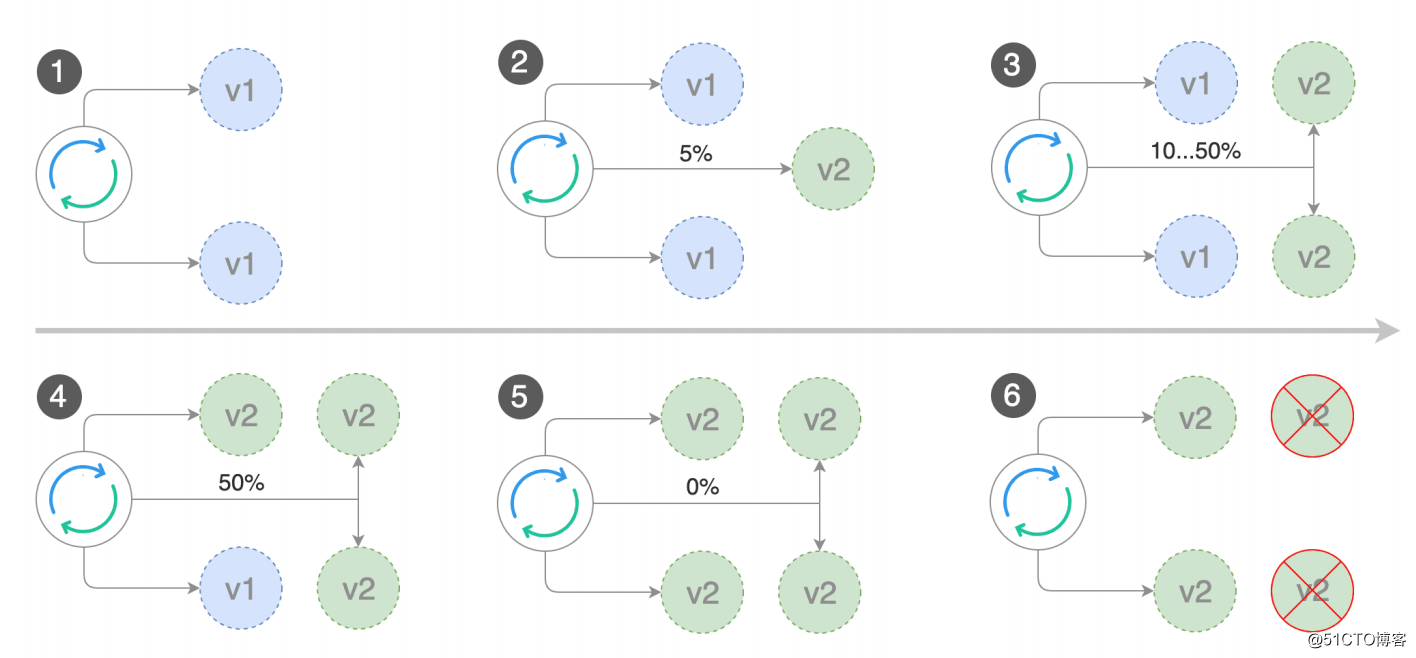
最终将100%的流量切换到灰度发布版本代表发布完成:
[root@m1 ~]# kubectl describe vs httpbin -n demo...
Spec:
  Gateways:
    public-gateway.istio-system.svc.cluster.local
  Hosts:
    httpbin
  Http:
    Route:
      Destination:
        Host:  httpbin-primary
      Weight:  0
      Destination:
        Host:  httpbin-canary
      Weight:  100
Events:        <none>
从 canary httpbin 的事件日志中也可以看到流量迁移的过程:
[root@m1 ~]# kubectl describe canary httpbin -n demo
  ...
  Normal   Synced  3m44s (x2 over 18m)  flagger  New revision detected! Restarting analysis for httpbin.demo
  Normal   Synced  3m14s (x2 over 18m)  flagger  Starting canary analysis for httpbin.demo
  Normal   Synced  3m14s (x2 over 18m)  flagger  Advance httpbin.demo canary weight 20
  Warning  Synced  2m44s (x2 over 17m)  flagger  Halt advancement no values found for istio metric request-success-rate probably httpbin.demo is not receiving traffic: running query failed: no values found
  Normal   Synced  2m14s                flagger  Advance httpbin.demo canary weight 40
  Normal   Synced  104s                 flagger  Advance httpbin.demo canary weight 60
  Normal   Synced  74s                  flagger  Advance httpbin.demo canary weight 80
  Normal   Synced  44s                  flagger  Advance httpbin.demo canary weight 100
当发布完成后,canary httpbin 的状态就会变更为 Succeeded :
[root@m1 ~]# kubectl get canary -n demoNAME      STATUS        WEIGHT   LASTTRANSITIONTIME
httpbin   Succeeded   0        2020-12-23T16:03:04Z
[root@m1 ~]#
提升系统的弹性能力
弹性设计目前在很多领域都很流行,例如环境景观设计中的弹性是指具有一定的灾后恢复能力,但灾难发生之后景观可以快速地恢复它的结构和功能。在产品设计中,一般弹性是指对产品形态特征等设计时,留有一定的余地,方便修改。
分布式系统中的弹性一般是指让系统具有一定的容错能力和应对能力,在故障发生时能够快速恢复,能够应对故障。本小节我们就来为之前部署的示例应用增加一些弹性能力。
系统可用性度量
我们先来了解一个概念:服务级别协议(SLA – Service Level Agreement)。服务级别协议是指提供服务的企业与客户之间就服务的品质、水准、性能等方面所达成的双方共同认可的协议或契约。 例如通常一个服务的提供商都会跟客户保证自己的服务具有什么级别的可用性,也就是我们平时说的几个9的可用性级别。
系统的可用性计算公式:
常见的可用性级别如下: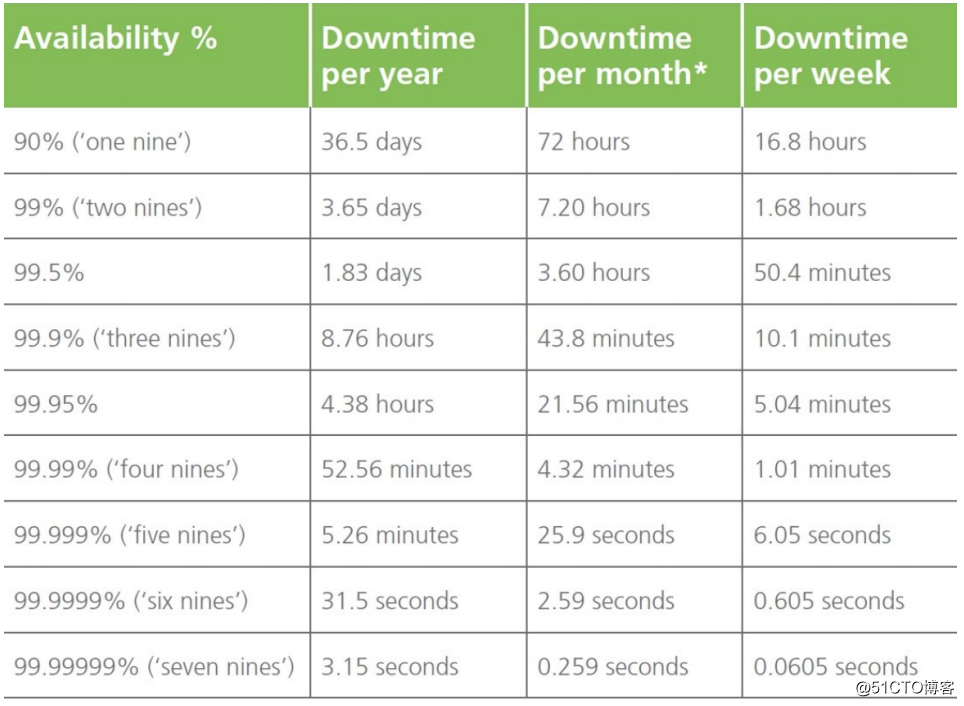
弹性设计
应对故障的一种方法,就是让系统具有容错和适应能力
防止故障(Fault)转化为失败(Failure)
主要包括:
容错性:重试、幂等
伸缩性:自动水平扩展(autoscaling)
过载保护:超时、熔断、降级、限流
弹性测试:故障注入
Istio 所提供的弹性能力:
超时
重试
熔断
故障注入
为 demo 应用提供弹性能力
首先,我们为 demo 应用创建一个Virtual Service:
[root@m1 ~]# kubectl apply -f - <<EOFapiVersion: networking.istio.io/v1alpha3kind: VirtualServicemetadata:
  name: httpbin
  namespace: demospec:
  hosts:
  - "*"
  gateways:
  - httpbin-gateway
  http:
  - route:
    - destination:
        host: httpbin
        port:
          number: 8000
EOF
添加第一个弹性能力:配置超时,配置如下所示:
[root@m1 ~]# kubectl apply -f - <<EOFapiVersion: networking.istio.io/v1alpha3kind: VirtualServicemetadata:
  name: httpbin
  namespace: demospec:
  hosts:
  - "*"
  gateways:
  - httpbin-gateway
  http:
  - route:
    - destination:
        host: httpbin
        port:
          number: 8000
    timeout: 1s  # 配置超时EOF
超时配置规则:
timeout & retries.perTryTimout 同时存在时
超时生效 =
min (timeout, retry.perTryTimout * retry.attempts)
在超时的基础上,我们还可以配置重试策略:
apiVersion: networking.istio.io/v1alpha3
kind: VirtualService
metadata:
  name: httpbin
  namespace: demo
spec:
  hosts:
  - "*"
  gateways:
  - httpbin-gateway
  http:
  - route:
    - destination:
        host: httpbin
        port:
          number: 8000
    retry:  # 配置重试策略
      attempts: 3
      perTryTimeout: 1s
    timeout: 8s
重试配置项: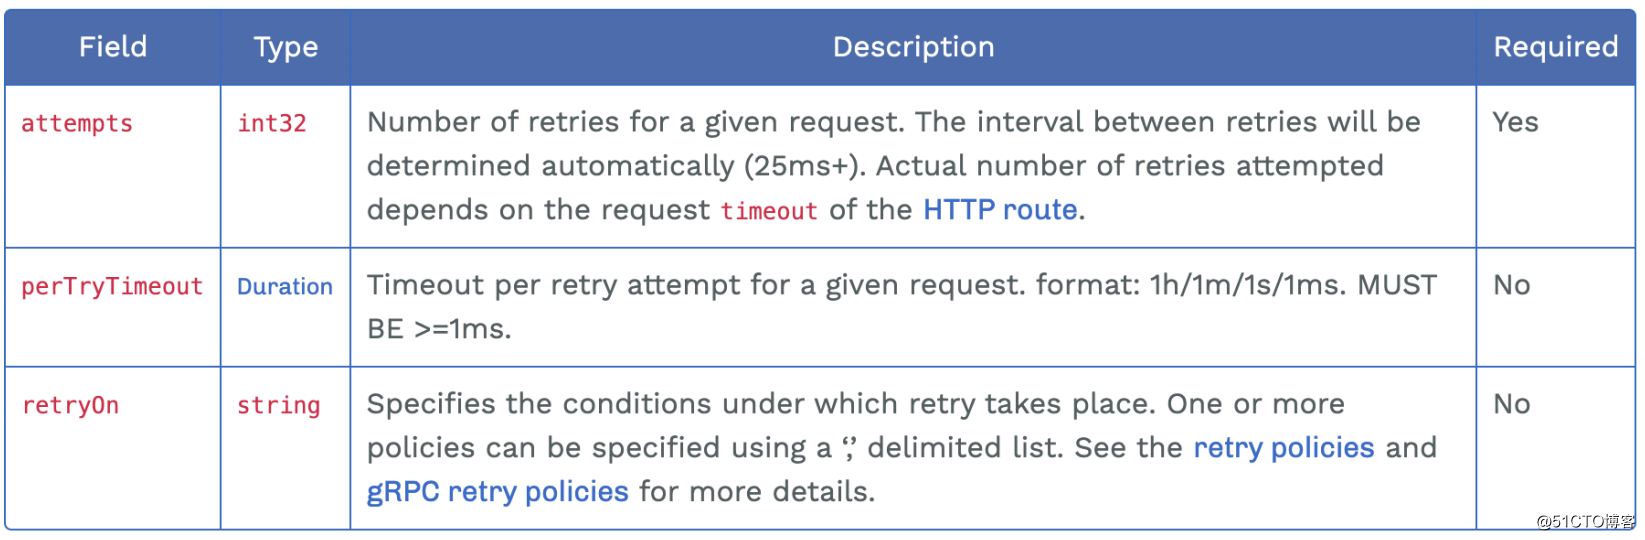
x-envoy-retry-on:5xx, gateway-error, reset, connect-failure…x-envoy-retry-grpc-on:cancelled, deadline-exceeded, internal, unavailable…
配置熔断:
apiVersion: networking.istio.io/v1alpha3
kind: DestinationRule
metadata:
  name: httpbin
  namespace: demo
spec:
  host: httpbin
  trafficPolicy:
    connectionPool:
      tcp:
        maxConnections: 1
      http:
        http1MaxPendingRequests: 1
        maxRequestsPerConnection: 1
      outlierDetection:
        consecutiveErrors: 1
        interval: 1s
        baseEjectionTime: 3m
        maxEjectionPercent: 100
熔断配置:
TCP 和 HTTP 连接池大小为 1
只容许出错 1 次
每秒 1 次请求计数
可以从负载池中移除全部 pod
发生故障的 pod 移除 3m 之后才能再次加入
配置安全策略
Istio 的安全解决方案
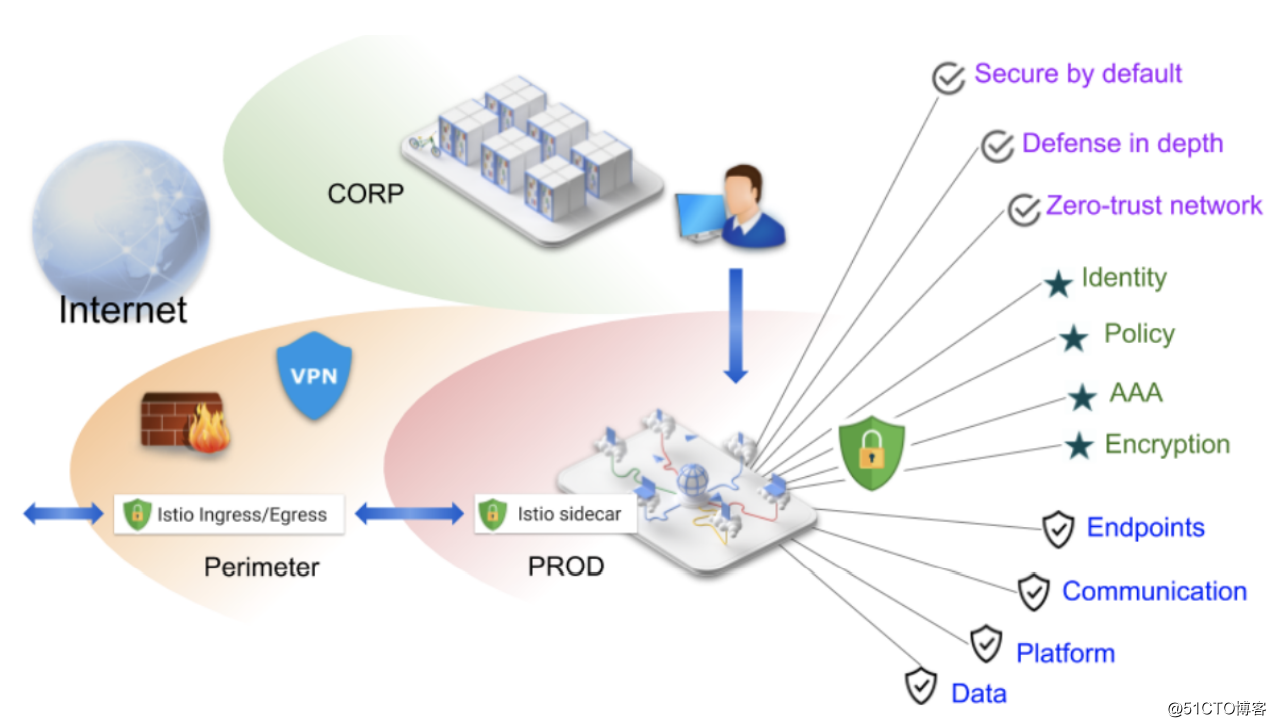
Istio 安全架构

实战
对特定的服务(httpbin)创建授权,注意没有配置rule,表示deny当前服务:
[root@m1 ~]# kubectl apply -f - <<EOFapiVersion: security.istio.io/v1beta1kind: AuthorizationPolicymetadata:
  name: httpbin
  namespace: demospec:
  selector:
    matchLabels:
      app: httpbin
EOF
以上配置的意思就是对于这个服务完全不可访问,我们可以测试一下:
# 请求被拒绝$ kubectl exec -it -n demo ${sleep_pod_name} -c sleep -- curl "http://httpbin.demo:8000/get"RBAC: access denied # 响应# 其他版本可以正常访问$ kubectl exec -it -n demo ${sleep_pod_name} -c sleep -- curl "http://httpbin-v2.demo:8000/get"我们可以通过如下配置对请求来源进行限定,例如请求来源必须是 demo 这个命名空间:
[root@m1 ~]# kubectl apply -f - <<EOFapiVersion: security.istio.io/v1beta1
kind: AuthorizationPolicy
metadata:
 name: httpbin
 namespace: demo
spec:
 action: ALLOW
 rules:
 - from:
   - source:
       principals: ["cluster.local/ns/demo/sa/sleep"]
   - source:
       namespaces: ["demo"]
EOF
测试:
# 请求通过$ kubectl exec -it -n demo ${sleep_pod_name} -c sleep -- curl "http://httpbin.demo:8000/get"# 请求被拒绝$ kubectl exec -it -n ${other_namespace} ${sleep_pod_name} -c sleep -- curl "http://httpbin.demo:8000/get"# 修改service account为${other_namespace}后,通过除了限定请求来源外,还可以限定只有特定的接口允许被访问:
[root@m1 ~]# kubectl apply -f - <<EOFapiVersion: security.istio.io/v1beta1kind: AuthorizationPolicymetadata:
 name: httpbin
 namespace: demospec:
 action: ALLOW
 rules:
 - from:
   - source:
       principals: ["cluster.local/ns/demo/sa/sleep"]
   - source:
       namespaces: ["demo"]
   to:
   - operation:
       methods: ["GET"]
       paths: ["/get"]
EOF
测试:
# 请求通过$ kubectl exec -it -n demo ${sleep_pod_name} -c sleep -- curl "http://httpbin.demo:8000/get"# 请求被拒绝$ kubectl exec -it -n demo ${sleep_pod_name} -c sleep -- curl "http://httpbin.demo:8000/ip"还可以配置其他特定条件,例如限定请求头,通常用于我们需要客户端携带特定的请求头才允许访问接口的场景:
[root@m1 ~]# kubectl apply -f - <<EOFapiVersion: security.istio.io/v1beta1kind: AuthorizationPolicymetadata:
 name: httpbin
 namespace: demospec:
 action: ALLOW
 rules:
 - from:
   - source:
       principals: ["cluster.local/ns/demo/sa/sleep"]
   - source:
       namespaces: ["demo"]
   to:
   - operation:
       methods: ["GET"]
       paths: ["/get"]
   when:
   - key: request.headers[x-rfma-token]
     values: ["test*"]
EOF
测试:
# 请求不通过$ kubectl exec -it -n demo ${sleep_pod_name} -c sleep -- curl "http://httpbin.demo:8000/get"# 加token后通过$ kubectl exec -it -n demo ${sleep_pod_name} -c sleep -- curl "http://httpbin.demo:8000/get" -H x-rfma-token:test1©著作权归作者所有:来自51CTO博客作者ZeroOne01的原创作品,如需转载,请注明出处,否则将追究法律责任