
Easycode自动化springboot的curd
这篇文章主要介绍了Easycode自动化springboot的curd,围绕主题的相关资料展开详细内容,具有一定的参考价值,西药的小伙伴可以参考一下,洗碗给对你有所帮助

只需要输入密码 测试即可:

显示成功 个人连接时遇到问题有
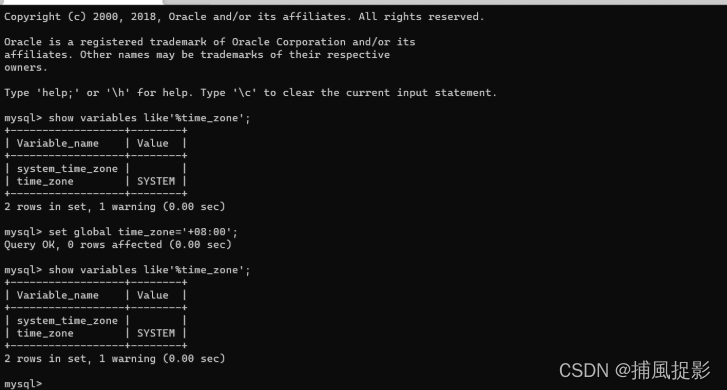
显示时区问题
数据显示不全 所有数据表都会展示到idea中


中间 path 选择代码生成的位置 店家choose进行选择 选择java包下的路径

代码生成后 需要做的调整
pom.xml
1 2 3 4 5 6 7 8 9 10 11 12 13 14 15 16 17 18 19 20 21 22 23 24 25 26 27 28 29 30 31 32 33 34 35 36 37 38 39 40 41 42 43 44 45 46 47 48 49 50 51 52 | <dependencies> <dependency> <groupId>org.springframework.boot</groupId> <artifactId>spring-boot-starter-web</artifactId> </dependency> <dependency> <groupId>org.mybatis.spring.boot</groupId> <artifactId>mybatis-spring-boot-starter</artifactId> <version>2.2.1</version> </dependency> <!-- 测试依赖--> <dependency> <groupId>junit</groupId> <artifactId>junit</artifactId> <version>4.13</version> <scope>test</scope> </dependency> <!-- springboot 分页插件 --> <dependency> <groupId>com.github.pagehelper</groupId> <artifactId>pagehelper-spring-boot-starter</artifactId> <version>1.2.13</version> </dependency> <!-- mysql 驱动 --> <dependency> <groupId>mysql</groupId> <artifactId>mysql-connector-java</artifactId> <version>8.0.25</version> </dependency> <!-- c3p0 数据源 --> <dependency> <groupId>com.mchange</groupId> <artifactId>c3p0</artifactId> <version>0.9.5.5</version> </dependency> <!--StringUtils--> <dependency> <groupId>org.apache.commons</groupId> <artifactId>commons-lang3</artifactId> </dependency> <dependency> <groupId>org.springframework.boot</groupId> <artifactId>spring-boot-devtools</artifactId> <!--当前这个项目被继承之后,这个不向下传递--> <optional>true</optional> </dependency> <dependency> <groupId>org.springframework.data</groupId> <artifactId>spring-data-commons</artifactId> <version>2.2.3.RELEASE</version> </dependency> </dependencies> |
Application.yml
1 2 3 4 5 6 7 8 9 10 11 12 13 14 15 16 17 18 19 20 21 22 23 24 25 26 27 28 29 30 31 32 33 34 35 36 37 38 39 40 41 42 43 44 45 46 | ## 数据源配置spring: ## 热部署配置 devtools: restart: enabled: true # 设置重启的目录,添加目录的文件需要restart additional-paths: src/main/java # 解决项目自动重新编译后接口报404的问题 poll-interval: 3000 quiet-period: 1000 datasource: type: com.mchange.v2.c3p0.ComboPooledDataSource driver-class-name: com.mysql.cj.jdbc.Driver url: jdbc:mysql://127.0.0.1:3306/springboot_mybatis?useUnicode=true&characterEncoding=utf8&useSSL=false&serverTimezone=GMT%2B8 username: root password: 123456 ##视图的配置 freemarker: template-loader-path: classpath*:/views/ charset: UTF-8 content-type: text/html cache: false suffix: .ftl## mybatis 配置mybatis: #映射文件的存放路径 mapper-locations: classpath*:/mapper/*.xml type-aliases-package: com.liuyang.bean,com.liuyang.vo,com.liuyang.query configuration: ## 下划线转驼峰配置 map-underscore-to-camel-case: true## pageHelperpagehelper: helper-dialect: mysql## 显示dao 执行sql语句logging: level: com: xxxx: mapper: debug在dao层加上@mapper注解 |
在启动类上加上 @MapperScan(“com.liuyang.dao”)

启动测试
添加操作

查询

还可以修改生成的模板

默认是 mybatis
到此这篇关于Easycode自动化springboot的curd的文章就介绍到这了
原文链接:https://blog.csdn.net/qq_44833327/article/details/122601098