
opencv+python识别七段数码显示器的数字(数字识别)
本文主要介绍了opencv+python识别七段数码显示器的数字(数字识别),文中通过示例代码介绍的非常详细,具有一定的参考价值,感兴趣的小伙伴们可以参考一下
目录
一、什么是七段数码显示器
二、创建opencv数字识别器
一、什么是七段数码显示器
七段LCD数码显示器有很多叫法:段码液晶屏、段式液晶屏、黑白笔段屏、段码LCD液晶屏、段式显示器、TN液晶屏、段码液晶显示器、段码屏幕、笔段式液晶屏、段码液晶显示屏、段式LCD、笔段式LCD等。
如下图,每个数字都由一个七段组件组成。

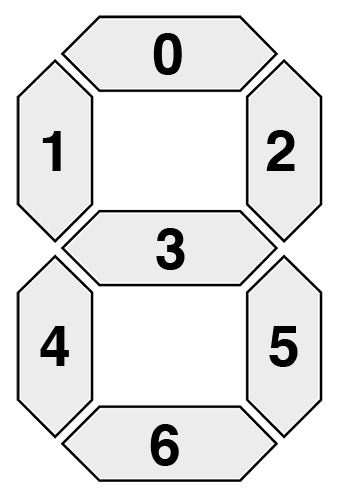
七段显示器总共可以呈现 128 种可能的状态:

我们要识别其中的0-9,如果用深度学习的方式有点小题大做,并且如果要进行应用还有很多前序工作需要进行,比如要确认识别什么设备的,怎么找到数字区域并进行分割等等。

二、创建opencv数字识别器
我们这里进行使用空调恒温器进行识别,首先整理下流程。
1、定位恒温器上的 LCD屏幕。
2、提取 LCD的图像。
3、提取数字区域
4、识别数字。
我们创建名称为recognize_digits.py的文件,代码如下。仅思路供参考(因为代码中的一些参数只适合测试图片)
1 2 3 4 5 6 7 8 9 10 11 12 13 14 15 16 17 18 19 20 21 22 23 24 25 26 27 28 29 30 31 32 33 34 35 36 37 38 39 40 41 42 43 44 45 46 47 48 49 50 51 52 53 54 55 56 57 58 59 60 61 62 63 64 65 66 67 68 69 70 71 72 73 74 75 76 77 78 79 80 81 82 83 84 85 86 87 88 89 90 91 92 93 94 95 96 97 98 99 100 101 102 103 104 105 106 107 108 109 110 111 112 113 114 115 116 117 118 119 120 121 122 | # import the necessary packagesfrom imutils.perspective import four_point_transformfrom imutils import contoursimport imutilsimport cv2# define the dictionary of digit segments so we can identify# each digit on the thermostat DIGITS_LOOKUP = { (1, 1, 1, 0, 1, 1, 1): 0, (0, 0, 1, 0, 0, 1, 0): 1, (1, 0, 1, 1, 1, 1, 0): 2, (1, 0, 1, 1, 0, 1, 1): 3, (0, 1, 1, 1, 0, 1, 0): 4, (1, 1, 0, 1, 0, 1, 1): 5, (1, 1, 0, 1, 1, 1, 1): 6, (1, 0, 1, 0, 0, 1, 0): 7, (1, 1, 1, 1, 1, 1, 1): 8, (1, 1, 1, 1, 0, 1, 1): 9} # load the example imageimage = cv2.imread("example.jpg")## pre-process the image by resizing it, converting it to# graycale, blurring it, and computing an edge mapimage = imutils.resize(image, height=500)gray = cv2.cvtColor(image, cv2.COLOR_BGR2GRAY)blurred = cv2.GaussianBlur(gray, (5, 5), 0)edged = cv2.Canny(blurred, 50, 200, 255) # find contours in the edge map, then sort them by their# size in descending ordercnts = cv2.findContours(edged.copy(), cv2.RETR_EXTERNAL, cv2.CHAIN_APPROX_SIMPLE)cnts = imutils.grab_contours(cnts)cnts = sorted(cnts, key=cv2.contourArea, reverse=True)displayCnt = None# loop over the contoursfor c in cnts: # approximate the contour peri = cv2.arcLength(c, True) approx = cv2.approxPolyDP(c, 0.02 * peri, True) # if the contour has four vertices, then we have found # the thermostat display if len(approx) == 4: displayCnt = approx break # extract the thermostat display, apply a perspective transform# to itwarped = four_point_transform(gray, displayCnt.reshape(4, 2))output = four_point_transform(image, displayCnt.reshape(4, 2)) # threshold the warped image, then apply a series of morphological# operations to cleanup the thresholded imagethresh = cv2.threshold(warped, 0, 255, cv2.THRESH_BINARY_INV | cv2.THRESH_OTSU)[1]kernel = cv2.getStructuringElement(cv2.MORPH_ELLIPSE, (1, 5))thresh = cv2.morphologyEx(thresh, cv2.MORPH_OPEN, kernel) # find contours in the thresholded image, then initialize the# digit contours listscnts = cv2.findContours(thresh.copy(), cv2.RETR_EXTERNAL, cv2.CHAIN_APPROX_SIMPLE)cnts = imutils.grab_contours(cnts)digitCnts = []# loop over the digit area candidatesfor c in cnts: # compute the bounding box of the contour (x, y, w, h) = cv2.boundingRect(c) # if the contour is sufficiently large, it must be a digit if w >= 15 and (h >= 30 and h <= 40): digitCnts.append(c) # sort the contours from left-to-right, then initialize the# actual digits themselvesdigitCnts = contours.sort_contours(digitCnts, method="left-to-right")[0]digits = [] # loop over each of the digitsfor c in digitCnts: # extract the digit ROI (x, y, w, h) = cv2.boundingRect(c) roi = thresh[y:y + h, x:x + w] # compute the width and height of each of the 7 segments # we are going to examine (roiH, roiW) = roi.shape (dW, dH) = (int(roiW * 0.25), int(roiH * 0.15)) dHC = int(roiH * 0.05) # define the set of 7 segments segments = [ ((0, 0), (w, dH)), # top ((0, 0), (dW, h // 2)), # top-left ((w - dW, 0), (w, h // 2)), # top-right ((0, (h // 2) - dHC) , (w, (h // 2) + dHC)), # center ((0, h // 2), (dW, h)), # bottom-left ((w - dW, h // 2), (w, h)), # bottom-right ((0, h - dH), (w, h)) # bottom ] on = [0] * len(segments) # loop over the segments for (i, ((xA, yA), (xB, yB))) in enumerate(segments): # extract the segment ROI, count the total number of # thresholded pixels in the segment, and then compute # the area of the segment segROI = roi[yA:yB, xA:xB] total = cv2.countNonZero(segROI) area = (xB - xA) * (yB - yA) # if the total number of non-zero pixels is greater than # 50% of the area, mark the segment as "on" if total / float(area) > 0.5: on[i]= 1 # lookup the digit and draw it on the image digit = DIGITS_LOOKUP[tuple(on)] digits.append(digit) cv2.rectangle(output, (x, y), (x + w, y + h), (0, 255, 0), 1) cv2.putText(output, str(digit), (x - 10, y - 10), cv2.FONT_HERSHEY_SIMPLEX, 0.65, (0, 255, 0), 2) # display the digitsprint(u"{}{}.{} \u00b0C".format(*digits))cv2.imshow("Input", image)cv2.imshow("Output", output)cv2.waitKey(0) |

原始图片

边缘检测

识别的结果图片
到此这篇关于opencv+python识别七段数码显示器的数字(数字识别)的文章就介绍到这了
原文链接:https://blog.csdn.net/bashendixie5/article/details/122361536