
Pygame库200行代码实现简易飞机大战
本文主要介绍了Pygame库200行代码实现简易飞机大战,文中通过示例代码介绍的非常详细,具有一定的参考价值,感兴趣的小伙伴们可以参考一下
写在开头,因为这个小游戏的实验主要是帮助我熟悉pygame库的使用,所以游戏的一些地方可能存在不完善处,还望包涵。

安装使用库
pygame简介
pygame是跨平台python模块,专为电子游戏设计,包括图像、声音。建立在SDL基础上,允许实时电子游戏研发而无需被低级语言束缚, 开发者可以把精力放在游戏的架构上。
pgame中主要模块介绍
(1) pygame
pygame模块会自动导入其它的pygame相关模块。
pygame模块包括surface函数, 可以返回一个新的surface 对象。 init()函数是pygame游戏的核心,必须在进入游戏的主循环之前调用。init()会自动初始化其它所有模块。
(2) pygame.locals
包括在你自己的模块作用域内使用的名字(变量)。包括事件类型、键和视频模式等的名字。
(3) pygame.display
包括处理pygame显示方式的函数。包括普通窗口和全屏模式。 pygame.display中一些常用的方法如下:
flip:更新显示。
update:更新一部分时候使用update。
set_mode:设定显示的类型和尺寸。
set_caption:设定pygame程序的标题。
get_surface:调用flip和blit前返回一个可用于画图的surface对象。
(4) pygame.font
包括font函数,用于表现不同的字体。
(5) pygame.sprite
游戏精灵,Group用做sprite对象的容器。调用group对象的update对象,会自动调用所有sprite对象的update方法。
(6) pygame.mouse
隐藏鼠标光标,获取鼠标位置。
(7) pygame.event
追踪鼠标单击、按键按下和释放等事件。
(8) pygame.image
用于处理保存在GIF、PNG或者JPEG文件内的图像。
注:程序中除了local模块和font模块没有使用,其他模块均有涉及。
pygame的安装
你可以选择使用pycharm中工具栏下方的python packages搜索pygame进行安装,当然也可以使用cmd命令符中常用的pip install pygame 的方法。
安装超时网速慢,直接超时,可以指定国内源镜像。
1 | pip install -i 国内镜像地址 包名 |
例如: pip install -i https://mirrors.aliyun.com/pypi/simple/ numpy
国内常用源镜像地址:
清华:https://pypi.tuna.tsinghua.edu.cn/simple
阿里云:http://mirrors.aliyun.com/pypi/simple/
中国科技大学: https://pypi.mirrors.ustc.edu.cn/simple/
豆瓣:http://pypi.douban.com/simple/
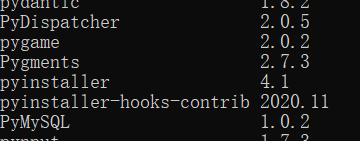
验证安装
验证pygame是否安装成功,在cmd命令符中使用 pip list 语句,如果安装成功,我们可以在下方结果中找到。
程序原理
首先创建游戏的主窗体,主窗体的大小就是你背景图片的大小。
1 2 3 4 5 6 7 8 9 10 11 12 13 14 | import pygame#游戏初始化pygame.init()#创建游戏主窗口screen = pygame.display.set_mode((480,700))#绘制背景图香#1 加载图像数据background = pygame.image.load('./image/background.png')#2 blit绘制图像#从左上角绘制screen.blit(background,(0,0))pygame.display.update()#卸载所有的模块pygame.quit() |
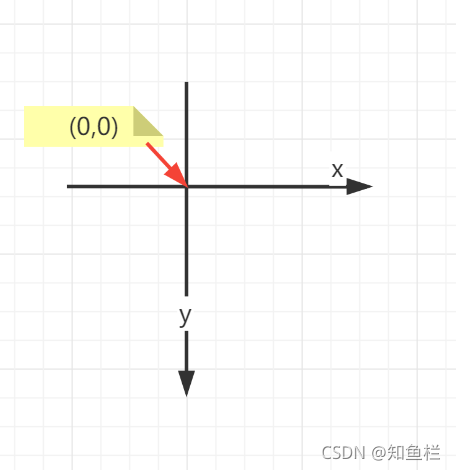
绘制图像时的方向,后面我们主机、敌机、背景、子弹的方向都需要注意这一点。
背景图像绘制完之后就是我们主机、敌机的绘制,我们可以在所有的绘制工作完成后再统一调用update方法
1 2 3 4 | #绘制飞机图片hero = pygame.image.load('./image/hero2.png')screen.blit(hero,(150,300))pygame.display.update() |
其实飞机大战的原理和动画片的原理一致,我们需要对一个个按下的指令进行反应,从而形成一个连贯的画面,这里我们就需要使用到pygame库中的time模块
1 2 3 4 5 6 7 8 9 | #创造时钟对象 屏幕绘制速率clock = pygame.time.Clock()#游戏循环while True: #指定循环体内部代码的执行频率 每秒重复60次 clock.tick(60) #将移动前飞机进行遮挡 达到动画效果 screen.blit(background, (0, 0)) screen.blit(hero,hero_rect) |
如果你想停止程序,发现点击窗体右上角的关闭并无反应,因为你还未在循环体内进行事件监听,然后对时间进行判断
1 2 3 4 5 6 7 8 | event_list = pygame.event.get()for event in event_list: #判断是否为退出事件 if event.type == pygame.QUIT: print("退出游戏...") #卸载所有模块 pygame.quit() exit() |
关于敌机的生成我们需要使用到sprite精灵和精灵组模块,创建两个一样的敌机,但是敌机的飞行速度不一样,然后将敌机精灵添加至敌机精灵组中,然后在循环体中我们不断将敌机精灵组进行绘制即可
1 2 3 4 5 6 7 | enemy = GameSprite("./image/enemy0.png")enemy1 = GameSprite("./image/enemy0.png",2)enemy_group = pygame.sprite.Group(enemy,enemy1)#精灵组调用方法enemy_group.update()enemy_group.draw(screen) |
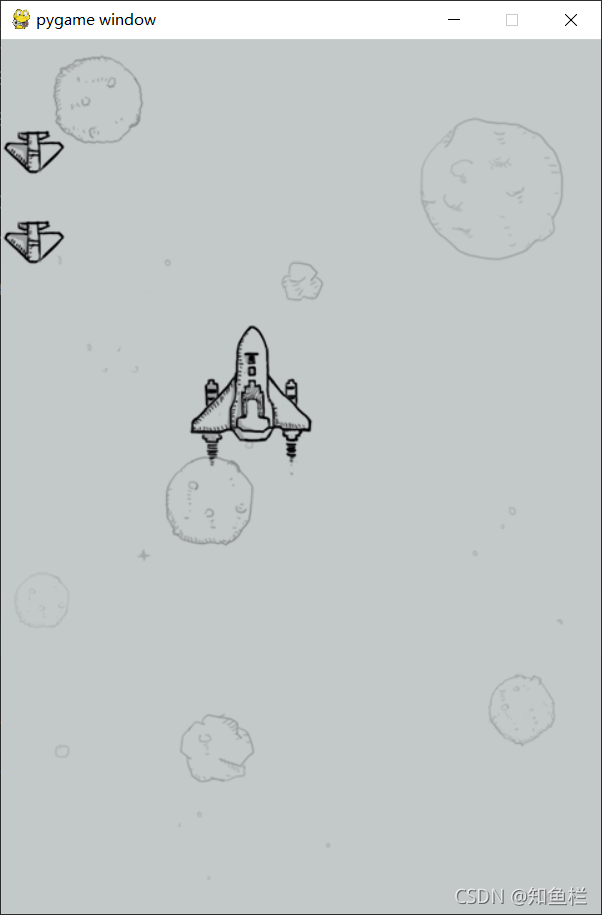
对上述部分代码进行整理简化,最后我们可以得到这样的效果图,主机和敌机都可以移动
1 2 3 4 5 6 7 8 9 10 11 12 13 14 15 16 17 18 19 20 21 22 23 24 25 26 27 28 29 30 31 32 33 34 35 36 37 38 39 40 41 42 43 44 45 46 47 48 49 50 51 52 53 54 55 56 57 58 59 60 61 62 63 64 | import pygamefrom plane_sprites import *#游戏初始化pygame.init()#创建游戏主窗口screen = pygame.display.set_mode((480,700))#绘制背景图香#1 加载图像数据background = pygame.image.load('./image/background.png')#2 blit绘制图像#从左上角绘制screen.blit(background,(0,0))#3 update更新屏幕显示# pygame.display.update()#绘制飞机图片hero = pygame.image.load('./image/hero2.png')screen.blit(hero,(150,300))#可以在所有绘制工作完成后,统一调用update方法pygame.display.update()#创造时钟对象 屏幕绘制速率clock = pygame.time.Clock()#定义飞机初始位置hero_rect = pygame.Rect(150,300,100,122)#敌机精灵创建enemy = GameSprite("./image/enemy0.png")enemy1 = GameSprite("./image/enemy0.png",2)enemy_group = pygame.sprite.Group(enemy,enemy1)#游戏循环while True: #指定循环体内部代码的执行频率 每秒重复60次 clock.tick(60) #监听时间 event_list = pygame.event.get() # if len(event_list)>0: # print(event_list) for event in event_list: #判断是否为退出事件 if event.type == pygame.QUIT: print("退出游戏...") #卸载所有模块 pygame.quit() exit() hero_rect.y -= 1 if hero_rect.y <=0: hero_rect.y = 700 #将移动前飞机进行遮挡 达到动画效果 screen.blit(background, (0, 0)) screen.blit(hero,hero_rect) #精灵组调用方法 enemy_group.update() enemy_group.draw(screen) pygame.display.update() passpygame.quit() |
程序升级
设置飞机大战的精灵类和常量
这里的update方法主要是在为了后面背景类、敌机类和子弹类中达到可以垂直飞行的效果
1 2 3 4 5 6 7 8 9 10 11 12 13 14 15 16 17 18 19 20 | #屏幕大小SCREEN_RECT = pygame.Rect(0,0,480,700)#刷新帧率SCREEN_PER_SEC = 60#创建敌机的定时器常量CREATE_ENEMY_EVENT = pygame.USEREVENT#英雄发射子弹事件HERO_FIRE_EVENT = pygame.USEREVENT + 1class GameSprite(pygame.sprite.Sprite): def __init__(self,image_name,speed=1): #调用父类初始化方法 super().__init__() #定义对象属性 self.image = pygame.image.load(image_name) self.rect = self.image.get_rect() self.speed = speed #更新显示 def update(self): self.rect.y += self.speed |
背景类和敌机类
因为想要背景会随着移动,所以在背景类中的init设置了is_alt参数,用来添加背景到原图像的上方,这样就可以达到背景滚动的效果。
在敌机类中对敌机的位置进行判断,如果敌机超过我们预设屏幕y的方位就会使用kill()方法从精灵组中删除,敌机生成的位置和速度采用了random随机数的randint()方法
1 2 3 4 5 6 7 8 9 10 11 12 13 14 15 16 17 18 19 20 21 22 23 24 25 26 27 28 29 30 31 32 33 34 | class Background(GameSprite): #游戏背景滚动 def __init__(self,is_alt=False): #调用父类中精灵中的创建 image/rect/speed super().__init__("./image/background.png") if is_alt: self.rect.y = -self.rect.height def update(self): super().update() #如果移出屏幕,将图像移到屏幕上访 if self.rect.y >= SCREEN_RECT.height: self.rect.y = -self.rect.heightclass Enemy(GameSprite): #敌机精灵 def __init__(self): #1 调用父类方法 创建敌机精灵 super().__init__("./image/enemy0.png") #2 指定敌机初始随机速度 self.speed = random.randint(1,2) #3 指定敌机初始随机位置 self.rect.bottom = 0 max_x = SCREEN_RECT.width - self.rect.width self.rect.x = random.randint(0,max_x) def update(self): #!调用父类方法 垂直方向飞行 super().update() #2 判断是否飞出屏幕 如果是,需要从精灵组中删除 if self.rect.y >= SCREEN_RECT.height: print("飞出屏幕,需要从精灵组中删除...") #kill方法可以将精灵从精灵族中移出,精灵自动销毁 self.kill() def __del__(self): print("敌机死亡 %s" % self.rect) |
主机类和子弹类
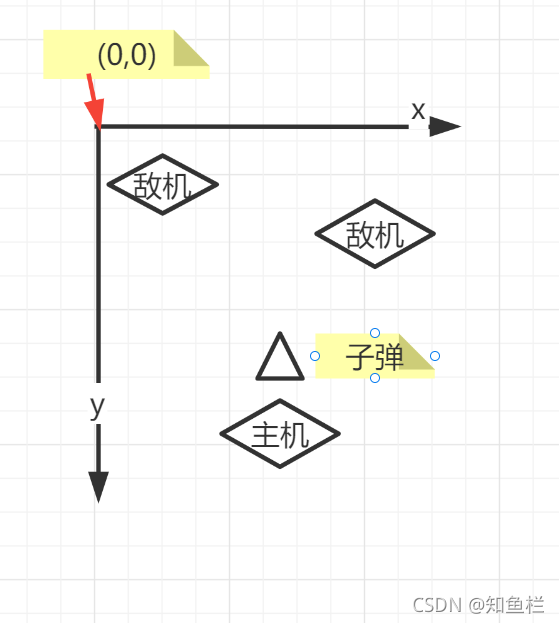
SCREEN_RECT.centerx是用来保证一开始主机初始在屏幕中央部分,关于主机的y因为在一开始画了一张绘制示意图所以这里应该为屏幕的SCREEN_RECT.bottom减去部分距离。
子弹类中和敌机类同理需要判断是否飞出屏幕范围,如果超过使用kill()方法从精灵组中删除,子弹的初始位置应该是主机的上方,既子弹的x等于主机的x
1 2 3 4 5 6 7 8 9 10 11 12 13 14 15 16 17 18 19 20 21 22 23 24 25 26 27 28 29 30 31 32 33 34 35 36 37 38 39 40 41 42 43 44 45 | #主角飞机class Hero(GameSprite): def __init__(self): # 调用父类 设置英雄图像和速度 super().__init__("./image/hero2.png",0) # 设置主机位置 self.rect.centerx = SCREEN_RECT.centerx self.rect.bottom = SCREEN_RECT.bottom - 50 # 子弹精灵组 self.bullet_group = pygame.sprite.Group() def update(self): #水平方向移动 self.rect.x += self.speed #控制英雄不能为0 if self.rect.x < 0: self.rect.x =0 elif self.rect.right > SCREEN_RECT.right: self.rect.right = SCREEN_RECT.right #子弹发射 def fire(self): print("发射子弹...") #创建子弹精灵 bullet = Bullet() #设置子弹位置 bullet.rect.bottom = self.rect.y-20 bullet.rect.centerx = self.rect.centerx #添加到子弹精灵组中 self.bullet_group.add(bullet)#子弹类class Bullet(GameSprite): def __init__(self): #调用父类方法 设置子弹图片速度 super().__init__("./image/bullet1.png",-2) def update(self): #调用父类方法 让子弹垂直飞行 super().update() #判断子弹是否飞出 if self.rect.bottom < 0: self.kill() def __del__(self): print("子弹被销毁") |
主游戏类
在主类中进行精灵组的创建,背景精灵组的创建是为了达到背景滚动的效果
1 2 3 4 5 6 7 8 9 10 11 | #精灵组的创建def __create_sprites(self): #创建背景精灵和精灵1组 bg1 = Background() bg2 = Background(True) self.back_group = pygame.sprite.Group(bg1,bg2) #创建敌机精灵和精灵组 self.enemy_group = pygame.sprite.Group( #创建英雄精灵和精灵组 self.hero = Hero() self.hero_group = pygame.sprite.Group(self.hero) |
游戏的初始化
1 2 3 4 5 6 7 8 9 10 | def __init__(self): print("游戏初始化") #创建游戏窗口 self.screen = pygame.display.set_mode(SCREEN_RECT.size) #创建游戏时钟 self.clock = pygame.time.Clock() self.__create_sprites() #敌机生成和主机开火的定时器 pygame.time.set_timer(CREATE_ENEMY_EVENT,1000)#单位是ms pygame.time.set_timer(HERO_FIRE_EVENT,500) |
事件监听方法
关于事件的监听过程中,需要对敌机生成和子弹飞行、主机移动指令做出对应反应
1 2 3 4 5 6 7 8 9 10 11 12 13 14 15 16 17 18 19 20 21 22 23 | def __event_handler(self): for event in pygame.event.get(): if event.type == pygame.QUIT: PlaneGame.__game_over() elif event.type == CREATE_ENEMY_EVENT: print("敌机生成...") #创建敌机精灵 enemy = Enemy() #敌机精灵加入精灵组 self.enemy_group.add(enemy) elif event.type == HERO_FIRE_EVENT: print("发射子弹...") self.hero.fire() #飞机移动 keyss_pressed = pygame.key.get_pressed() if keyss_pressed[pygame.K_RIGHT]: print("向右移动") self.hero.speed = 2 elif keyss_pressed[pygame.K_LEFT]: print("向左移动") self.hero.speed = -2 else: self.hero.speed = 0 |
碰撞检测
对于子弹碰撞敌机和敌机碰撞主机的情况进行判定
1 2 3 4 5 6 7 8 9 | #碰撞检测def __check_collide(self): #子弹摧毁敌机 pygame.sprite.groupcollide(self.hero.bullet_group,self.enemy_group,True,True) #敌机撞毁英雄 enemies = pygame.sprite.spritecollide(self.hero, self.enemy_group, True) if len(enemies) > 0: self.hero.kill() PlaneGame.__game_over() |
精灵组更新显示
1 2 3 4 5 6 7 8 9 10 11 12 13 14 | #精灵更新显示def __update_sprites(self): #背景精灵组 self.back_group.update() self.back_group.draw(self.screen) #敌机精灵组 self.enemy_group.update() self.enemy_group.draw(self.screen) #主机精灵组 self.hero_group.update() self.hero_group.draw(self.screen) #子弹精灵组 self.hero.bullet_group.update() self.hero.bullet_group.draw(self.screen) |
游戏的开始与结束
1 2 3 4 5 6 7 8 9 10 11 12 13 14 15 16 17 18 | def start_game(self): print("游戏开始...") while True: #1 设置刷新帧率 self.clock.tick(SCREEN_PER_SEC) #2 时间监听 self.__event_handler() #3 碰撞检测 self.__check_collide() #4 更新敌机 self.__update_sprites() #5 更新显示 pygame.display.update()@staticmethoddef __game_over(): print("游戏结束") pygame.quit() exit() |
程序总结
程序中print语句是为了我在运行中进行功能的检测,可以直接注释掉,对于整个程序的运行并无影响。游戏只是简单的规则,主机可以左右移动,敌机会随机从上方垂直下来,敌机撞到主机之后就会游戏结束直接关闭游戏窗体,比如击毁敌机也没有得分这一设置,这些都是可以再对规则进行优化的部分,因为只是为了帮助我熟悉pygame库的功能,所以代码并未写的更加详细,感兴趣的话你可以对代码部分进行更改达到你想要的效果,程序升级部分并未进行太多的文字解释部分,在代码中我保留了我的注释部分方便你对代码进行解读。
程序中用到的素材以及未使用到的音乐都在链接中。
到此这篇关于Pygame库200行代码实现简易飞机大战 的文章就介绍到这了
原文链接:https://blog.csdn.net/qq_45279235/article/details/121002349
伪原创工具 SEO网站优化 https://www.237it.com/