
人脸检测实战终极之OpenCV+Python实现人脸对齐
这篇文章主要是为了演示如何使用 OpenCV、Python 和面部标志从而实现对齐人脸。文中示例代码对我们的工作或学习有一定的帮助,感兴趣的小伙伴可以学习一下
目录
前言
实现面部矫正器
导入必要的包
对齐人脸
展示结果
前言
这篇博文的目的是演示如何使用 OpenCV、Python 和面部标志对齐人脸。
给定一组面部标志(输入坐标),我们的目标是将图像扭曲并转换为输出坐标空间。
在这个输出坐标空间中,整个数据集中的所有面都应该:
在图像中居中。
旋转,使眼睛位于水平线上(即,旋转面部,使眼睛位于相同的 y 坐标上)。
进行缩放,使面的大小大致相同。
为此,我们将首先调用一个实现的 Python 类FaceAligner ,以使用仿射变换对齐人脸。
注意:仿射变换用于旋转、缩放、平移等。我们可以将上述所有三个要求打包到一个 cv2.warpAffine 调用中; 诀窍是创建旋转矩阵 M 。
然后,我们将创建一个示例驱动程序 Python 脚本来接受输入图像、检测人脸并对齐它们。
最后,我们将回顾我们使用 OpenCV 过程进行人脸对齐的结果。
实现面部矫正器
面部对齐算法本身基于 Mastering OpenCV with Practical Computer Vision Projects (Baggio, 2012) 的第 8 章,如果您有 C++ 背景或兴趣,我强烈推荐它。 本书在 GitHub 上提供了开放访问的代码示例。
新建facealigner.py实现FaceAligner类。
1 2 3 4 5 6 7 8 9 10 11 12 13 14 15 16 17 18 19 | # import the necessary packagesfrom imutils.face_utils.helpers import FACIAL_LANDMARKS_68_IDXSfrom imutils.face_utils.helpers import FACIAL_LANDMARKS_5_IDXSfrom imutils.face_utils.helpers import shape_to_npimport numpy as npimport cv2class FaceAligner: def __init__(self, predictor, desiredLeftEye=(0.35, 0.35), desiredFaceWidth=256, desiredFaceHeight=None): # store the facial landmark predictor, desired output left # eye position, and desired output face width + height self.predictor = predictor self.desiredLeftEye = desiredLeftEye self.desiredFaceWidth = desiredFaceWidth self.desiredFaceHeight = desiredFaceHeight # if the desired face height is None, set it to be the # desired face width (normal behavior) if self.desiredFaceHeight is None: self.desiredFaceHeight = self.desiredFaceWidth |
导入必要的包
定义的构造函数开始我们的 FaceAligner 类。
我们的构造函数有 4 个参数:
predictor :面部标志性预测器模型。
requiredLeftEye :一个可选的 (x, y) 元组,显示默认值,指定所需的输出左眼位置。对于此变量,通常会看到 20-40% 范围内的百分比。这些百分比控制对齐后人脸的可见程度。使用的确切百分比将因应用程序而异。使用 20% 时,您基本上会获得“放大”的脸部视图,而使用较大的值时,脸部会显得更“缩小”。
requiredFaceWidth :另一个可选参数,以像素为单位定义我们想要的人脸。我们将此值默认为 256 像素。
requiredFaceHeight :最后一个可选参数,以像素为单位指定我们所需的人脸高度值。
接下来,让我们决定是想要一张方形的人脸图像还是矩形的图像。检查 requiredFaceHeight 是否为 None ,如果是,我们将其设置为 desiredFaceWidth ,这意味着面部是方形的。方形图像是典型情况。或者,我们可以为 desiredFaceWidth 和 desiredFaceHeight 指定不同的值以获得感兴趣的矩形区域。
现在我们已经构建了我们的 FaceAligner 对象,接下来我们将定义一个对齐人脸的函数。
这个函数有点长,所以我把它分成了 5 个代码块,让它更容易理解:
1 2 3 4 5 6 7 8 9 | def align(self, image, gray, rect): # convert the landmark (x, y)-coordinates to a NumPy array shape = self.predictor(gray, rect) shape = shape_to_np(shape) # extract the left and right eye (x, y)-coordinates (lStart, lEnd) = FACIAL_LANDMARKS_IDXS["left_eye"] (rStart, rEnd) = FACIAL_LANDMARKS_IDXS["right_eye"] leftEyePts = shape[lStart:lEnd] rightEyePts = shape[rStart:rEnd] |
定义了 align 函数,它接受三个参数:
image : RGB 输入图像。
gray :灰度输入图像。
rect :由 dlib 的 HOG 人脸检测器生成的边界框矩形。
应用 dlib 的面部标志预测器并将标志转换为 NumPy 格式的 (x, y) 坐标。
接下来,从 helpers.py 脚本中找到的 FACIAL_LANDMARK_IDXS 字典中读取 left_eye 和 right_eye 区域。 这些 2 元组值存储在左/右眼开始和结束索引中。
提取leftEyePts 和 rightEyePts 。
接下来,计算每只眼睛的中心以及眼睛质心之间的角度。
这个角度是对齐我们的图像的关键组成部分。
眼睛之间的绿线夹角,如下图所示,是我们比较关心的。

接下来是角度计算:
1 2 3 4 5 6 7 | # compute the center of mass for each eyeleftEyeCenter = leftEyePts.mean(axis=0).astype("int")rightEyeCenter = rightEyePts.mean(axis=0).astype("int")# compute the angle between the eye centroidsdY = rightEyeCenter[1] - leftEyeCenter[1]dX = rightEyeCenter[0] - leftEyeCenter[0]angle = np.degrees(np.arctan2(dY, dX)) - 180 |
分别通过平均每只眼睛的所有 (x, y) 点来计算每只眼睛的质心,也称为质心。
给定眼睛中心,我们可以计算 (x, y) 坐标的差异并取反正切以获得眼睛之间的旋转角度。
这个角度将允许我们校正旋转。
为了确定角度,我们首先计算 y 方向的增量 dY 。 这是通过在第 38 行找到 rightEyeCenter 和 leftEyeCenter 之间的差异来完成的。
类似地,我们计算 dX ,即第 39 行 x 方向的增量。
接下来,我们计算面部旋转的角度。 我们使用带有参数 dY 和 dX 的 NumPy 的 arctan2 函数,然后转换为度数,同时减去 180 以获得角度。
在以下代码块中,我们计算所需的右眼坐标(作为左眼位置的函数)并计算新结果图像的比例。
1 2 3 4 5 6 7 8 9 10 11 | # compute the desired right eye x-coordinate based on the# desired x-coordinate of the left eyedesiredRightEyeX = 1.0 - self.desiredLeftEye[0]# determine the scale of the new resulting image by taking# the ratio of the distance between eyes in the *current*# image to the ratio of distance between eyes in the# *desired* imagedist = np.sqrt((dX ** 2) + (dY ** 2))desiredDist = (desiredRightEyeX - self.desiredLeftEye[0])desiredDist *= self.desiredFaceWidthscale = desiredDist / dist |
根据所需的左眼 x 坐标计算所需的右眼。从 1.0 中减去 self.desiredLeftEye[0] 因为所需的RightEyeX 值应该与图像的右边缘等距,因为相应的左眼 x 坐标与其左边缘的距离相同。
然后可以通过获取当前图像中眼睛之间的距离与所需图像中眼睛之间的距离的比率来确定人脸的比例
首先,计算欧几里得距离比 dist 。
接下来,使用左右眼 x 值之间的差异,计算所需的距离,desiredDist。
通过在第 52 行乘以所需的面宽来更新所需的距离。这实质上是根据所需的宽度缩放的眼睛距离。
最后,比例是通过将 desiredDist 除以我们之前计算的 dist 来计算的。
现在有了旋转角度和比例,需要在计算仿射变换之前采取一些步骤。这包括找到眼睛之间的中点以及计算旋转矩阵并更新其平移分量:
1 2 3 4 5 6 7 8 9 10 11 | # compute center (x, y)-coordinates (i.e., the median point)# between the two eyes in the input imageeyesCenter = (int((leftEyeCenter[0] + rightEyeCenter[0]) // 2), int((leftEyeCenter[1] + rightEyeCenter[1]) // 2))# grab the rotation matrix for rotating and scaling the faceM = cv2.getRotationMatrix2D(eyesCenter, angle, scale)# update the translation component of the matrixtX = self.desiredFaceWidth * 0.5tY = self.desiredFaceHeight * self.desiredLeftEye[1]M[0, 2] += (tX - eyesCenter[0])M[1, 2] += (tY - eyesCenter[1]) |
计算 eyeCenter ,即左右眼之间的中点。 这将用于我们的旋转矩阵计算。 本质上,这个中点位于鼻子的顶部,是我们将面部旋转的点:

为了计算旋转矩阵 M ,我们使用 cv2.getRotationMatrix2D 指定 eyeCenter 、角度和比例。这三个值中的每一个都先前已计算过,因此请根据需要返回。
cv2.getRotationMatrix2D 的参数说明如下:
eyeCenter :眼睛之间的中点是我们将围绕面部旋转的点。
angle:我们将面部旋转到的角度,以确保眼睛位于同一水平线上。
scale :我们将放大或缩小图像的百分比,确保图像缩放到所需的大小。
现在必须更新矩阵的平移分量,使人脸在仿射变换后仍然在图像中。
取所需面宽的一半并将值存储为 tX,即 x 方向的平移。
为了计算 tY ,y 方向的平移,将所需的面部高度乘以所需的左眼 y 值,desiredLeftEye[1]。
使用 tX 和 tY ,通过从它们对应的眼睛中点值(第 66 行和第 67 行)中减去每个值来更新矩阵的平移分量。
然后应用仿射变换来对齐人脸:
1 2 3 4 5 6 | # apply the affine transformation(w, h) = (self.desiredFaceWidth, self.desiredFaceHeight)output = cv2.warpAffine(image, M, (w, h), flags=cv2.INTER_CUBIC)# return the aligned facereturn output |
为方便起见,将 desiredFaceWidth 和 desiredFaceHeight 分别存储到 w 和 h 中(第 70 行)。
然后调用 cv2.warpAffine 执行最后一步。 此函数调用需要 3 个参数和 1 个可选参数:
image : 人脸图像。
M :平移、旋转和缩放矩阵。
(w, h) :输出面所需的宽度和高度。
flags :用于扭曲的插值算法,在本例中为 INTER_CUBIC 。 要了解其他可能的标志和图像转换,请参阅 OpenCV 文档。
最后,对齐的脸面。
对齐人脸
开始编写人脸对齐脚本,将其命名为Now let's put this alignment class to work with a simple driver script. Open up a new file, name it align_faces.py:
1 2 3 4 5 6 7 8 9 10 11 12 13 14 | # import the necessary packagesfrom imutils.face_utils import FaceAlignerfrom imutils.face_utils import rect_to_bbimport argparseimport imutilsimport dlibimport cv2# construct the argument parser and parse the argumentsap = argparse.ArgumentParser()ap.add_argument("-p", "--shape-predictor", required=True,help="path to facial landmark predictor")ap.add_argument("-i", "--image", required=True,help="path to input image")args = vars(ap.parse_args()) |
如果您的系统上没有安装 imutils 和/或 dlib,请确保通过 pip 安装/升级它们:
1 2 | pip install --upgrade imutilspip install --upgrade dlib |
win10安装dlib参考:如何安装dlib gpu版本
1 2 3 4 5 | # initialize dlib's face detector (HOG-based) and then create# the facial landmark predictor and the face alignerdetector = dlib.get_frontal_face_detector()predictor = dlib.shape_predictor(args["shape_predictor"])fa = FaceAligner(predictor, desiredFaceWidth=256) |
使用 dlib 的 get_frontal_face_detector 初始化我们的检测器对象。
使用 --shape-predictor 来实例化我们的面部标志预测器,这是 dlib 的预训练预测器的路径。
通过在第 21 行初始化一个对象 fa 来利用刚刚在上一节中构建的 FaceAligner 类。我们指定了 256 像素的人脸宽度。
接下来,加载图像并为人脸检测做准备:
1 2 3 4 5 6 7 8 | # load the input image, resize it, and convert it to grayscaleimage = cv2.imread(args["image"])image = imutils.resize(image, width=800)gray = cv2.cvtColor(image, cv2.COLOR_BGR2GRAY)# show the original input image and detect faces in the grayscale# imagecv2.imshow("Input", image)rects = detector(gray, 2) |
加载由命令行参数 --image 指定的图像。 调整图像的大小,保持第 25 行的纵横比,使其宽度为 800 像素。 然后将图像转换为灰度。
处理输入图像中的人脸检测,我们在其中应用了 dlib 的人脸检测器。 此函数返回 rects ,这是我们检测器发现的人脸周围的边界框列表。
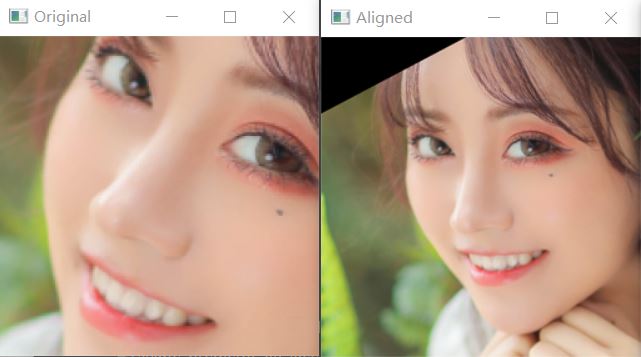
在下一个块中,我们遍历 rects ,对齐每个人脸,并显示原始和对齐的图像。
1 2 3 4 5 6 7 8 9 10 11 | # loop over the face detectionsfor rect in rects: # extract the ROI of the *original* face, then align the face # using facial landmarks (x, y, w, h) = rect_to_bb(rect) faceOrig = imutils.resize(image[y:y + h, x:x + w], width=256) faceAligned = fa.align(image, gray, rect) # display the output images cv2.imshow("Original", faceOrig) cv2.imshow("Aligned", faceAligned) cv2.waitKey(0) |
开始循环。
对于 dlib 预测的每个边界框 rect,我们将其转换为格式 (x, y, w, h)。
随后,将框的大小调整为 256 像素的宽度,保持纵横比。将这个原始但调整大小的图像存储为 faceOrig 。
对齐图像,指定图像、灰度图像和矩形。
最后,将原始和对应的对齐人脸图像显示到各自窗口的屏幕上。
在显示下一个原始/对齐图像对之前,等待用户在任一窗口处于焦点时按下一个键。
对所有检测到的人脸重复上面的过程,然后脚本退出。
展示结果
输入命令:
1 | python align_faces.py --shape-predictor shape_predictor_68_face_landmarks.dat --image 11.jpg |

到此这篇关于人脸检测实战终极之OpenCV+Python实现人脸对齐的文章就介绍到这了