
VsCode插件开发之插件初步通信的方法步骤
这篇文章主要介绍了VsCode插件开发之插件初步通信的方法步骤,小编觉得挺不错的,现在分享给大家,也给大家做个参考。一起跟随小编过来看看吧
参考了Egret Wing,想像Egret Wing那样在上方titlebar最右边上面增加一个menu(这个menu相对于一个按钮,当点击这个按钮时会出现一个window弹框,这个window弹框里就包含相关的表单信息以供登录或者注册使用。我是以这个作为参考模板的。但是目前进展并不是很顺。于是我通过插件的方式暂时性解决了这个问题。但是觉得还不是想要的那样。
Egret Wing是这样的,如图所示:

不得不承认一点Egret Wing改造的挺不错的,不愧是对VsCode进行魔改。
今天先说一下通过插件通信。
我主要参考的是一个叫小茗同学的插件开发,并改造其插件来达到我的目的。
这个小茗同学我觉得他写的插件开发,我觉得不是特别详细全面,当然,参考意义还是有的。
他的插件开发目录如下:
他的插件github地址为:https://github.com/sxei/vscode-plugin-demo.git
他的插件可以在VsCode插件扩展中搜到(搜到后安装,然后直接在下载成功的插件的基础上改造),例如:

那么说说我是如何改造它的呢?
我主要改造它这么几个地方?
一个是图标,另外一个修改它的html界面(主要是修改custom-welcome.html),同时我要和还改了package.json文件。
插件开发可以用TypeScript,也可以用JavaScript。
如果是用TypeScript的话,通常扩展脚本文件是extension.ts形式存在,如果是JavaScript,则是以extension.js的形式存在。
在此我想强调的是改他人插件或者自己编写插件,以ts为例,主要把握也就两个文件,一个是extension.ts,另一个就是package.json。
如何从0开发以插件的相关视频,感兴趣的可以看看,感觉还是有一定的启发的:https://v.qq.com/x/page/k08220bdz3s.htmlb
我改造后的插件代码,放在我的个人github上,大家可以将其下载下来放入,如下两个文件中(任意一个都行):

注意:
.vscode文件夹:官方插件下载好默认放入的目录。
.vscode-oss-dev:下载源码,自己编译,下载插件放置的目录。
自己编译的不知道由于什么原因不能直接联网通信搜索一些应用市场下载的插件。
通常情况下(以.vscode-oss-dev为例),git clone下来我的插件地址,然后将其移植到这个目录就能看到对应的效果,效果图如下:
我的VsCode插件地址为:https://github.com/youcong1996/study_simple_demo/tree/vscode-plugin-communication
将其克隆下来放入.vscode或者.vscode-oss-dev中的extensions目录下即可起作用。
另外有一点要强调的是,如果是vscode非自己编译的,需要重启一下vscode,如果是自己编译的话,监听需要暂时中断重新输入(yarn watch)。
接下来说说我修改的三个地方。
1.修改package.json(包含图标一起说了及其点击登录的同时展示对应的左侧栏sidebar)
1 2 3 4 5 6 7 8 9 10 11 12 13 14 15 16 17 18 19 20 21 22 23 24 25 26 27 28 29 30 31 32 33 34 35 36 37 38 39 40 41 42 43 44 45 46 47 48 49 50 51 52 53 54 55 56 57 58 59 60 61 62 63 64 65 66 67 68 69 70 71 72 73 74 75 76 77 78 79 80 81 82 83 84 85 86 87 88 89 90 91 92 93 94 95 96 97 98 99 100 101 102 103 104 105 106 107 108 109 110 111 112 113 114 115 116 117 118 119 120 121 122 123 124 125 126 127 128 129 130 131 132 133 134 135 136 137 138 139 140 141 142 143 144 145 146 147 148 149 150 151 152 153 154 155 156 157 158 159 160 161 162 163 164 165 166 167 168 169 170 171 172 173 174 175 176 177 178 179 180 181 182 183 184 185 186 187 188 189 190 191 192 193 194 195 | { "name": "vscode-plugin-demo", "displayName": "vscode-plugin-demo", "description": "VSCode插件demo", "keywords": [ "vscode", "plugin", "demo" ], "version": "1.0.3", "publisher": "sxei", "engines": { "vscode": "^1.27.0" }, "categories": [ "Other" ], "icon": "images/icon.png", "activationEvents": [ "*" ], "main": "./src/extension", "contributes": { "configuration": { "type": "object", "title": "Code插件demo", "properties": { "vscodePluginDemo.yourName": { "type": "string", "default": "guest", "description": "你的名字" }, "vscodePluginDemo.showTip": { "type": "boolean", "default": true, "description": "启动时显示自定义欢迎页" } } }, "commands": [ { "command": "extension.sayHello", "title": "Hello,小茗同学" }, { "command": "extension.demo.getCurrentFilePath", "title": "获取当前文件(夹)路径" }, { "command": "extension.demo.testMenuShow", "title": "这个菜单仅在JS文件中出现", "icon": { "light": "./images/tool-light.svg", "dark": "./images/tool-light.svg" } }, { "command": "extension.demo.openWebview", "title": "打开WebView" }, { "command": "extension.demo.showWelcome", "title": "显示自定义欢迎页" } ], "keybindings": [ { "command": "extension.sayHello", "key": "ctrl+f10", "mac": "cmd+f10", "when": "editorTextFocus" }, { "command": "extension.demo.openWebview", "key": "ctrl+f9", "mac": "cmd+f9", "when": "editorTextFocus" } ], "menus": { "editor/context": [ { "when": "editorFocus", "command": "extension.sayHello", "group": "navigation@6" }, { "when": "editorFocus", "command": "extension.demo.getCurrentFilePath", "group": "navigation@5" }, { "when": "editorFocus && resourceLangId == javascript", "command": "extension.demo.testMenuShow", "group": "z_commands" }, { "command": "extension.demo.openWebview", "group": "navigation" } ], "editor/title": [ { "when": "editorFocus && resourceLangId == javascript", "command": "extension.demo.testMenuShow", "group": "navigation" } ], "editor/title/context": [ { "when": "resourceLangId == javascript", "command": "extension.demo.testMenuShow", "group": "navigation" } ], "explorer/context": [ { "command": "extension.demo.getCurrentFilePath", "group": "navigation" }, { "command": "extension.demo.openWebview", "group": "navigation" } ] }, "snippets": [ { "language": "javascript", "path": "./snippets/javascript.json" }, { "language": "html", "path": "./snippets/html.json" } ], "viewsContainers": { "activitybar": [ { "id": "beautifulGirl", "title": "测试", "icon": "images/beautifulGirl.svg" } ] }, "views": { "beautifulGirl": [ { "id": "测试001", "name": "test" }, { "id": "测试002", "name": "test" }, { "id": "测试003", "name": "test" } ] }, "iconThemes": [ { "id": "testIconTheme", "label": "测试图标主题", "path": "./theme/icon-theme.json" } ] }, "scripts": { "postinstall": "node ./node_modules/vscode/bin/install", "test": "node ./node_modules/vscode/bin/test" }, "devDependencies": { "typescript": "^2.6.1", "vscode": "^1.1.6", "eslint": "^4.11.0", "@types/node": "^7.0.43", "@types/mocha": "^2.2.42" }, "license": "SEE LICENSE IN LICENSE.txt", "bugs": { }, "repository": { "type": "git", }, "__metadata": { "id": "ac2b7b16-d87f-4e51-87a8-37011e8aa713", "publisherId": "cdd0fc1d-3acf-4250-a09b-95545e29bdbc", "publisherDisplayName": "小茗同学" }} |
在package.json我也就修改了这么几个地方,一个是views(这个view通常主要用于展示左侧的sidebar视图),一个是viewsContainers(我主要修改beautifulGirl.svg)。
修改后的效果分别如下所示:


2.通信(修改custom-welcome.html)
通信我目前采用最原始的javascript的ajax请求,其实jQuery及其vue.js的异步通信也是可以的。
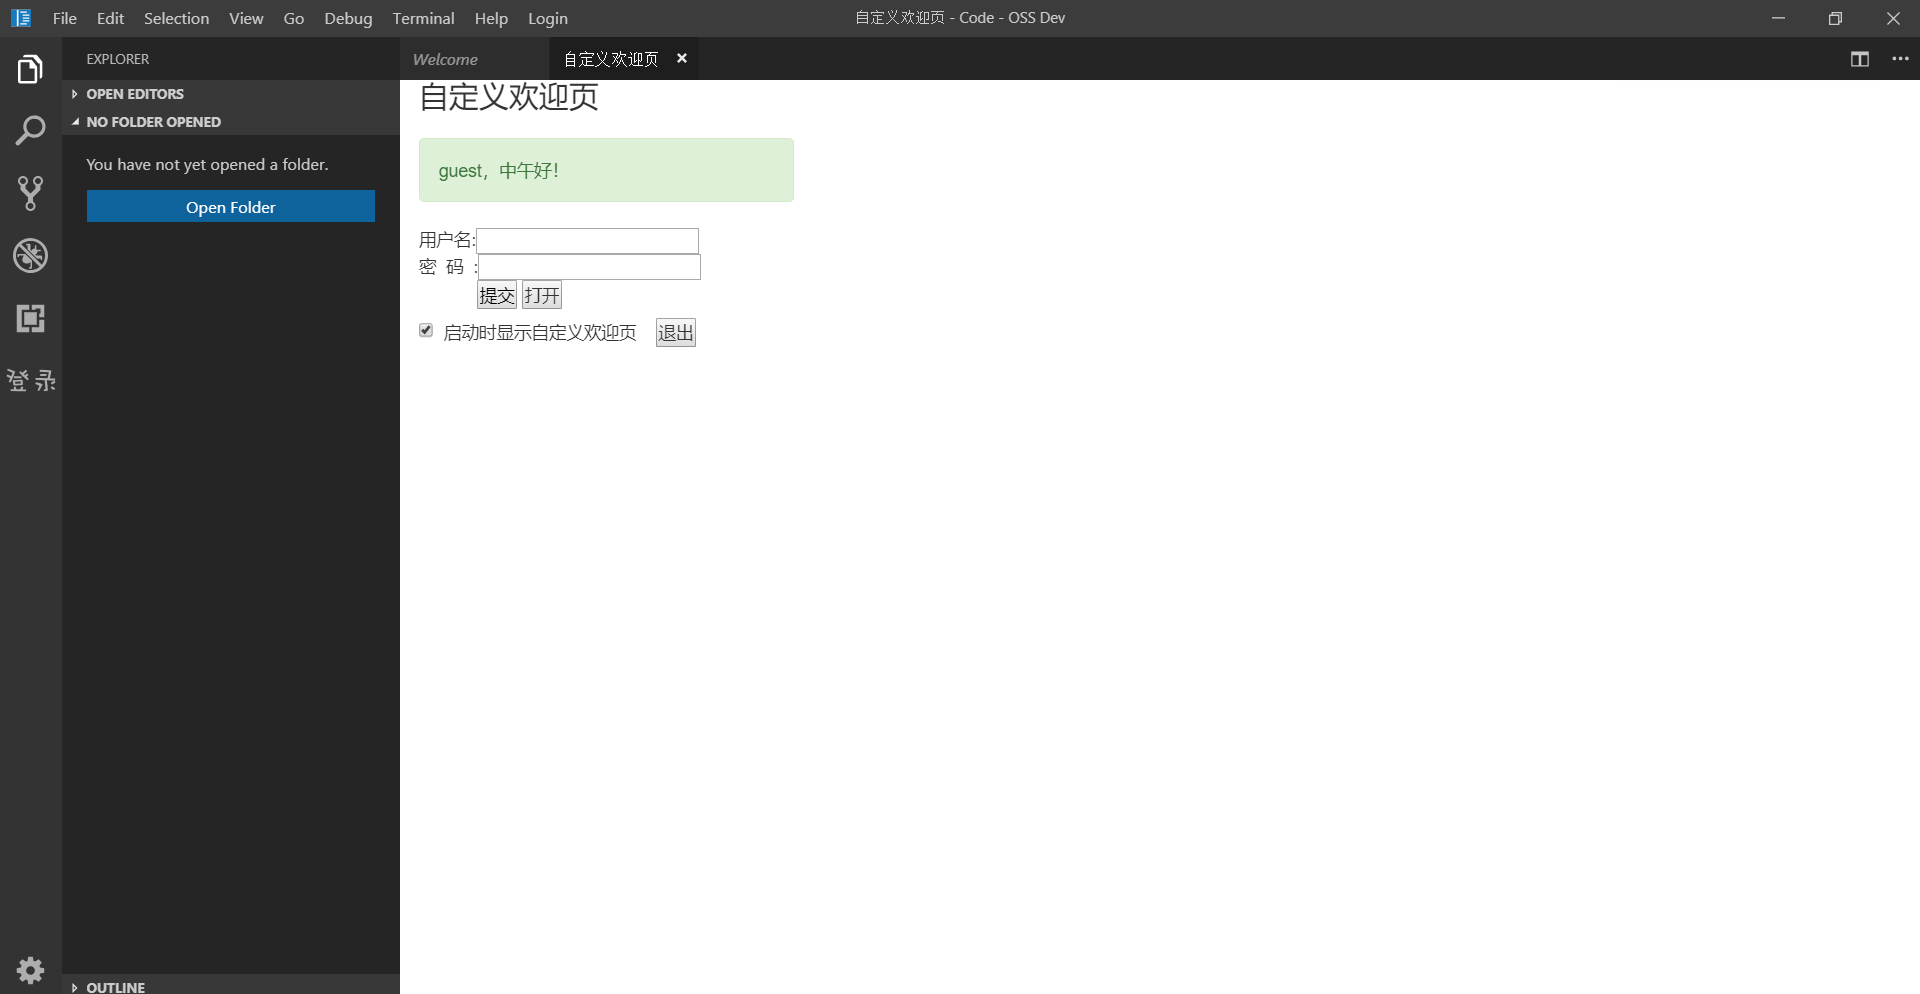
这个custom-welcome.html你可以理解成它就是一个webview。
custom-welcome.html文件内容如下:
1 2 3 4 5 6 7 8 9 10 11 12 13 14 15 16 17 18 19 20 21 22 23 24 25 26 27 28 29 30 31 32 33 34 35 36 37 38 39 40 41 42 43 44 45 46 47 48 49 50 51 52 53 54 55 56 57 58 59 60 61 62 63 64 65 66 67 68 69 70 71 72 73 74 75 76 77 78 79 80 81 82 83 84 85 86 87 88 89 90 91 92 93 94 95 96 97 98 99 100 101 102 103 104 105 106 107 108 109 110 111 112 113 114 115 116 117 118 119 120 121 122 123 124 125 126 127 128 129 130 131 132 133 134 135 136 137 138 139 140 141 142 143 144 145 146 147 148 149 150 151 152 153 154 155 156 157 158 159 160 161 162 163 164 165 166 167 168 169 170 171 | <!DOCTYPE html><html lang="en"><head> <meta charset="UTF-8"> <meta name="viewport" content="width=device-width, initial-scale=1.0"> <title>自定义欢迎页</title> <link rel="stylesheet" href="../../lib/bootstrap-3.3.1/css/bootstrap.min.css" rel="external nofollow" > <link rel="stylesheet" href="../../lib/layui/css/layui.css" rel="external nofollow" > <style> html, body, #app { height: 100%; } ::-webkit-scrollbar { width: 10px; height: 10px } ::-webkit-scrollbar-track { border-radius: 10px; background-color: #d8dce5 } ::-webkit-scrollbar-thumb { border-radius: 5px; background-color: #adadad } ::-webkit-scrollbar-thumb:hover { background-color: #929292 } ::-webkit-scrollbar-thumb:active { background-color: #666363 } ::-webkit-scrollbar-corner { background-color: #535353 } ::-webkit-scrollbar-resizer { background-color: #ff6e00 } .page-title { margin-bottom: 20px; } .control-label { font-weight: normal; } .btn-primary { background-color: #1890ff; border-color: #1890ff; outline: none; } .btn-primary:focus, .btn-primary:hover { background-color: #40a9ff; border-color: #40a9ff; outline: none; } .btn-primary.active, .btn-primary:active { background-color: #096dd9; border-color: #096dd9; color: #fff; outline: none; } </style></head><body> <div id="app" class="container-fluid"> <h3 class="page-title">自定义欢迎页</h3> <p class="alert alert-success" style="width: 300px;">{{userName}},{{time}}好! <span id="info"></span> </p> <form class="form-horizontal"> <div class="form-group"> <div class="col-sm-6"> <div id="form"> <form> <p>用户名:<input type="text" id="userName" style="color:black;"/></p> <p>密 码 :<input type="password" id="password" style="color:black;"/></p> <p> <input type="button" style="color:black;" value="提交" onclick="test()"/> <input type="button" value="打开" onclick="openLogin()"/> </form> </div> <div class="checkbox"> <label> <input type="checkbox" v-model="show"> 启动时显示自定义欢迎页 <input type="button" onclick="register()" value="退出"/> </label> </div> </div> </div> </form> </div> <script src="../../lib/jquery/jquery.min.js"></script> <script src="../../lib/bootstrap-3.3.1/js/bootstrap.min.js"></script> <script src="../../lib/vue-2.5.17/vue.js"></script> <script src="../../src/view/custom-welcome.js"></script> <script src="../../lib/layui/layui.js"></script> <script src="../../lib/layer/layer-v3.1.1/layer/mobile/layer.js"></script> <script> function openLogin(){ layui.use('layer', function(){ var layer = layui.layer; layer.open({ type: 2, title: 'Login', fix: false, maxmin: true, shadeClose: true, shade: 0.8, area: ['500px', '500px'], content: 'login.html', end: function () { location.reload(); } }); }); } function test(){ var userName = document.getElementById("userName").value; if(userName != null && userName != undefined){ var xhr = new XMLHttpRequest(); xhr.onreadystatechange = function () { if (xhr.readyState == 4) { if ((xhr.status >= 200 && xhr.status < 300) || xhr.status == 304) { $("#info").html("登录成功"); $("#form").hide(); console.log('test:'+xhr.status); console.log(xhr.responseText); } else { console.log("请求成功:" + xhr.status); } } }; xhr.send(null); }else{ layui.use('layer', function(){ var layer = layui.layer; layer.msg('userName为必填项'); }); } } function register(){ $("#info").html(""); $("#form").show(); } </script></body></html> |
这个html在浏览器上看到的效果如下所示:

目前这仅仅是一个很初级的(蹩脚通信),后续我将会继续补充对VsCode的源码解析及其插件开发相关的详细说明,由于目前掌握的比较分散不够系统,暂时延后讲解。
以上就是本文的全部内容,希望对大家的学习有所帮助