
SpringBoot中Mybatis + Druid 数据访问的详细过程
Spring Boot 底层都是采用 SpringData 的方式进行统一处理各种数据库,SpringData也是Spring中与SpringBoot、SpringCloud 等齐名的知名项目,下面看下SpringBoot Mybatis Druid数据访问的详细过程,感兴趣的朋友一起看看吧
目录
1、简介
2、JDBC
3、CRUD操作
4、自定义数据源 DruidDataSource
1、配置 Druid 数据源监控
2、配置 Druid web 监控 filter
5、SpringBoot 整合mybatis
1. 导入mybatis所需要的依赖
2.配置数据库连接信息
3,创建实体类
4.配置Mapper接口类
6.SpringBoot 整合
1、简介
对于数据访问层,无论是SQL(关系型数据库) 还是NOSQL(非关系型数据库),SpringBoot 底层都是采用 SpringData 的方式进行统一处理。
Spring Boot 底层都是采用 SpringData 的方式进行统一处理各种数据库,SpringData也是Spring中与SpringBoot、SpringCloud 等齐名的知名项目。
SpingData 官网:https://spring.io/projects
数据库相关的启动器 : 可以参考官方文档:https://docs.spring.io/springboot/docs/2.1.7.RELEASE/reference/htmlsingle/#using-boot-starter
2、JDBC
新建一个项目测试:springboot-data; 引入相应的模块!基础模块

项目建好之后,发现自动帮我们导入了如下的启动器:
1 2 3 4 5 6 7 8 9 10 | <dependency> <groupId>org.springframework.boot</groupId> <artifactId>spring-boot-starter-jdbc</artifactId></dependency><dependency> <groupId>mysql</groupId> <artifactId>mysql-connector-java</artifactId> <scope>runtime</scope></dependency> |
实现数据库的访问
先连接上数据库 , 直接使用IDEA连接即可【操作】
SpringBoot中,我们只需要简单的配置就可以实现数据库的连接了;
我们使用yaml的配置文件进行操作!
1 2 3 4 5 6 | spring: datasource: username: root password: 123456 #?serverTimezone=UTC解决时区的报错 url: jdbc:mysql://localhost:3306/mybatis?serverTimezone=UTC&useUnicode=true&characterEncoding=utf-8 |
配置完这一些东西后,就可以直接去使用了,因为SpringBoot已经默认帮我们进行了自动配置;我们去测试类测试一下
1 2 3 4 5 6 7 8 9 10 11 12 13 14 15 16 17 18 19 20 21 22 23 24 25 26 27 28 | package com.kk;import org.junit.jupiter.api.Test;import org.springframework.beans.factory.annotation.Autowired;import org.springframework.boot.test.context.SpringBootTest;import javax.sql.DataSource;import java.sql.Connection;import java.sql.SQLException;@SpringBootTestclass Springboot04DataApplicationTests { @Autowired DataSource dataSource; @Test void contextLoads() throws SQLException { //查看默认的数据源 class com.zaxxer.hikari.HikariDataSource dbcp System.out.println(dataSource.getClass()); //获得数据库连接 Connection connection = dataSource.getConnection(); System.out.println(connection); connection.close(); }} |
在运行的时候可能会遇到的Bug
SpringBoot 中 Invalid character found in the request target 异常
在启动类中添加
1 2 3 4 5 6 7 8 9 10 11 | @Beanpublic ConfigurableServletWebServerFactory webServerFactory() { TomcatServletWebServerFactory factory = new TomcatServletWebServerFactory(); factory.addConnectorCustomizers(new TomcatConnectorCustomizer() { @Override public void customize(Connector connector) { connector.setProperty("relaxedQueryChars", "|{}[]"); } }); return factory;} |
输出结果:
可以看到它默认给我们配置的数据源为 : class com.zaxxer.hikari.HikariDataSource , 我们并没有手动配置
全局搜索一下,找到数据源的所有自动配置都在 :DataSourceProperties 文件下;这里自动配置的原理以及能配置哪些属性?
Spring Boot 2.1.7 默认使用 com.zaxxer.hikari.HikariDataSource 数据源,
而以前版本,如 Spring Boot 1.5 默认使用 org.apache.tomcat.jdbc.pool.DataSource 作为数据源;
HikariDataSource 号称 Java WEB 当前速度最快的数据源,相比于传统的 C3P0 、DBCP、Tomcat jdbc 等连接池更加优秀;
有了数据库连接,显然就可以 CRUD 操作数据库了。
3、CRUD操作
1、有了数据源(com.zaxxer.hikari.HikariDataSource),可以拿到数据库连接(java.sql.Connection),有了连接,就可以使用连接和原生的 JDBC 语句来操作数据库
2、即使不使用第三方第数据库操作框架,如 MyBatis等,Spring 本身也对原生的JDBC 做了轻量级的封装,即 org.springframework.jdbc.core.JdbcTemplate。
3、数据库操作的所有 CRUD 方法都在 JdbcTemplate 中。
4、Spring Boot 不仅提供了默认的数据源,同时默认已经配置好了 JdbcTemplate 放在了容器中,程序员只需自己注入即可使用
5、JdbcTemplate 的自动配置原理是依赖 org.springframework.boot.autoconfigure.jdbc 包下的 org.springframework.boot.autoconfigure.jdbc.JdbcTemplateAutoConfiguration 类
JdbcTemplate主要提供以下几类方法:
execute方法:可以用于执行任何SQL语句,一般用于执行DDL语句;
update方法及batchUpdate方法:update方法用于执行新增、修改、删除等语句;batchUpdate方法用于执行批处理相关语句;
query方法及queryForxxx方法:用于执行查询相关语句;
call方法:用于执行存储过程、函数相关语句。
测试:
1 2 3 4 5 6 7 8 9 10 11 12 13 14 15 16 17 18 19 20 21 22 23 24 25 26 27 28 29 30 31 32 33 34 35 36 37 38 39 40 41 42 43 44 45 46 47 48 49 50 51 52 53 54 55 56 | package com.kk.controller;import org.springframework.beans.factory.annotation.Autowired;import org.springframework.jdbc.core.JdbcTemplate;import org.springframework.web.bind.annotation.GetMapping;import org.springframework.web.bind.annotation.PathVariable;import org.springframework.web.bind.annotation.RestController;import java.util.List;import java.util.Map;@RestControllerpublic class JDBCController { //JdbcTemplate 是 core 包的核心类,用于简化 JDBC操作,还能避免一些常见的错误,如忘记关闭数据库连接 //Spring Boot 默认提供了数据源,默认提供了 org.springframework.jdbc.core.JdbcTemplate //JdbcTemplate 中会自己注入数据源,使用起来也不用再自己来关闭数据库连接 @Autowired JdbcTemplate jdbcTemplate; //查询数据库的所有信息 //没有实体类,数据库中的东西怎么获取? Map //List 中的1个 Map 对应数据库的 1行数据 //Map 中的 key 对应数据库的字段名,value 对应数据库的字段值 @GetMapping("/userList") public List<Map<String ,Object>> userList(){ String sql="select * from user"; List<Map<String, Object>> list_maps = jdbcTemplate.queryForList(sql); return list_maps; } @GetMapping("/addUser") public String addUser(){ String sql="insert into mybatis.user(id,name,pwd) values(2,'dabai','123456')"; jdbcTemplate.update(sql); return "update-ok"; } @GetMapping("/updateUser/{id}") public String updateUser(@PathVariable("id") int id){ String sql="update mybatis.user set name=?,pwd=? where id="+id; //封装 Object[] objects = new Object[2]; objects[0]="xiaobai"; objects[1]="9999999"; jdbcTemplate.update(sql,objects); return "updateUser-ok"; } @GetMapping("/deleteUser/{id}") public String deleteUser(@PathVariable("id") int id){ String sql="delete from mybatis.user where id=?"; jdbcTemplate.update(sql,id); return "deleteUser-ok"; }} |
测试成功!
原理探究 :
org.springframework.boot.autoconfigure.jdbc.DataSourceConfiguration 数据源配置类作用 :根据逻辑判断之后,添加数据源;
SpringBoot默认支持以下数据源:
com.zaxxer.hikari.HikariDataSource (Spring Boot 2.0 以上,默认使用此数据源)
org.apache.tomcat.jdbc.pool.DataSource
org.apache.commons.dbcp2.BasicDataSource
可以使用 spring.datasource.type 指定自定义的数据源类型,值为要使用的连接池实现的完全限定名。默认情况下,它是从类路径自动检测的。
1 2 3 4 5 6 7 8 9 10 11 12 13 14 | @Configuration@ConditionalOnMissingBean({DataSource.class})@ConditionalOnProperty( name = {"spring.datasource.type"})static class Generic { Generic() { } @Bean public DataSource dataSource(DataSourceProperties properties) { return properties.initializeDataSourceBuilder().build(); }} |
4、自定义数据源 DruidDataSource
DRUID 简介
Druid 是阿里巴巴开源平台上一个数据库连接池实现,结合了 C3P0、DBCP、PROXOOL 等 DB 池的优点,同时 加入了日志监控。
Druid 可以很好的监控 DB 池连接和 SQL 的执行情况,天生就是针对监控而生的 DB 连接池。
Spring Boot 2.0 以上默认使用 Hikari 数据源,可以说 Hikari 与 Driud 都是当前 Java Web 上最优秀的数据源,我们 来重点介绍 Spring Boot 如何集成 Druid 数据源,如何实现数据库监控。
*com.alibaba.druid.pool.DruidDataSource 基本配置参数如下:*
| 配置 | 缺省值 | 说明 |
|---|---|---|
| name | 配置这个属性的意义在于,如果存在多个数据源,监控的时候可以通过名字来区分开来。 如果没有配置,将会生成一个名字,格式是:“DataSource-” + System.identityHashCode(this). 另外配置此属性至少在1.0.5版本中是不起作用的,强行设置name会出错 详情-点此处。 | |
| url | 连接数据库的url,不同数据库不一样。例如: mysql : jdbc:mysql://10.20.153.104:3306/druid2 oracle : jdbc:oracle:thin:@10.20.149.85:1521:ocnauto | |
| username | 连接数据库的用户名 | |
| password | 连接数据库的密码。如果你不希望密码直接写在配置文件中,可以使用ConfigFilter。详细看这里:https://github.com/alibaba/druid/wiki/使用ConfigFilter | |
| driverClassName | 根据url自动识别 | 这一项可配可不配,如果不配置druid会根据url自动识别dbType,然后选择相应的driverClassName |
| initialSize | 0 | 初始化时建立物理连接的个数。初始化发生在显示调用init方法,或者第一次getConnection时 |
| maxActive | 8 | 最大连接池数量 |
| maxIdle | 8 | 已经不再使用,配置了也没效果 |
| minIdle | 最小连接池数量 | |
| maxWait | 获取连接时最大等待时间,单位毫秒。配置了maxWait之后,缺省启用公平锁,并发效率会有所下降,如果需要可以通过配置useUnfairLock属性为true使用非公平锁。 | |
| poolPreparedStatements | false | 是否缓存preparedStatement,也就是PSCache。PSCache对支持游标的数据库性能提升巨大,比如说oracle。在mysql下建议关闭。 |
| maxOpenPreparedStatements | -1 | 要启用PSCache,必须配置大于0,当大于0时,poolPreparedStatements自动触发修改为true。在Druid中,不会存在Oracle下PSCache占用内存过多的问题,可以把这个数值配置大一些,比如说100 |
| validationQuery | 用来检测连接是否有效的sql,要求是一个查询语句。如果validationQuery为null,testOnBorrow、testOnReturn、testWhileIdle都不会其作用。 | |
| validationQueryTimeout | 单位:秒,检测连接是否有效的超时时间。底层调用jdbc Statement对象的void setQueryTimeout(int seconds)方法 | |
| testOnBorrow | true | 申请连接时执行validationQuery检测连接是否有效,做了这个配置会降低性能。 |
| testOnReturn | false | 归还连接时执行validationQuery检测连接是否有效,做了这个配置会降低性能 |
| testWhileIdle | false | 建议配置为true,不影响性能,并且保证安全性。申请连接的时候检测,如果空闲时间大于timeBetweenEvictionRunsMillis,执行validationQuery检测连接是否有效。 |
| timeBetweenEvictionRunsMillis | 1分钟(1.0.14) | 有两个含义: 1) Destroy线程会检测连接的间隔时间,如果连接空闲时间大于等于minEvictableIdleTimeMillis则关闭物理连接 2) testWhileIdle的判断依据,详细看testWhileIdle属性的说明 |
| numTestsPerEvictionRun | 不再使用,一个DruidDataSource只支持一个EvictionRun | |
| minEvictableIdleTimeMillis | 30分钟(1.0.14) | 连接保持空闲而不被驱逐的最长时间 |
| connectionInitSqls | 物理连接初始化的时候执行的sql | |
| exceptionSorter | 根据dbType自动识别 | 当数据库抛出一些不可恢复的异常时,抛弃连接 |
| filters | 属性类型是字符串,通过别名的方式配置扩展插件,常用的插件有: 监控统计用的filter:stat 日志用的filter:log4j 防御sql注入的filter:wall | |
| proxyFilters | 类型是List<com.alibaba.druid.filter.Filter>,如果同时配置了filters和proxyFilters,是组合关系,并非替换关系 |
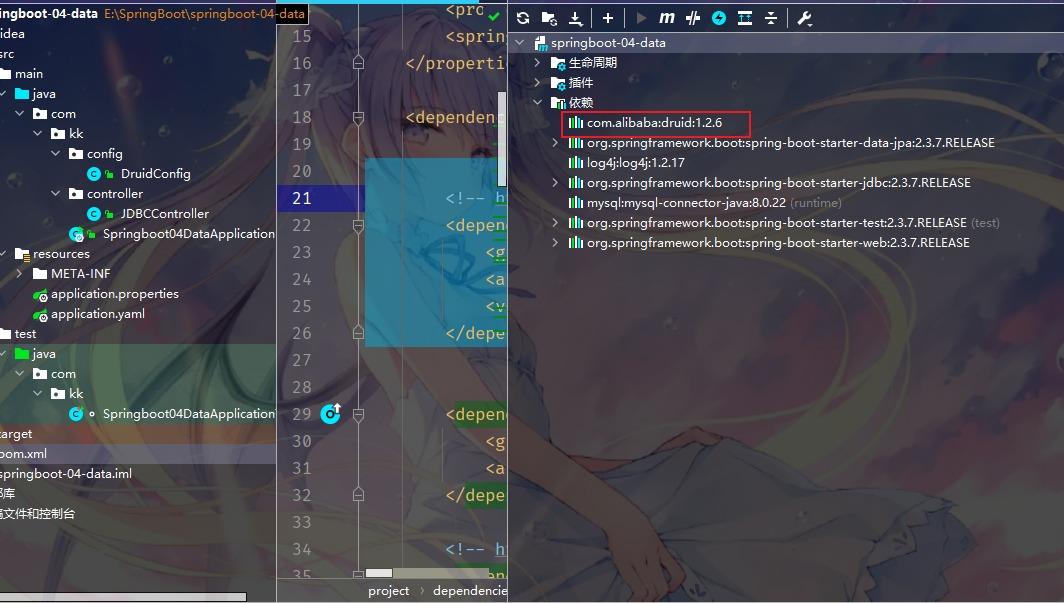
引入数据源
1 2 3 4 5 6 | <!-- https://mvnrepository.com/artifact/com.alibaba/druid --><dependency> <groupId>com.alibaba</groupId> <artifactId>druid</artifactId> <version>1.2.6</version></dependency> |
查看项目依赖,导入成功!
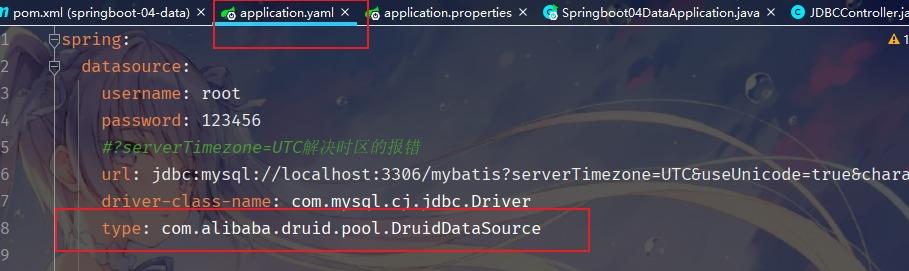
切换数据源;
之前已经说过 Spring Boot 2.0 以上默认使用 com.zaxxer.hikari.HikariDataSource 数据源,可以通过 spring.datasource.type 指定数据源。
1 | type: com.alibaba.druid.pool.DruidDataSource |
设置数据源连接初始化大小、最大连接数、等待时间、最小连接数 等设置项;
1 2 3 4 5 6 7 8 9 10 11 12 13 14 15 16 17 18 19 20 | #Spring Boot 默认是不注入这些属性值的,需要自己绑定#druid 数据源专有配置initialSize: 5minIdle: 5maxActive: 20maxWait: 60000timeBetweenEvictionRunsMillis: 60000minEvictableIdleTimeMillis: 300000validationQuery: SELECT 1 FROM DUALtestWhileIdle: truetestOnBorrow: falsetestOnReturn: falsepoolPreparedStatements: true#配置监控统计拦截的filters,stat:监控统计、log4j:日志记录、wall:防御sql注入#如果允许时报错 java.lang.ClassNotFoundException: org.apache.log4j.Priority#则导入 log4j 依赖即可,Maven 地址: https://mvnrepository.com/artifact/log4j/log4jfilters: stat,wall,log4jmaxPoolPreparedStatementPerConnectionSize: 20useGlobalDataSourceStat: trueconnectionProperties: druid.stat.mergeSql=true;druid.stat.slowSqlMillis=500 |
log4****日志依赖
1 2 3 4 5 6 | <!-- https://mvnrepository.com/artifact/log4j/log4j --><dependency> <groupId>log4j</groupId> <artifactId>log4j</artifactId> <version>1.2.17</version></dependency> |
测试
1 2 3 4 5 6 7 8 9 10 11 12 13 14 15 16 17 18 19 20 21 22 23 | public class SpringbootDemoDataApplicationTests { //注入数据源 @Autowired DataSource dataSource; @Test public void contextLoads() throws SQLException { //看一下默认数据源 System.out.println(dataSource.getClass()); //获得连接 Connection connection = dataSource.getConnection(); System.out.println(connection); DruidDataSource druidDataSource = (DruidDataSource) dataSource; System.out.println("druidDataSource 数据源最大连接数:" + druidDataSource.getMaxActive()); System.out.println("druidDataSource 数据源初始化连接数:" + druidDataSource.getInitialSize()); //关闭连接 connection.close(); }} |
测试成功!
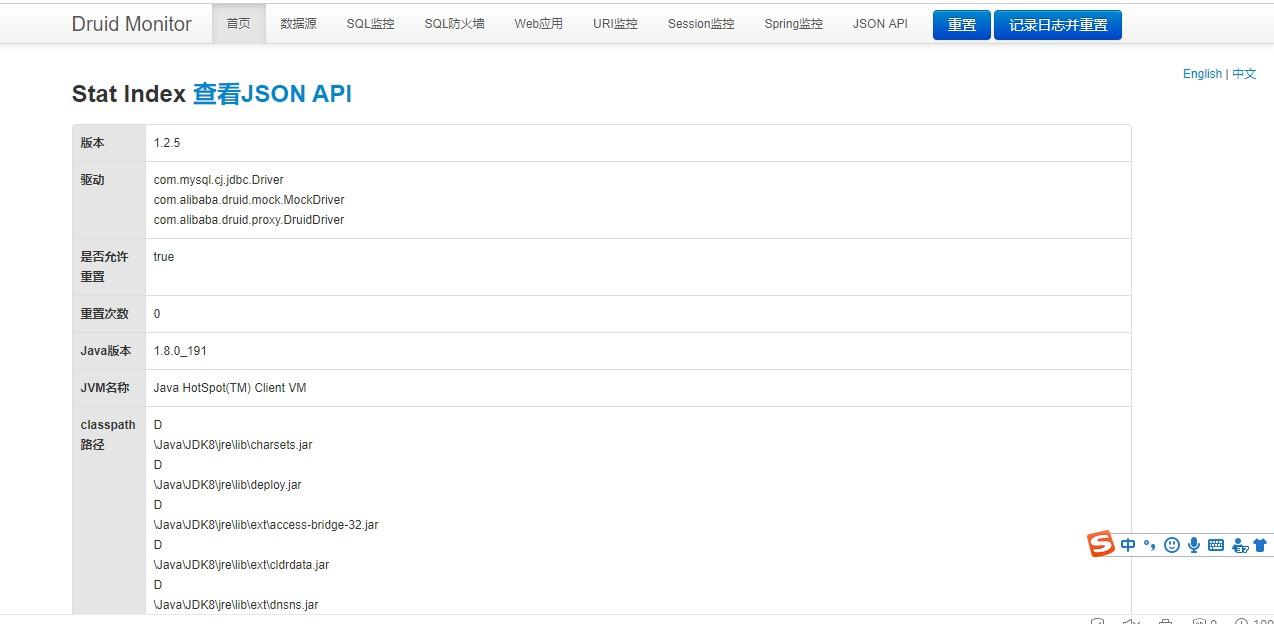
1、配置 Druid 数据源监控
Druid 数据源具有监控的功能,并提供了一个web界面方便用户查看,类似安装路由器 时,它也提供了一个默认的 web 页面。
所以第一步需要设置 Druid 的后台管理页面,比如登录账号、密码等配置后台管理;
1 2 3 4 5 6 7 8 9 10 11 12 13 14 15 16 17 18 19 20 21 22 23 24 25 26 27 28 29 30 31 32 33 34 35 36 37 38 39 40 41 42 43 44 45 46 47 48 49 50 51 52 53 54 55 56 57 58 59 60 61 62 63 64 65 66 | package com.kk.config;import com.alibaba.druid.pool.DruidDataSource;import com.alibaba.druid.support.http.StatViewServlet;import com.alibaba.druid.support.http.WebStatFilter;import org.springframework.boot.context.properties.ConfigurationProperties;import org.springframework.boot.web.servlet.FilterRegistrationBean;import org.springframework.boot.web.servlet.ServletRegistrationBean;import org.springframework.context.annotation.Bean;import org.springframework.context.annotation.Configuration;import javax.servlet.Filter;import javax.sql.DataSource;import java.util.HashMap;import java.util.Map;@Configurationpublic class DruidConfig { @ConfigurationProperties(prefix = "spring.datasource") //关联application.yaml中的spring.datasource @Bean public DataSource druidDataSource(){ return new DruidDataSource(); } //配置 Druid 监控管理后台的Servlet; //内置 Servler 容器时没有web.xml文件,所以使用 Spring Boot 的注册 Servlet 方式 @Bean public ServletRegistrationBean statViewServlet() { ServletRegistrationBean bean = new ServletRegistrationBean(new StatViewServlet(), "/druid/*"); Map<String, String> initParams = new HashMap<>(); initParams.put("loginUsername", "admin"); //后台管理界面的登录账号 initParams.put("loginPassword", "123456"); //后台管理界面的登录密码 //后台允许谁可以访问 //initParams.put("allow", "localhost"):表示只有本机可以访问 //initParams.put("allow", ""):为空或者为null时,表示允许所有访问 initParams.put("allow", ""); //deny:Druid 后台拒绝谁访问 //initParams.put("kuangshen", "192.168.1.20");表示禁止此ip访问 //设置初始化参数 bean.setInitParameters(initParams); return bean; //这些参数可以在 com.alibaba.druid.support.http.StatViewServlet 的父类 com.alibaba.druid.support.http.ResourceServlet 中找到 } //filter @Bean public FilterRegistrationBean webStatFilter(){ FilterRegistrationBean<Filter> bean = new FilterRegistrationBean<>(); bean.setFilter(new WebStatFilter()); //可以过滤哪些请求? HashMap<String, String> initParameters = new HashMap<>(); //这些东西不进行统计 initParameters.put("exclusions","*.js,*.css,/druid/*"); bean.setInitParameters(initParameters); return bean; }} |
测试访问! http://localhost:8080/druid/login.html


2、配置 Druid web 监控 filter
这个过滤器的作用就是统计 web 应用请求中所有的数据库信息,比如 发出的 sql 语句,sql 执行的时间、请求次数、请求的 url 地址、以及seesion 监控、数据库表的访问次数 等等。
1 2 3 4 5 6 7 8 9 10 11 12 13 14 15 | //filter@Beanpublic FilterRegistrationBean webStatFilter(){ FilterRegistrationBean<Filter> bean = new FilterRegistrationBean<>(); bean.setFilter(new WebStatFilter()); //可以过滤哪些请求? HashMap<String, String> initParameters = new HashMap<>(); //这些东西不进行统计 initParameters.put("exclusions","*.js,*.css,/druid/*"); bean.setInitParameters(initParameters); return bean;} |

执行sql

执行sql之后会有记录

5、SpringBoot 整合mybatis
1. 导入mybatis所需要的依赖
1 2 3 4 5 6 | <!-- https://mvnrepository.com/artifact/org.mybatis.spring.boot/mybatis-spring-boot-starter --><dependency> <groupId>org.mybatis.spring.boot</groupId> <artifactId>mybatis-spring-boot-starter</artifactId> <version>2.2.0</version></dependency> |
2.配置数据库连接信息
1 2 3 4 5 6 7 8 9 | # 数据库驱动:spring.datasource.driver-class-name=com.mysql.cj.jdbc.Driver# 数据源名称spring.datasource.name=defaultDataSource# 数据库连接地址spring.datasource.url=jdbc:mysql://localhost:3306/mybatis?useUnicode=true&characterEncoding=utf-8&serverTimezone=UTC# 数据库用户名&密码:spring.datasource.username=rootspring.datasource.password=123456 |
测试一下连接是否成功!
1 2 3 4 5 6 7 8 9 10 11 12 13 14 15 16 17 18 19 20 21 | package com.kk;import org.junit.jupiter.api.Test;import org.springframework.beans.factory.annotation.Autowired;import org.springframework.boot.test.context.SpringBootTest;import javax.sql.DataSource;import java.sql.SQLException;@SpringBootTestclass Springboot05MybatisApplicationTests { @Autowired DataSource dataSource; @Test void contextLoads() throws SQLException { System.out.println(dataSource.getClass()); System.out.println(dataSource.getConnection()); }} |
测试成功!
3,创建实体类
1 2 3 4 5 6 7 8 9 10 11 12 13 14 15 16 17 18 19 20 21 | package com.kk;import org.junit.jupiter.api.Test;import org.springframework.beans.factory.annotation.Autowired;import org.springframework.boot.test.context.SpringBootTest;import javax.sql.DataSource;import java.sql.SQLException;@SpringBootTestclass Springboot05MybatisApplicationTests { @Autowired DataSource dataSource; @Test void contextLoads() throws SQLException { System.out.println(dataSource.getClass()); System.out.println(dataSource.getConnection()); }} |
4.配置Mapper接口类
1 2 3 4 5 6 7 8 9 10 11 12 13 14 15 16 17 18 19 20 21 22 23 24 25 | package com.kk.mapper;import com.kk.pojo.User;import org.apache.ibatis.annotations.Mapper;import org.springframework.stereotype.Repository;import java.util.List;//这个注解表示 这是一个mybatis 的mapper类@Mapper //controller层@Repository //springpublic interface UserMapper { List<User> queryUserList(); User queryUserById(int id); int addUser(User user); int updateUser(User user); int deleteUser(int id);} |
5.编写controller
1 2 3 4 5 6 7 8 9 10 11 12 13 14 15 16 17 18 19 20 21 22 23 24 25 26 27 28 29 30 31 32 33 34 35 36 37 38 39 40 41 42 43 44 45 46 47 48 49 50 51 52 53 54 | package com.kk.controller;import com.kk.mapper.UserMapper;import com.kk.pojo.User;import org.springframework.beans.factory.annotation.Autowired;import org.springframework.web.bind.annotation.GetMapping;import org.springframework.web.bind.annotation.RestController;import java.util.List;@RestControllerpublic class UserController { @Autowired private UserMapper userMapper; @GetMapping("/queryUserList") public List<User> queryUserList(){ List<User> userList = userMapper.queryUserList(); for (User user : userList) { System.out.println(user); } return userList; } //根据id选择用户 @GetMapping("/queryUserById") public String selectUserById(){ User user = userMapper.queryUserById(1); System.out.println(user); return "ok"; } //添加一个用户 @GetMapping("/addUser") public String addUser(){ userMapper.addUser(new User(1,"大黄","9999999")); userMapper.addUser(new User(3,"大黄","9999999")); userMapper.addUser(new User(4,"大黄","9999999")); return "ok"; } //修改一个用户 @GetMapping("/updateUser") public String updateUser(){ userMapper.updateUser(new User(5,"黄毛","999999")); return "ok"; } //根据id删除用户 @GetMapping("/deleteUser") public String deleteUser(){ userMapper.deleteUser(5); return "ok"; }} |

6.SpringBoot 整合
以前 MyBatis 未与 spring 整合时,配置数据源、事务、连接数据库的账号、密码等都是在 myBatis 核心配置文件中进行的
myBatis 与 springboot 整合后,配置数据源、事务、连接数据库的账号、密码等就交由 spring 管理。因此,在这里我们即使不使用mybatis配置文件也完全ok!
既然已经提供了 myBatis 的映射配置文件,就需要告诉 spring boot 这些文件的位置
1 2 3 4 5 6 | # 整合mybatis# 设置别名以及设置能让spring识别#指定myBatis的核心配置文件与Mapper映射文件# 注意:对应实体类的路径mybatis.type-aliases-package=com.kk.pojomybatis.mapper-locations=classpath:mybatis/mapper/*.xml |
springboot 官方并没有提供 myBaits 的启动器,是 myBatis 官方提供的开发包来适配的 spring boot,从 pom.xml 文件中的依赖包名也能看出来,并非是以 spring-boot 开头的;
同理上面全局配置文件中的这两行配置也是以 mybatis 开头 而非 spring 开头也充分说明这些都是 myBatis 官方提供的
从 org.mybatis.spring.boot.autoconfigure.MybatisProperties 中查看所有配置项
1 2 3 4 5 6 7 8 9 10 11 12 13 14 15 16 17 | @ConfigurationProperties( prefix = "mybatis")public class MybatisProperties { public static final String MYBATIS_PREFIX = "mybatis"; private static final ResourcePatternResolver resourceResolver = new PathMatchingResourcePatternResolver(); private String configLocation; private String[] mapperLocations; private String typeAliasesPackage; private Class<?> typeAliasesSuperType; private String typeHandlersPackage; private boolean checkConfigLocation = false; private ExecutorType executorType; private Class<? extends LanguageDriver> defaultScriptingLanguageDriver; private Properties configurationProperties; @NestedConfigurationProperty private Configuration configuration; |
ybatis"
)
public class MybatisProperties {
public static final String MYBATIS_PREFIX = “mybatis”;
private static final ResourcePatternResolver resourceResolver = new PathMatchingResourcePatternResolver();
private String configLocation;
private String[] mapperLocations;
private String typeAliasesPackage;
private Class<?> typeAliasesSuperType;
private String typeHandlersPackage;
private boolean checkConfigLocation = false;
private ExecutorType executorType;
private Class<? extends LanguageDriver> defaultScriptingLanguageDriver;
private Properties configurationProperties;
@NestedConfigurationProperty
private Configuration configuration;
[官方文档](
到此这篇关于SpringBoot中Mybatis + Druid 数据访问的详细过程的文章就介绍到这了
原文链接:https://blog.csdn.net/weixin_50569789/article/details/120943618